Automate deployment
Introduction
The procedure for "using the AWS server" is written in 5 parts.
Please check the articles below.
① Initial setting of EC2 ② Create a database in production environment ③ Start Rails on EC2 ④ Set up the Web server ⑤ Automate deployment ← Imakoko
Deployment automation
Deploying work that was done manually (means to start the server using the "unicorn_rails command"), Allows you to do it with a single command from your local terminal. For that purpose, we use what is called an "automatic deployment tool".
This time, we will introduce an automatic deployment tool called Capistrano.
Preparation for introduction
Install Gem to use Capistrano in Gemfile Then bundle install in the application directory
group :development, :test do
  gem 'capistrano'
  gem 'capistrano-rbenv'
  gem 'capistrano-bundler'
  gem 'capistrano-rails'
  gem 'capistrano3-unicorn'
end
After loading the gem, enter the following command
Terminal (local)
- Application directory
% bundle exec cap install
The file is generated as below
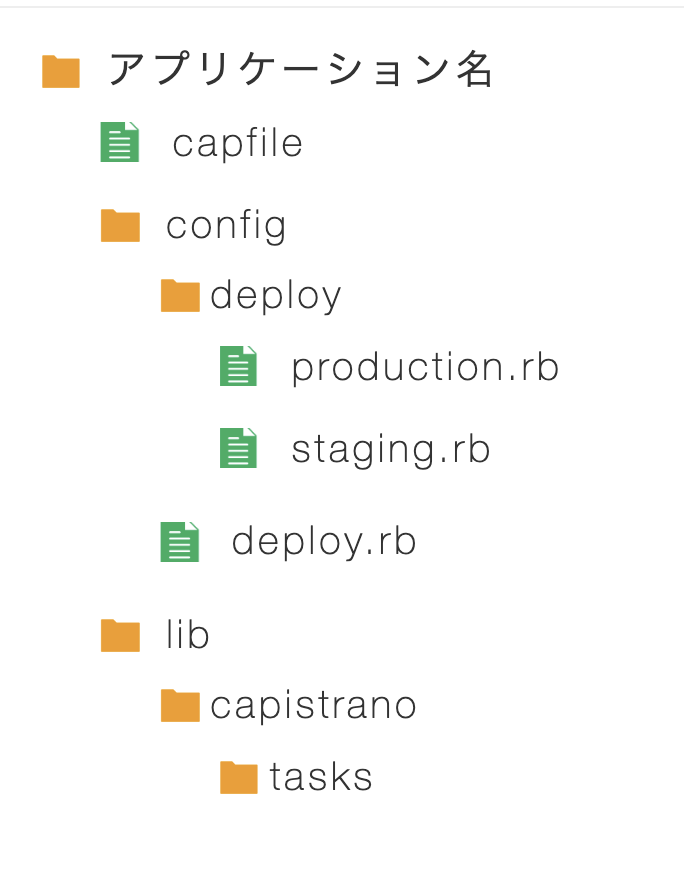
Edit Capfile
capfile
require "capistrano/setup"
require "capistrano/deploy"
require 'capistrano/rbenv'
require 'capistrano/bundler'
require 'capistrano/rails/assets'
require 'capistrano/rails/migrations'
require 'capistrano3/unicorn'

Dir.glob("lib/capistrano/tasks/*.rake").each { |r| import r }
Edit production.rb
config/deploy/production.rb
server 'Prepared Elastic IP', user: 'ec2-user', roles: %w{app db web}
Edit deploy.rb
Delete all the description of deploy.rb and paste the following code Attention points "Capistrano version" → described in Gemfile.lock "Application name" "GitHub user name, repository name" "Version of ruby used in this app" "Own key pair name"
config/deploy.rb
#Described the version of capistrano. Continue to use the fixed version and prevent troubles due to version change
lock 'Capistrano version'

#Used to display Capistrano logs
set :application, 'Own application name'

#Specify from which repository the app should be pulled
set :repo_url,  '[email protected]:Github username/Repository name.git'

#Specify a directory to be referenced in common even if the version changes
set :linked_dirs, fetch(:linked_dirs, []).push('log', 'tmp/pids', 'tmp/cache', 'tmp/sockets', 'vendor/bundle', 'public/system', 'public/uploads')

set :rbenv_type, :user
set :rbenv_ruby, 'The version of ruby used in this app' #If you proceed according to the article, '2.6.5’

#Which public key to use for deployment
set :ssh_options, auth_methods: ['publickey'],
                                  keys: ['~/.ssh/Own key pair name.pem']

#Location of the file containing the process number
set :unicorn_pid, -> { "#{shared_path}/tmp/pids/unicorn.pid" }

#Location of Unicorn configuration files
set :unicorn_config_path, -> { "#{current_path}/config/unicorn.rb" }
set :keep_releases, 5

#Description for restarting Unicorn after the deployment process is finished
after 'deploy:publishing', 'deploy:restart'
namespace :deploy do
  task :restart do
    invoke 'unicorn:restart'
  end
end
Once Capistrano auto-deploys, the production directory of the application changes. Multiple directories are created, such as backing up apps with Capistrano.
** The following three are especially important **
releases directory
The "releases directory" is a collection of apps deployed through Capistrano. With the past apps remaining here, you can revert to the previous version even if something goes wrong during deployment. The description of "set: keep_releases" in deploy.rb specifies the number of saved files in the past. This time, 5 are set to save the past version.
current directory
In the "current directory", the newest one in the releases folder is It looks like it is being copied automatically. In other words, "currently deployed content = current content".
shared directory
A directory that stores directories that are commonly referenced even if the version changes. Specifically, log, public, tmp, and vendor directories are stored.
Edit Unicorn config file
Rails application directories are more visible during automatic deployment than during manual deployment It is one step deeper. Therefore, it is necessary to make some changes.
[Before editing] config/unicorn.rb
#Put the directory where the application code on the server is installed in a variable
app_path = File.expand_path('../../', __FILE__)

#Determine application server performance
worker_processes 1

#Specify the directory where the application is installed
working_directory app_path

#Specify the location of the files required to start Unicorn
pid "#{app_path}/tmp/pids/unicorn.pid"

#Specify the port number
listen 3000

#Specify a file to log errors
stderr_path "#{app_path}/log/unicorn.stderr.log"

#Specify the file to record the normal log
stdout_path "#{app_path}/log/unicorn.stdout.log"

(abridgement)
[After editing] config/unicorn.rb
# 「../Is increasing by one
app_path = File.expand_path('../../../', __FILE__)

#Determine application server performance
worker_processes 1

#Specify "current"
working_directory "#{app_path}/current"

#Changed to refer to inside "shared"
listen "#{app_path}/shared/tmp/sockets/unicorn.sock"

#Changed to refer to inside "shared"
pid "#{app_path}/shared/tmp/pids/unicorn.pid"

#Changed to refer to inside "shared"
stderr_path "#{app_path}/shared/log/unicorn.stderr.log"

#Changed to refer to inside "shared"
stdout_path "#{app_path}/shared/log/unicorn.stdout.log"
(abridgement)
Edit Nginx config file
Similar to Unicorn's config file, compared to manual deployment Rails application directories are one step deeper during automatic deployment. Therefore, it is necessary to make some changes.
Run in terminal (in EC2)
$ sudo vim /etc/nginx/conf.d/rails.conf
Edit below ① 3rd line: Edit to "~ application name / shared / tmp / ~" ② 14th line: Add the entire line → root / var / www / application name / current / public; ③ 20th line: Add the entire line → root / var / www / application name / current / public;
/etc/nginx/conf.d/rails.conf
upstream app_server {
  #Settings for linking with Unicorn
  server unix:/var/www/Application name/shared/tmp/sockets/unicorn.sock;
}

# {}The part surrounded by is called a block. Can set the server
server {
  #The port number on which this program accepts connections
  listen 80;
  #Request URL to accept connection Cannot be accessed with URL not written here
  server_name Elastic IP;

  #Set the maximum size of files uploaded from the client to 2 giga. The default is 1 mega, so keep it large
  client_max_body_size 2g;

#The root directory when the connection came
  root /var/www/Application name/current/public;

#assets file(CSS and JavaScript files, etc.)Settings applied when access comes to
  location ^~ /assets/ {
    gzip_static on;
    expires max;
    add_header Cache-Control public;
    root /var/www/Application name/current/public;
  }

  try_files $uri/index.html $uri @unicorn;

  location @unicorn {
    proxy_set_header X-Forwarded-For $proxy_add_x_forwarded_for;
    proxy_set_header Host $http_host;
    proxy_redirect off;
    proxy_pass http://app_server;
  }

  error_page 500 502 503 504 /500.html;
}
After completing the input, execute in the order of "esc key" → ": wq" and save. Don't forget to reload / restart after changing Nginx settings
Run in terminal (in EC2)
[ec2-user@ip-***-**-**-*** ~]$ sudo systemctl reload nginx
[ec2-user@ip-***-**-**-*** ~]$ sudo systemctl restart nginx
Confirm database startup
If the database is not started, the deployment will fail, so check the database status with the following command.
Run in terminal (in EC2)
[ec2-user@ip-***-**-**-*** ~]$ sudo systemctl status mariadb
If "active" is displayed as shown below, it is running.
● mariadb.service - MariaDB database server
   Loaded: loaded (/usr/lib/systemd/system/mariadb.service; disabled; vendor preset: disabled)
   Active: active (running)since gold 2020-07-17 03:46:51 UTC; 8s ago
  Process: 17044 ExecStartPost=/usr/libexec/mariadb-wait-ready $MAINPID (code=exited, status=0/SUCCESS)
  Process: 17008 ExecStartPre=/usr/libexec/mariadb-prepare-db-dir %n (code=exited, status=0/SUCCESS)
 Main PID: 17043 (mysqld_safe)
   CGroup: /system.slice/mariadb.service
           ├─17043 /bin/sh /usr/bin/mysqld_safe --basedir=/usr
           └─17206 /usr/libexec/mysqld --basedir=/usr --datadir=/var/lib/mysql --plugin-dir=/usr/lib64/mysql/plugin --log-error=/var/log/mariadb/mariadb.log --pid-file=/var/run/mariadb/mariadb.pid --so...
- If it is not "active", execute sudo systemctl start mariadb
Kill Unicorn process
You need to kill the unicorn process before auto-deploying. If you do an automatic deployment with the unicorn server already running, Because you will have to start the server twice. (Automatic deployment also plays a role in launching the server)
① Check the process
[ec2-user@ip-***-**-**-*** <Repository name>]$ ps aux | grep unicorn

ec2-user 17877  0.4 18.1 588472 182840 ?       Sl   01:55   0:02 unicorn_rails master -c config/unicorn.rb -E production -D
ec2-user 17881  0.0 17.3 589088 175164 ?       Sl   01:55   0:00 unicorn_rails worker[0] -c config/unicorn.rb -E production -D
ec2-user 17911  0.0  0.2 110532  2180 pts/0    S+   02:05   0:00 grep --color=auto unicorn
② Kill the process
#In the above example, "7877"
[ec2-user@ip-***-**-**-*** <Repository name>]$kill process number
Push all local fixes to master
Make sure that all local code changes are pushed to master. Now the preparation for automatic deployment is complete.
Perform automatic deployment
Return to the local terminal and execute automatic deployment with the following command
#Run in the application directory
% bundle exec cap production deploy
- After restarting the EC2 instance, be sure to restart the "database" and "Nginx" as well.
Run in terminal (in EC2)
[ec2-user@ip-***-**-**-*** ~]$ sudo systemctl restart mariadb
[ec2-user@ip-***-**-**-*** ~]$ sudo systemctl restart nginx
Check with browser
Access with Elastic IP from a browser.
- Note that it is "http: //
/" instead of "http: // : 3000 /".
that's all. Thank you for your hard work.