[AWS] Verknüpfen Sie die Speichernutzung der Ubuntu EC2-Instanz mit CloudWatch
Die EC2-Speichernutzung wird nicht als Standardmetrik erfasst und erfordert, dass zusätzliche Einstellungen in CloudWatch überprüft werden.
Das Verfahren ist auf der offiziellen Seite organisiert, aber alle Zielverteilungen befinden sich auf derselben Seite. Da es geschrieben ist, werde ich die in Ubuntu festgelegte Prozedur auf dieser Seite zusammenfassen.
Im Folgenden sind die Schritte aufgeführt, die wir auf einer neu gestarteten Ubuntu 20.04-Instanz gesehen haben. Sie können es über die Befehlszeile oder über SSM installieren.
1. 1. Installation über die Befehlszeile
1-1. Erstellen und Anhängen einer IAM-Rolle
Vor der Installation müssen Sie eine Rolle erstellen, um die Metriken in CloudWatch zu platzieren und an die Instanz anzuhängen. Wählen Sie in der Konsole unter IAM → Rollen die Option "Rolle erstellen".
 |
|---|
Wählen Sie AWS Service, EC2 und fahren Sie mit dem nächsten Schritt fort.
 |
|---|
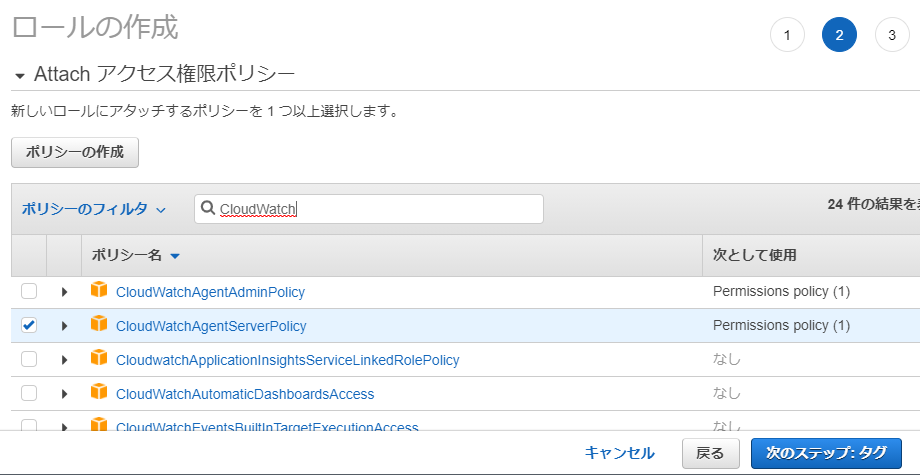
Aktivieren Sie in der Richtlinienauswahl CloudWatchAgentServerPolicy </ b> </ font> und fahren Sie mit dem nächsten Schritt fort.
 |
|---|
Der nächste Bildschirm dient zur Eingabe von Tags. Geben Sie also ein beliebiges Tag ein, um fortzufahren. Geben Sie abschließend einen Namen ein ( CloudWatchAgentServerRole </ font> usw.), um die Rolle zu erstellen.
 |
|---|
Hängen Sie die Rolle nach dem Erstellen an die Instanz an. Wählen Sie im Menü Instanz Aktionen → Sicherheit → IAM-Rolle ändern.
 |
|---|
Wählen Sie die zuvor erstellte Rolle aus und speichern Sie sie, um sie abzuschließen.
 |
|---|
1-2. Installation und Bestätigung
Der Rest ist die Befehlsausführung auf der Instanz.
Laden Sie zuerst das Installationsprogramm herunter und installieren Sie es
$ sudo wget https://s3.amazonaws.com/amazoncloudwatch-agent/ubuntu/amd64/latest/amazon-cloudwatch-agent.deb

$ sudo dpkg -i -E ./amazon-cloudwatch-agent.deb
* Die Region Tokio kann auch von folgenden Seiten heruntergeladen werden
https://s3.ap-northeast-1.amazonaws.com/amazoncloudwatch-agent-ap-northeast-1/ubuntu/amd64/latest/amazon-cloudwatch-agent.deb
Führen Sie dann den Assistenten aus, um die Konfigurationsdatei zu erstellen. Es gibt viele Einstellungselemente, aber wenn Sie die Speichernutzungsrate erhalten möchten, können Sie mit den meisten Standardeinstellungen fortfahren (Enter). Nur zwei Stellen, an denen ich mich geändert habe, sind mit ★ markiert.
$ sudo /opt/aws/amazon-cloudwatch-agent/bin/amazon-cloudwatch-agent-config-wizard
=============================================================
= Welcome to the AWS CloudWatch Agent Configuration Manager =
=============================================================
On which OS are you planning to use the agent?
1. linux
2. windows
default choice: [1]:

Trying to fetch the default region based on ec2 metadata...
Are you using EC2 or On-Premises hosts?
1. EC2
2. On-Premises
default choice: [1]:

Which user are you planning to run the agent?
1. root
2. cwagent
3. others
default choice: [1]:

Do you want to turn on StatsD daemon?
1. yes
2. no
default choice: [1]:

Which port do you want StatsD daemon to listen to?
default choice: [8125]

What is the collect interval for StatsD daemon?
1. 10s
2. 30s
3. 60s
default choice: [1]:

What is the aggregation interval for metrics collected by StatsD daemon?
1. Do not aggregate
2. 10s
3. 30s
4. 60s
default choice: [4]:

Do you want to monitor metrics from CollectD?
1. yes
2. no
default choice: [1]:

Do you want to monitor any host metrics? e.g. CPU, memory, etc.
1. yes
2. no
default choice: [1]:

Do you want to monitor cpu metrics per core? Additional CloudWatch charges may apply.
1. yes
2. no
default choice: [1]:

Do you want to add ec2 dimensions (ImageId, InstanceId, InstanceType, AutoScalingGroupName) into all of your metrics if the info is avai                          lable?
1. yes
2. no
default choice: [1]:

Would you like to collect your metrics at high resolution (sub-minute resolution)? This enables sub-minute resolution for all metrics, b                          ut you can customize for specific metrics in the output json file.
1. 1s
2. 10s
3. 30s
4. 60s
default choice: [4]:

Which default metrics config do you want?
1. Basic
2. Standard
3. Advanced
4. None
default choice: [1]:

Current config as follows:
{
* Anzeige des Einstellungsinhalts entfällt *
}
Are you satisfied with the above config? Note: it can be manually customized after the wizard completes to add additional items.
1. yes
2. no
default choice: [1]:

Do you have any existing CloudWatch Log Agent (http://docs.aws.amazon.com/AmazonCloudWatch/latest/logs/AgentReference.html) configuratio                          n file to import for migration?
1. yes
2. no
default choice: [2]:

Do you want to monitor any log files?
1. yes
2. no
default choice: [1]:
2 ★ Geben Sie 2 ★ ein
Saved config file to /opt/aws/amazon-cloudwatch-agent/bin/config.json successfully.
Current config as follows:
{
* Anzeige des Einstellungsinhalts entfällt *
}
Please check the above content of the config.
The config file is also located at /opt/aws/amazon-cloudwatch-agent/bin/config.json.
Edit it manually if needed.
Do you want to store the config in the SSM parameter store?
1. yes
2. no
default choice: [1]:
2 ★ Geben Sie 2 ★ ein
Program exits now.
Nach der Ausführung wird die Konfigurationsdatei an / opt / aws / amazon-cloudwatch-agent / bin / config.json ausgegeben. Geben Sie sie an und starten Sie den Agenten.
$ sudo /opt/aws/amazon-cloudwatch-agent/bin/amazon-cloudwatch-agent-ctl -a fetch-config -m ec2 -s -c file:/opt/aws/amazon-cloudwatch-agent/bin/config.json
/opt/aws/amazon-cloudwatch-agent/bin/config-downloader --output-dir /opt/aws/amazon-cloudwatch-agent/etc/amazon-cloudwatch-agent.d --download-source file:/opt/aws/amazon-cloudwatch-agent/bin/config.json --mode ec2 --config /opt/aws/amazon-cloudwatch-agent/etc/common-config.toml --multi-config default
Successfully fetched the config and saved in /opt/aws/amazon-cloudwatch-agent/etc/amazon-cloudwatch-agent.d/file_config.json.tmp
Start configuration validation...
* Unterwegs weggelassen *
======== Error Log ========
2020-11-10T07:48:25Z E![telegraf] Error running agent: Error parsing /opt/aws/amazon-cloudwatch-agent/etc/amazon-cloudwatch-agent.toml, open /usr/share/collectd/types.db: no such file or directory
Ich habe einen Startfehler erhalten. Es scheint, dass das collectd-Modul nicht installiert ist, also installieren Sie es.
$ sudo apt-get update
$ sudo apt install collectd
Nach der Installation konnte ich den CloudWatch-Agenten starten.
$ sudo /opt/aws/amazon-cloudwatch-agent/bin/amazon-cloudwatch-agent-ctl -a fetch-config -m ec2 -s -c file:/opt/aws/amazon-cloudwatch-agent/bin/config.json
/opt/aws/amazon-cloudwatch-agent/bin/config-downloader --output-dir /opt/aws/amazon-cloudwatch-agent/etc/amazon-cloudwatch-agent.d --download-source file:/opt/aws/amazon-cloudwatch-agent/bin/config.json --mode ec2 --config /opt/aws/amazon-cloudwatch-agent/etc/common-config.toml --multi-config default
Successfully fetched the config and saved in /opt/aws/amazon-cloudwatch-agent/etc/amazon-cloudwatch-agent.d/file_config.json.tmp
Start configuration validation...
* Unterwegs weggelassen *
Configuration validation second phase succeeded
Configuration validation succeeded
Created symlink /etc/systemd/system/multi-user.target.wants/amazon-cloudwatch-agent.service → /etc/systemd/system/amazon-cloudwatch-agent.service.

$ ps -ef | grep amazon-cloudwatch-agent
root       25666       1  0 08:04 ?        00:00:00 /opt/aws/amazon-cloudwatch-agent/bin/amazon-cloudwatch-agent -config /opt/aws/amazon-cloudwatch-agent/etc/amazon-cloudwatch-agent.toml -envconfig /opt/aws/amazon-cloudwatch-agent/etc/env-config.json -pidfile /opt/aws/amazon-cloudwatch-agent/var/amazon-cloudwatch-agent.pid
root       25694    1807  0 08:08 pts/0    00:00:00 grep --color=auto amazon-cloudwatch-agent
Nach dem Start des Agenten können Sie nach einer kurzen Wartezeit die Metriken in CloudWatch überprüfen. Sie können sehen, dass die Speichernutzung (mem_used_percent) der Zielinstanz in CloudWatch → Alle → CWAgent → ImageId, InstanceId, InstanceType angezeigt wird (der Name ist standardmäßig etwas verwirrend).
 |
|---|
2. Mit SSM installieren
Von hier aus ist es das Einstellungsverfahren in SSM.
2-1. Erstellen und Anhängen einer IAM-Rolle
Erster Vorgang 1. Erstellen Sie eine Rolle für PUT-Metriken in CloudWatch sowie. Die Vorgehensweise ist dieselbe, aber die anzuhängende Richtlinie unterscheidet sich, da die Einstellung über SSM erfolgt. Wählen Sie in der Konsole unter IAM → Rollen die Option "Rolle erstellen".
|
|---|
Wählen Sie AWS Service, EC2 und fahren Sie mit dem nächsten Schritt fort.
|
|---|
Aktivieren Sie in der Richtlinienauswahl AmazonSSMManagedInstanceCore </ b> </ font> und CloudWatchAgentAdminPolicy </ b> </ font> Und fahren Sie mit dem nächsten Schritt fort. Hier werden viele Richtlinien angezeigt. Suchen Sie also nacheinander und wählen Sie sie aus. (* Der folgende Screenshot wurde aus Gründen der Übersichtlichkeit erstellt. Tatsächlich gibt es viele Richtlinien dazwischen, sodass dieser Status nicht auftritt </ font>.)
 |
|---|
Der nächste Bildschirm dient zur Eingabe von Tags. Geben Sie also ein beliebiges Tag ein, um fortzufahren. Geben Sie abschließend einen Namen ein ( AmazonSSMManagedInstanceRole </ font> usw.), um die Rolle zu erstellen.
 |
|---|
Hängen Sie die Rolle nach dem Erstellen an die Instanz an. Wählen Sie im Menü Instanz Aktionen → Sicherheit → IAM-Rolle ändern.
|
|---|
Wählen Sie die zuvor erstellte Rolle aus und speichern Sie sie, um sie abzuschließen.
 |
|---|
2-2. Installation und Bestätigung
Das Einrichten des SSM funktioniert weiterhin auf der Konsole. Wählen Sie SSM → Befehl ausführen → Befehl ausführen.

Überprüfen Sie AWS-ConfigureAWSPackage.
 |
|---|
Geben Sie in den Befehlsparametern am unteren Rand desselben Bildschirms AmazonCloudWatchAgent als Namen und spätestens als Version ein.
 |
|---|
Wählen Sie im Ziel weiter unten die Instanz manuell aus → Überprüfen Sie die Zielinstanz.
 |
|---|
Überprüfen Sie abschließend (dieser Bildschirm ist sehr hoch) die Ausgabeoptionen und klicken Sie auf die Schaltfläche "Ausführen".
 |
|---|
Bestätigen Sie, dass das Ausführungsergebnis normal ist.
 |
|---|
Melden Sie sich dann bei der Instanz an und führen Sie den Assistenten aus, um die Konfigurationsdatei zu erstellen. Schritt 1. Fast das gleiche wie bei der Standardeinstellung (Enter), aber im Fall von SSM kann sich die Auswahl ändern. Nur eine Stelle, an der ich es geändert habe, ist mit einem Stern markiert.
$ sudo /opt/aws/amazon-cloudwatch-agent/bin/amazon-cloudwatch-agent-config-wizard
=============================================================
= Welcome to the AWS CloudWatch Agent Configuration Manager =
=============================================================
On which OS are you planning to use the agent?
1. linux
2. windows
default choice: [1]:

Trying to fetch the default region based on ec2 metadata...
Are you using EC2 or On-Premises hosts?
1. EC2
2. On-Premises
default choice: [1]:

Which user are you planning to run the agent?
1. root
2. cwagent
3. others
default choice: [1]:

Do you want to turn on StatsD daemon?
1. yes
2. no
default choice: [1]:

Which port do you want StatsD daemon to listen to?
default choice: [8125]

What is the collect interval for StatsD daemon?
1. 10s
2. 30s
3. 60s
default choice: [1]:

What is the aggregation interval for metrics collected by StatsD daemon?
1. Do not aggregate
2. 10s
3. 30s
4. 60s
default choice: [4]:

Do you want to monitor metrics from CollectD?
1. yes
2. no
default choice: [1]:

Do you want to monitor any host metrics? e.g. CPU, memory, etc.
1. yes
2. no
default choice: [1]:

Do you want to monitor cpu metrics per core? Additional CloudWatch charges may apply.
1. yes
2. no
default choice: [1]:

Do you want to add ec2 dimensions (ImageId, InstanceId, InstanceType, AutoScalingGroupName) into all of your metrics if the info is available?
1. yes
2. no
default choice: [1]:

Would you like to collect your metrics at high resolution (sub-minute resolution)? This enables sub-minute resolution for all metrics, but you can customize for specific metrics in the output json file.
1. 1s
2. 10s
3. 30s
4. 60s
default choice: [4]:

Which default metrics config do you want?
1. Basic
2. Standard
3. Advanced
4. None
default choice: [1]:

Current config as follows:
{
* Anzeige des Einstellungsinhalts entfällt *
}
Are you satisfied with the above config? Note: it can be manually customized after the wizard completes to add additional items.
1. yes
2. no
default choice: [1]:

Do you have any existing CloudWatch Log Agent (http://docs.aws.amazon.com/AmazonCloudWatch/latest/logs/AgentReference.html) configuration file to import for migration?
1. yes
2. no
default choice: [2]:

Do you want to monitor any log files?
1. yes
2. no
default choice: [1]:
2 ★ Geben Sie 2 ★ ein
Saved config file to /opt/aws/amazon-cloudwatch-agent/bin/config.json successfully.
Current config as follows:
{
* Anzeige des Einstellungsinhalts entfällt *
}
Please check the above content of the config.
The config file is also located at /opt/aws/amazon-cloudwatch-agent/bin/config.json.
Edit it manually if needed.
Do you want to store the config in the SSM parameter store?
1. yes
2. no
default choice: [1]:

What parameter store name do you want to use to store your config? (Use 'AmazonCloudWatch-' prefix if you use our managed AWS policy)
default choice: [AmazonCloudWatch-linux]

Trying to fetch the default region based on ec2 metadata...
Which region do you want to store the config in the parameter store?
default choice: [ap-northeast-1]

Which AWS credential should be used to send json config to parameter store?
1. ASxxxxxxxxxxxxxxx4D(From SDK)
2. Other
default choice: [1]:

Successfully put config to parameter store AmazonCloudWatch-linux.
Program exits now.
Kehren Sie nach dem Einstellen zu SSM zurück und starten Sie den Agenten. Wählen Sie Verwaltete Instanz → Instanz auswählen → Inventar festlegen → Befehl ausführen.
 |
|---|
Wählen Sie in der Befehlsdokumentation Amazon CloudWatch-ManageAgent aus. Aufgrund der großen Anzahl von Befehlstypen wird dies nur angezeigt, wenn Sie die Seite mit der Schaltfläche > rechts vorrücken.
 |
|---|
Geben Sie AmazonCloudWatch-linux in die Befehlsparameter am unteren Bildschirmrand ein.
 |
|---|
Wählen Sie im Ziel weiter unten die Instanz manuell aus → Überprüfen Sie die Zielinstanz.
 |
|---|
Überprüfen Sie abschließend (dieser Bildschirm ist sehr hoch) die Ausgabeoptionen und klicken Sie auf die Schaltfläche "Ausführen".
|
|---|
Schritt 1. Ich habe auch einen Startfehler erhalten.
 |
|---|
Wenn Sie "/ var / log / amazon / ssm" aktivieren, sehen Sie, dass dieselbe Fehlermeldung ausgegeben wird (nur der relevante Teil wird extrahiert).
"standardOutput": "======== Error Log ========\n2020-11-10T09:31:25Z E![telegraf] Error running agent:
 Error parsing /opt/aws/amazon-cloudwatch-agent/etc/amazon-cloudwatch-agent.toml, open /usr/share/collectd/types.db:
 no such file or directory\n",
"standardError": "2020/11/10 09:31:25 Reading json config file path: /opt/aws/amazon-cloudwatch-agent/etc/amazon-cloudwatch-agent.d/ssm_AmazonCloudWatch-linux.tmp ...\nfailed to run commands: exit status 1"
Installieren Sie das Collectd-Modul.
$ sudo apt-get update
$ sudo apt install collectd
Nach der Installation konnte ich den Agenten durch Drücken der Schaltfläche zum erneuten Ausführen des Befehls starten.
 |
|---|
 |
|---|
Danach können Sie die Metriken auch in CloudWatch überprüfen.
 |
|---|
Damit ist der Einstellvorgang abgeschlossen. (SSM scheint Raum für eine Überprüfung zu haben, sodass die Arbeit nur mit SSM abgeschlossen werden kann.) Es wurde bestätigt, dass jede Prozedur mit CloudWatch verknüpft werden kann.
Referenzmaterial
Recommended Posts