Extract feature points with OpenCV3 and Python3 (AgastFeature, FAST, GFTT, MSER, AKAZE, BRISK, KAZE, ORB, SimpleBlob, SIFT)
Introduction
OpenCV (Open Source Computer Vision Library) is a collection of BSD-licensed video / image processing libraries. There are many algorithms for image filtering, template matching, object recognition, video analysis, machine learning, and more.
● Example of motion tracking using OpenCV (OpenCV Google Summer of Code 2015) https://www.youtube.com/watch?v=OUbUFn71S4s
● Click here for installation and easy usage Install OpenCV 3 (core + contrib) in Python 3 environment & Difference between OpenCV 2 and OpenCV 3 & simple operation check
● Click here for still image filtering Try edge detection with OpenCV Perform various filters with OpenCV (gradient, high-pass, Laplacian, Gaussian)
● Click here for processing video files Try converting videos in real time with OpenCV Try converting webcam / camcorder video in real time with OpenCV
This time, I will try to extract feature points using OpenCV. Feature points are used as basic data when creating a panoramic image by connecting multiple images or creating an optical flow of a moving object with a video.
ORB (Oriented FAST and Rotated BRIEF)、AKAZE (Accelerated KAZE)
ORB is an algorithm that extracts feature points and features, and has robustness in all of movement, rotation, and zoom. Originally, an algorithm called SIFT gained robustness against zoom in addition to movement and rotation. However, SIFT requires a lot of calculation and is slow, so an algorithm called SURF with improved speed came out. However, both SIFT and SURF are patented, so you will have to pay a patent fee to use them. Therefore, in 2011, an algorithm called ORB was developed that has robustness for movement, rotation, and zoom, has a high calculation speed, and can be used freely.
Also, from OpenCV 3.0, the algorithm called AKAZE developed in 2013 is supported. Although AKAZE requires a little more calculation than ORB, it has better extraction accuracy in low-frequency and high-frequency regions than ORB, and is said to be effective in tracking high-speed cameras. Click here for a comparison video of AKAZE and ORB (youtube).
The appropriate algorithm depends on the object and task, so it is necessary to actually apply it and compare which one is the most appropriate. A wide range of studies are required, such as whether the feature points and features can be detected, whether they are within the required sampling time, and whether the hardware performance is appropriate.
program
Now, let's extract the feature points using the ORB algorithm and display the extracted feature points on the image. The flow is as follows.
- Load image file
- Extraction of feature points & features with ORB
- Write feature points on the image
- Display the result image
-
Various parameters --All defaults
-
Operation verification environment
- OpenCV 3.1.0
- Python 3.5.1
FeatureDetection.py
import cv2

#Loading image files
img = cv2.imread('img.jpg')

# ORB (Oriented FAST and Rotated BRIEF)
detector = cv2.ORB_create()

#Feature detection
keypoints = detector.detect(img)

#Writing feature points on an image
out = cv2.drawKeypoints(img, keypoints, None)

#display
cv2.imshow("keypoints", out)
Execution result
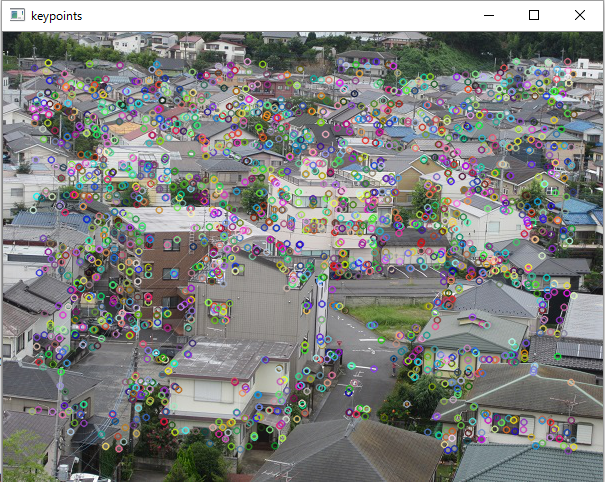
When the feature points are extracted by ORB and the feature points are superimposed on the image, the result is as follows. To the human eye, it seems that the person standing on the road in front is a characteristic point, but to the computer's eyes, the person standing on the road does not seem to be so characteristic.
 ORB
ORB
When the feature points are extracted with AKAZE and the feature points are superimposed on the image, the result is as follows. This recognizes the person standing on the road in front as a feature point.
 AKAZE
AKAZE
By the way, it was as follows when arranged in descending order of the number of feature points. However, the various options are running with the defaults, and as a result of this happening in this image, there is no deep meaning in the number.
SimpleBlobDetector < ORB < MSER < GFTT < AKAZE < KAZE < BRISK < FAST < AgastFeature
Feature extraction algorithm supported by OpenCV 3
OpenCV also supports algorithms other than ORB. You can change the algorithm simply by switching the detector of the program.
# AgastFeatureDetector detector = cv2.AgastFeatureDetector_create()
# FAST detector = cv2.FastFeatureDetector_create()
# MSER detector = cv2.MSER_create()
# AKAZE detector = cv2.AKAZE_create()
# BRISK detector = cv2.BRISK_create()
# KAZE detector = cv2.KAZE_create()
# ORB (Oriented FAST and Rotated BRIEF) detector = cv2.ORB_create()
# SimpleBlobDetector detector = cv2.SimpleBlobDetector_create()
# SIFT detector = cv2.xfeatures2d.SIFT_create()
GFTT (simplified version of Harris method) has its own wrapper method.
corners = cv2.goodFeaturesToTrack(image, maxCorners, qualityLevel, minDistance[, corners[, mask[, blockSize[, useHarrisDetector[, k]]]]])
If you want to count the number of feature points, you can count by len () keypoints.
print(len(keypoints))
ORB, GFTT, AKAZE, KAZE, BRISK, SIFT calculate not only feature points but also feature quantities.
-
Two-step method
keypoints = detector.detect(image) descriptors = detector.compute(image, keypoints)
-
One-step method
keypoints, descriptors = detector.detectAndCompute(image)
Feature point KeyPoint object
| attribute | Contents |
|---|---|
| pt | Point (x, y) |
| size | Feature point diameter |
| angle | [0, 360)The angle of the range. The y-axis is downward and clockwise. If it cannot be calculated-1。 |
| response | Strength of feature points |
| octave | Pyramid layer that detected feature points |
| class_id | ID of the class to which the feature point belongs |
This is the code to access.
\ # Specify the position of the array i = 5 \ # Take out one feature keypoint = keypoints[i] \ # Access each attribute keypoint.pt keypoint.size keypoint.angle keypoint.response keypoint.octave keypoint.class_id
Some algorithms seem to use only part of KeyPoint. For example, when I analyzed the sample image lena.jpg with AKAZE, the values were set to pt, size, response, octave, class_id, and angle was not used.
Recommended Posts