A story that contributes to new corona analysis using a free trial of Google Cloud Platform
(Reprinted from my blog)
Introduction
In the previous article, I tried to analyze the new corona with Folding @ Home on an AWS instance, but it didn't work very well due to instance constraints. In this article, I tried the same thing with a free trial frame of Google Cloud Platform. This time, we will take advantage of the ** 12-month $ 300 credit ** that you get when you sign up for a trial.
What I did ①: Create an account
This time from creating an account.
- Go to [https://cloud.google.com/] and click "Free Trial"
- Log in with your Google account
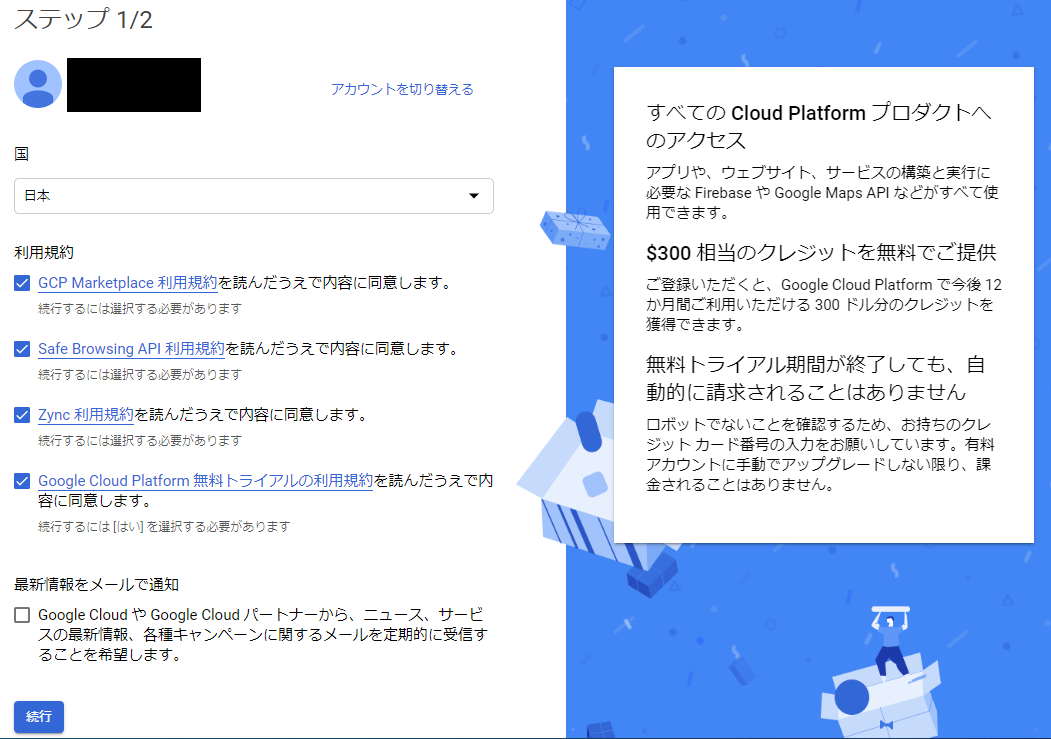
- Agree to the terms of use, enter personal information
- You will be asked for your credit card information here, but this is for personal verification only. If you exceed the free tier credit, you will only be able to stop the instance and there will be no additional charge.
What I did (2): Creating a project
Create a new project for this purpose.
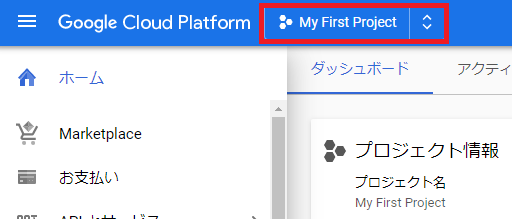
- Click the part labeled "My First Project" at the top right of the screen. Click "New Project" in the pop-up screen
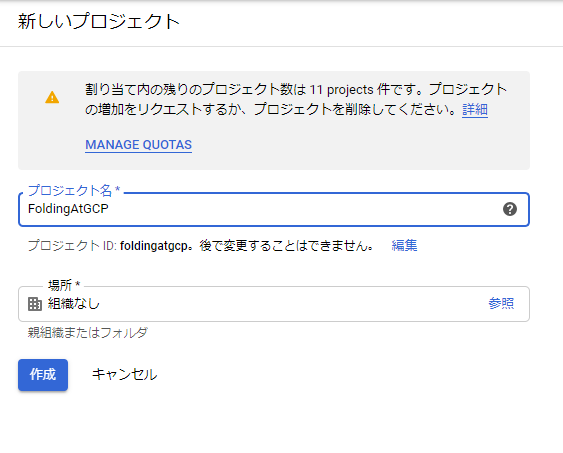
- Create by entering the project name appropriately.
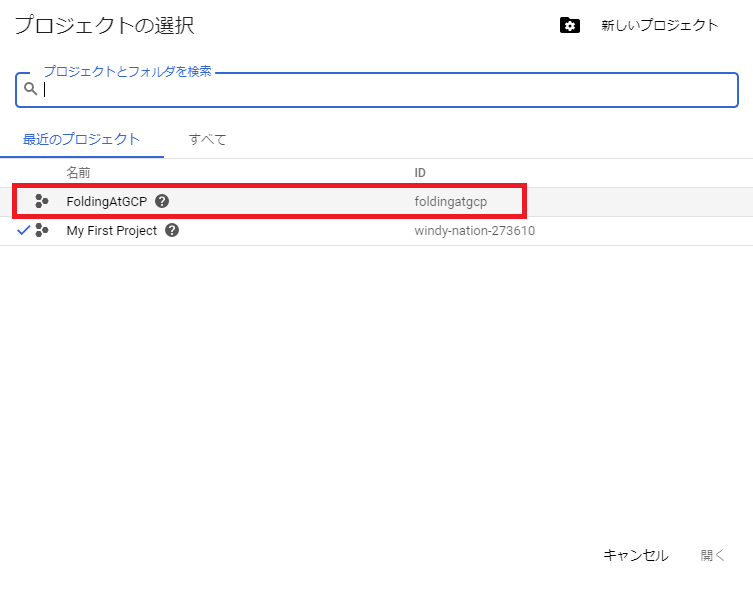
- Since it does not switch automatically, click "My First Project" again, select the created project from the pop-up screen, and click "Open".
What I did ③: Creating a VPC environment
As when I tried it on AWS, first build a VPC environment and set up an instance in it.
③-1. VPC + subnet creation
- Select "VPC Network"-> "VPC Network" from the menu on the left side of the screen.
- Please note that it will take some time for the screen to be displayed for the first time.
- Click "Create VPC Network" at the top of the screen

- Decide on a name for your VPC.
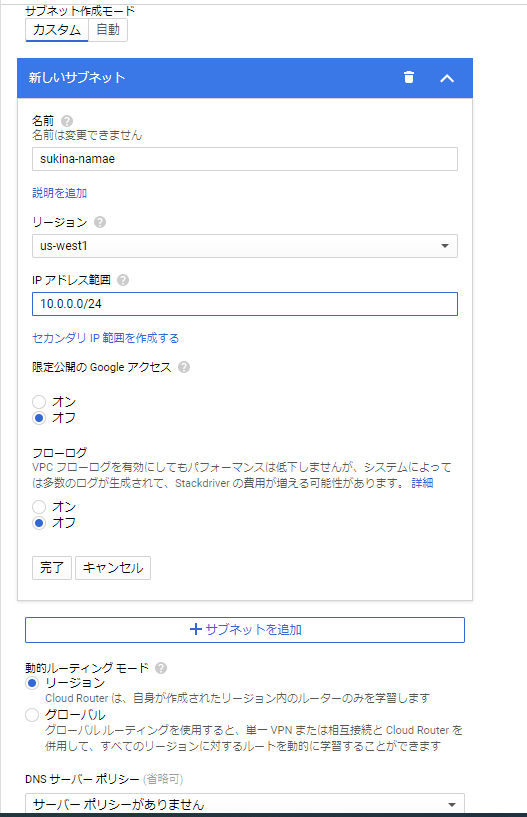
- You can also create subnets here. This time, I made the settings as shown in the image below.
- Here, select us-west1 for the region to match the instance to be built later.
- Press "Create" to complete.
③-2. Firewall settings
- The created VPC is displayed at the bottom of the screen, so click the VPC name.
- Click "Firewall Rules"-> "Add Firewall Rules"
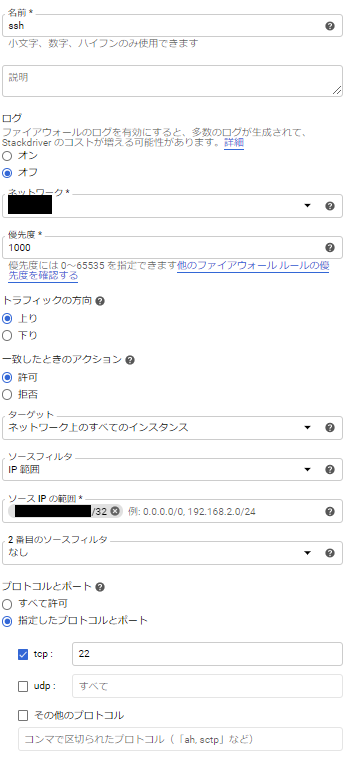
- Enter the following and click "Create".
- Enter your own IP address in "Source IP Range" as you only need to be able to access it (eg
100.101.102.103/32)
-
Set the following two ports as described above.
-
tcp: 7396 (for Folding @ Home web controller)
-
tcp: Any number in the range 49152-65535 (for SSH connection)
-
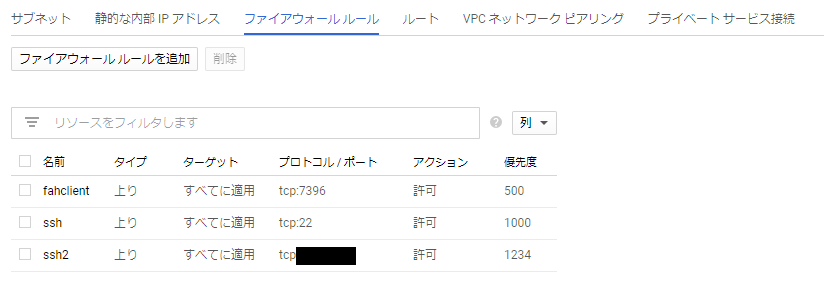
Finally, it will be as follows. (tcp: 22 will be removed in a later step)
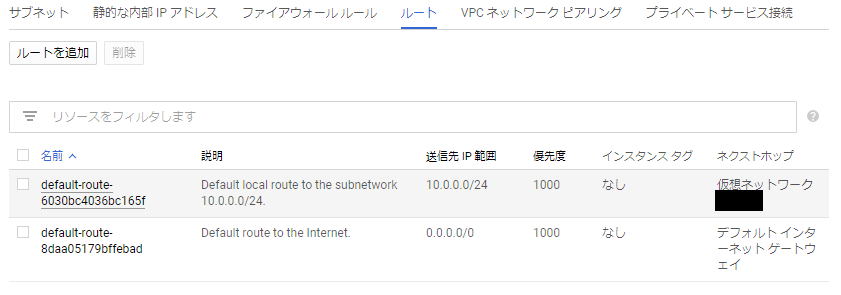
- Supplement; In AWS, the route table and Internet gateway created by the user are set by GCP.
What I did ④: Build a VM instance on VPC
Create a VM instance (EC2 in AWS) on the VPC environment created in (3).
④-1. Instance creation
- From the menu on the left side of the screen, select "Compute Engine"-> "VM Instance" and click "Create"
- Set as follows. (Screenshot omitted. Not created yet.)
- If not stated, leave the default.
- This time, instead of the completely free
f1-micro, I chosen1-standard-1, which can use the entire CPU for one core. At the time of writing the article, the monthly fee is $ 24.67 with the following settings, so it is calculated that the free credit will not be exhausted even if it is rotated for one year.
| item | Set value |
|---|---|
| region | us-west1 |
| zone | us-west1-b |
| Machine | n1-standard-1 |
| CPU platform | freedom |
| Boot disk | Debian GNU/Linux9(stertch)10GB standard persistent disk |
| Firewall | Uncheck both |
- Click "Management, Security, Disk, Network, Single Tenancy" at the bottom of the screen
- In "Network Interface" on the "Networking" tab, select the VPC environment created in ③ and click "Finish".
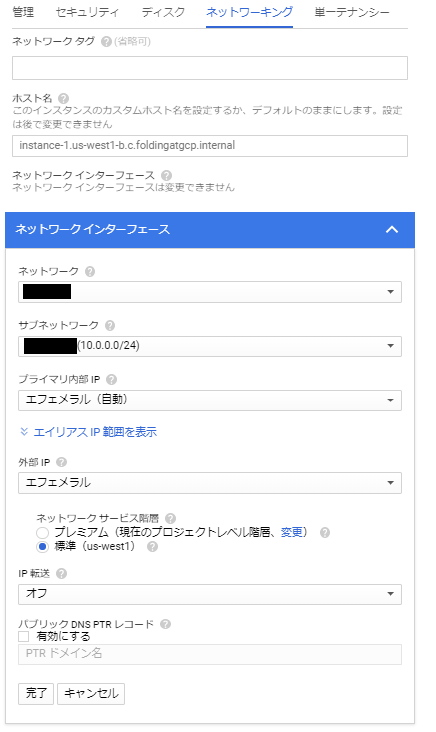
- Click "Create" to create and start the VM.
④-2. Creating a new user with root privileges
- Click the name of the created VM instance on the VM instance list screen.
- The details screen will appear, so click "Edit" at the top of the screen.
- At the bottom of the screen, there is a place that says "There are 0 SSH authentication keys", so click "View and edit" below it.
- The following box will appear, so copy and paste the contents of the public key file.
- If all goes well, you'll see your username on the left side of the box. ** This name will be the new user name registered in Linux. ** **
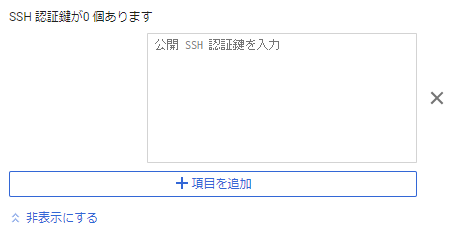
- Press "Save" to complete
What I did ⑤: Linux settings
Change SSH port number
-
④ SSH login to the VM with the private key corresponding to the public key registered in -2 and the user name displayed at the time of registration.
-
The IP address of the access destination is the one displayed in "External IP" of the VM instance list.
-
I haven't changed the settings yet, so access with port number 22.
-
Edit
/ etc / ssh / sshd_configand add the following line In * *****, enter the SSH port number specified for the firewall in ③.
Port *****
- After updating the file, execute the following command
$ sudo service sshd reload
- Here, confirm that "SSH login is possible with the port number specified above" and "SSh login is not possible with port number 22".
- If you can confirm it, delete the firewall rule for tcp: 22 created in ③-2 just in case.
What I did ⑥: Introducing Folding @ Home
Introduced only the minimum required FAH Client.
Installation
$ wget https://download.foldingathome.org/releases/public/release/fahclient/debian-stable-64bit/v7.6/fahclient_7.6.9_amd64.deb
$ sudo dpkg -i --force-depends fahclient_7.6.9_amd64.deb
- The following screen will appear, so enter the user name etc. interactively.
- The user information system works even if you do not set it, so if you do not know it, you can leave it blank.
- If you select
fullin the Power (how much CPU resources are allocated) setting, the calculation will be performed using the maximum CPU of the machine. If you selectlight, it will operate with a CPU usage rate of around 50%.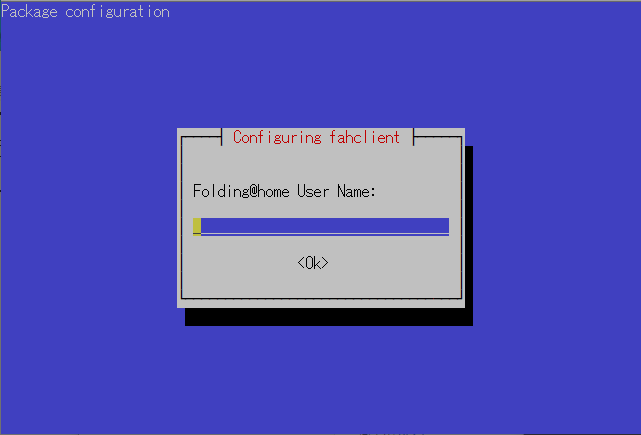
Setting
- Edit
/etc/fahclient/config.xml. Root privilege is required for updating.
<config>
  <!-- Client Control -->
  <fold-anon v='true'/>

  <!-- Folding Slot Configuration -->
  <!-- v7.6.9-COVID for cause after 1-If you specify 19, corona related tasks will be assigned preferentially.-->
  <cause v='COVID_19'/>
  <gpu v='false'/>

  <!--Access authority setting to the Web controller. xxx.xxx.xxx.Enter your IP address in place of xxx-->
  <allow>127.0.0.1 xxx.xxx.xxx.xxx</allow>
  <web-allow>127.0.0.1 xxx.xxx.xxx.xxx</web-allow>

  <!--How much CPU resources do you use? light,middle,3 choices of full-->
  <power v='full'/>

  <!-- User Information -->
  <!--User information. If you enter the user name, how much you contributed individually will be aggregated-->
  <user v='deflat'/>
  <!--The ID of the team you want to belong to. Optional. By the way, 222 is"Japan"team.-->
  <team v='222'/>
  <!--Optional. You can get more points by registering your e-mail address on the official website and setting the received key.-->
  <passkey v='***Paste the key here***'/>

  <!--Slot number and type. This time there is only one CPU so don't mess with it-->
  <!-- Folding Slots -->
  <slot id='0' type='CPU'/>

</config>
Reflect settings & restart service
- Restart the service with the following command.
- Supplement: Even if you stop during task processing, the next time you start, it will calculate from the continuation properly.
$ sudo /etc/init.d/FAHClient stop
$ sudo /etc/init.d/FAHClient start
Operation check
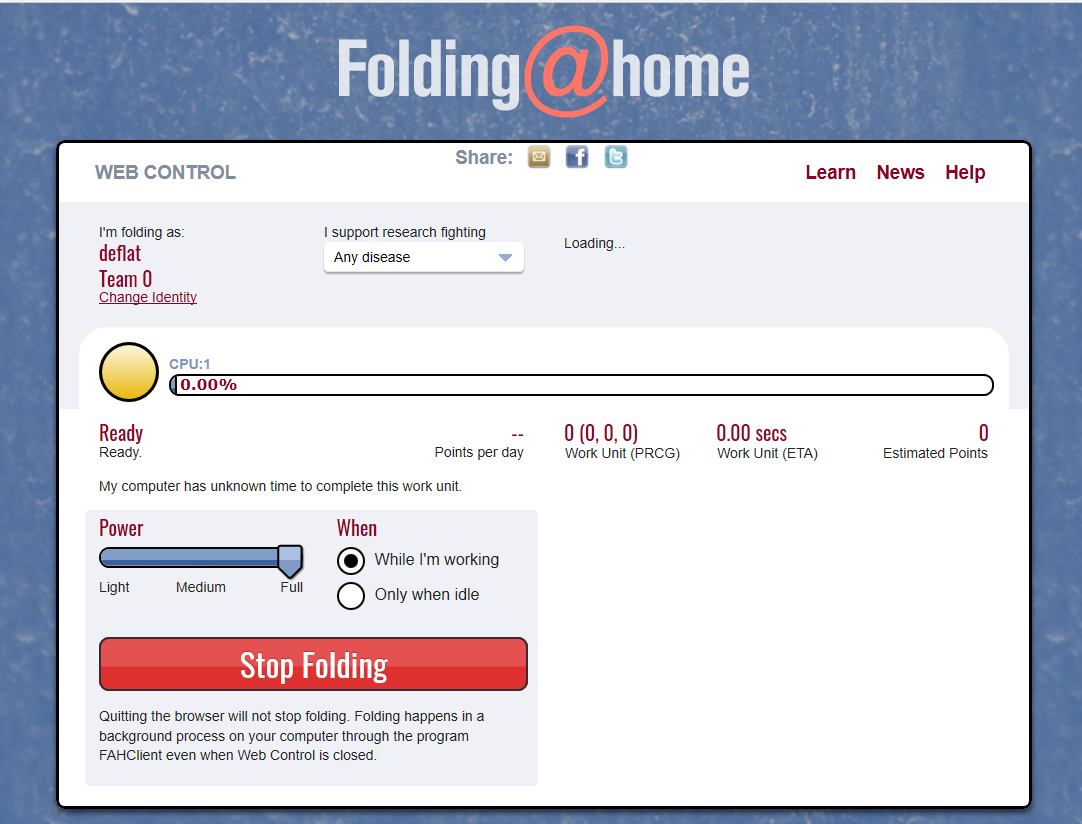
- Access
http: // <external IP address of VM instance>: 7396with a web browser. - OK when the following screen appears. If the task has already been acquired, the progress status etc. will be displayed.
result
- So far, there are no problems, and one task can be completed in about 10 hours.
Summary
- He said, "Let's practice building an environment for Google Cloud Platform while contributing to the analysis of the new coronavirus."
- As a result, I was able to build a VM with reasonable specifications even within the range of free credit.
- I will leave the environment created this time running for a while. I would also like to be able to report what happened in about a month.
Change log
- Compatible with the latest version of FAH Client (Ver 7.6.9-1) on April 20, 2020
Recommended Posts