Let's develop a full stack application with NextJS / NestJS / PostgreSQL / Docker! Hands-on ② (Front end, Docker edition)
Introduction
Sorry I made you wait! This is the second installment of Last Hands-on Article.
This time, we will start the settings around the front end (NextJS), Nginx server and Docker.
I wrote this article hoping that it would be template-like code for anyone who wants to try out this tech stack.
Let's do it now!
Prerequisites
- Docker must be installed. (It's easier to install Dockerhub)
- Node is installed (v12.0.0 is recommended for the convenience of the package to be used. It is convenient to switch the version if nvm is installed.)
- If you want to do hands-on, you have read Server Side Edition.
Target audience
- Those who have studied Docker, React, NodeJS, etc. independently, but want to study everything comprehensively
- For the time being, those who want to develop a full-stack app using only Typescript
- Those who have heard of NextJS / NestJS / Docker but have never used / want to use it
Click here to see the completed code
Main story
Last time, I implemented it mainly around the server side (NestJS). Using the special notation and architecture of the framework called NestJS, I wrote the code corresponding to the connection code to the database and the HTTP request (GET and POST).
Let's develop from the front end using NextJS this time!
Before that, as a review of the last time, I will post the configuration diagram of the application!
App configuration

- Point (1): By sandwiching the nginx server between the browser and the system, it was given the role of a proxy server/router. If only "/" is specified in the request parameter, it will be distributed to NextJS, and if "/ api" is specified in the parameter, it will be distributed to NestJS.
- Point (2): Launch the app inside the Docker container. This enables environment-independent development.
Let's implement the front end with NextJS!
Creating a project
First, front end! Hit the following command to create a project!
Click here for NextJS documentation
#Click here for npm
npx create-next-app
#Click here for yarn group
yarn create next-app
Then, the project will be created as below!

Create Typescript configuration file
However, I want to use Typescript this time, so let's create a `` `tsconfig.json``` configuration file in the root directory!
touch tsconfig.json

#When I try it with yarn run dev, it installs the following dependencies
I'll get angry

yarn add --dev typescript @types/react @types/node
Modify the tsconfig.json file as follows
tsconfig.json
{
  "compilerOptions": {
    "sourceMap": true,
    "noImplicitAny": true,
    "module": "esnext",
    "target": "es6",
    "jsx": "preserve",
    "lib": [
      "dom",
      "dom.iterable",
      "esnext"
    ],
    "allowJs": true,
    "baseUrl": "./",
    "skipLibCheck": true,
    "strict": false,
    "forceConsistentCasingInFileNames": true,
    "noEmit": true,
    "esModuleInterop": true,
    "resolveJsonModule": true,
    "isolatedModules": true,
    "moduleResolution": "node"
  },
  "include": [
    "pages/**/*",
  ],
  "exclude": [
    "node_modules"
  ]
}
This time, I set to recursively check all folders and files under ``` pages / . If you want to check Typescript strictly, please set `strict: true`.
The NextJS project is now Typescript compliant. After that, let's set all extensions under pages to .ts```.
Also set ESLINT and Prettier.
I want to make the development code highly readable in advance ...
I think there are personal preferences, but let's set the minimum settings!
I'm using VS Code as an editor, so I'll include the ESLint and Prettier plugins.
.prettierrc.js
module.exports = {
  semi: true,
  trailingComma: 'es5',
  singleQuote: true,
  printWidth: 100,
  tabWidth: 2,
  useTabs: false,
}
.eslintrc.js
module.exports = {
  overrides: [
    {
      files: ['*.ts', '*.tsx'],
      parserOptions: {
        project: ['./tsconfig.json'],
        tsconfigRootDir: __dirname,
        sourceType: 'module',
      },
    },
  ],
  extends: [
    'eslint:recommended',
    'plugin:react/recommended',
    'plugin:@typescript-eslint/recommended',
    'plugin:@typescript-eslint/eslint-recommended',
    'plugin:prettier/recommended',
    'prettier/@typescript-eslint',
  ],
  plugins: ['@typescript-eslint', 'react', 'prettier'],
  parser: '@typescript-eslint/parser',
  env: {
    browser: true,
    node: true,
    es6: true,
  },
  parserOptions: {
    sourceType: 'module',
    ecmaFeatures: {
      jsx: true,
    },
  },
  rules: {
    'react/prop-types': 'off',
    'react/react-in-jsx-scope': 'off',
    '@typescript-eslint/no-explicit-any': 'off',
    'prettier/prettier': 'error',
  },
  settings: {
    react: {
      version: 'detect',
    },
  },
};
** Troubleshooting: ** If ESLint or Prettier doesn't work, please note that there are many cases where package.json does not have the required dependencies or "format On Save" is false in the VS Code settings. Hey!
Modify pages file
This time, I intentionally simplified the configuration of the app. So, it is enough to modify `_app.ts` and `index.ts`.
_app.tsx
import React from 'react';
import type { AppProps /*, AppContext */ } from 'next/app';

import '../styles/global.scss';

function MyApp({ Component, pageProps }: AppProps): JSX.Element {
  return <Component {...pageProps} />;
}

// Only uncomment this method if you have blocking data requirements for
// every single page in your application. This disables the ability to
// perform automatic static optimization, causing every page in your app to
// be server-side rendered.
//
// MyApp.getInitialProps = async (appContext: AppContext) => {
//   // calls page's `getInitialProps` and fills `appProps.pageProps`
//   const appProps = await App.getInitialProps(appContext);

//   return { ...appProps }
// }

export default MyApp;
index.tsx
import Head from 'next/head';
import React, { useEffect, useState } from 'react';
import axios from 'axios';
import { MovieListType } from '../interface/movie';

export default function Home(): React.ReactElement {
  const [movieName, setMovieName] = useState<string>('');
  const [movieList, setMovieList] = useState<Array<MovieListType>>([]);

  useEffect(() => {
    console.log(movieList);
  }, [movieList]);

  useEffect(() => {
    let tmp: any = '';

    const fetchMovieList = async (): Promise<void> => {
      const { data } = await axios.get('/api/movielist');
      tmp = data;

      setMovieList(tmp);
    };

    fetchMovieList();
  }, []);

  function onMovieNameInput(event: React.ChangeEvent<HTMLInputElement>) {
    const inputValue = (event.target as HTMLInputElement).value;
    setMovieName(inputValue);
  }

  async function onClickWatchLater() {
    await axios.post('/api/movielist', {
      movieName,
    });

    const { data } = await axios.get('/api/movielist');

    setMovieList(data);
  }

  return (
    <div>
      <Head>
        <title>I Theater</title>
        <link rel="icon" href="/favicon.ico" />
        <link rel="preconnect" href="https://fonts.gstatic.com" />
        <link
          href="https://fonts.googleapis.com/css2?family=Unlock&display=swap"
          rel="stylesheet"
        />
      </Head>
      <div className="wrapper">
        <div className="search">
          <div>
            <h1 className="title">ITheater</h1>
          </div>
          <div>
            <input
              className="input u-margin-bottom-medium"
              value={movieName}
              onChange={onMovieNameInput}
            />
          </div>
          <div>
            <button className="btn" onClick={onClickWatchLater}>
              Watch Later!
            </button>
          </div>
        </div>
        <div>
          {movieList.map((el: MovieListType, index: number) => {
            if (movieList.length === 0) {
              return <div></div>;
            } else {
              return (
                <div key={index} className="result result__element">
                  <div className="result__row--number">{el.id}</div>
                  <div className="result__row--border"></div>
                  <div className="result__row--title">{el.movieName}</div>
                </div>
              );
            }
          })}
        </div>
      </div>
    </div>
  );
}
The point is that the path name of the request destination when registering the name of a new movie starts with "/ api". This is the code needed to identify the nginx server you will implement later!
Next, let's define the interface as type-safe. Basically, it should match the server-side entity class.
movielist.ts
export type MovieListType = {
  id: number;
  movieName: string;
};
CSS settings
SCSS/SASS (CSS compiler) is used for the CSS file. This time, we adopted "BEM" as the design notation for the front end.
As the architecture, we use the "7-1" pattern.
Download the source from this link and replace the styles folder.
This completes the front-end implementation!
Nginx server implementation
Now, let's start implementing nginx ~
Although I was enthusiastic, the setting of nginx only touches the really rudimentary part w
Well, to be exact, I can only touch there w
Basically, you act as an intermediary to decide whether to send a request to the client (∴ NextJS) or server (∴ NestJS) according to the path of the URI.
I'd like to dig deeper into nginx with a one-shot article, but the root function is enough for this app ... Ku, Sumimasen Maoshimides
Let's take a second look and create a `nginx` folder in the root directory and a configuration file `default.conf`!
default.conf
# NextJS
upstream client {
#Here, client is docker that will be created later.-compose.The endpoint defined in yml.
  server client:3000;
}

# NestJS
upstream api {
#Here, api is docker that will be created later-compose.The endpoint defined in yml.
  server api:5000;
}

server {
  listen 80;

#Here we define the sorting rules
  location / {
  proxy_pass http://client;
  }

  location /api {
  rewrite /api/(.*) /$1 break;
  proxy_pass http://api;
  }
}
Docker settings
It's finally the end. Place each Dockerfile in the designated location!
client/
│   ├ ...
│   └ Dockerfile.dev
│
nginx/
│   ├ default.conf
│   └ Dockerfile.dev
│
server/
│   ├ ...
│   └ Dockerfile.dev
│
└ docker-compose.yml
Since it is not a Dockerfile for production, add `.dev` to the extension. When deploying to AWS or Heroku, it is common to create a Dockerfile without an extension separately from Dockerfile.dev.
/client/Dockerfile.dev
FROM node:alpine
WORKDIR /app
COPY ./package.json ./
RUN yarn
COPY . .
CMD ["yarn", "dev"]
/nginx/Dockerfile.dev
FROM nginx
COPY default.conf /etc/nginx/conf.d/default.conf
/server/Dockerfile.dev
FROM node:alpine
WORKDIR /app
COPY ./package.json ./
RUN yarn
COPY . .
CMD ["yarn", "start:dev"]
Point (1): Node: alpine is used for client and server. Since node is already installed in this image, there is an advantage when working with node applications. Point (2): COPY is performed in two steps in the Dockerfile of client and server.
COPY ./package.json ./
RUN yarn
COPY . .
This is to prevent you from re-installing (yarning) packages as you make modifications to your code on the host. You can reduce development costs.
docker-compose.yml
docker-compose.yml
version: "3.9"
services:
  postgres:
    image: "postgres:latest"
    environment:
      - POSTGRES_PASSWORD=postgres_password
  client:
    build:
      context: ./client
      dockerfile: Dockerfile.dev
    volumes:
      - /app/node_modules
      - ./client:/app
  api:
    build:
      context: ./server
      dockerfile: Dockerfile.dev
    volumes:
      - /app/node_modules
      - ./server:/app
    environment:
      - PGUSER=postgres
      - PGHOST=postgres
      - PGDATABASE=postgres
      - PGPASSWORD=postgres_password
      - PGPORT=5432
  nginx:
    depends_on:
      - client
      - api
    restart: always
    build:
      context: ./nginx
      dockerfile: Dockerfile.dev
    ports:
      - "3050:80"
Point (1): The volumes value is set in the client and api containers. By mounting the file on the host path on Docker, the modified code will be updated automatically when you save it.
    volumes:
      - /app/node_modules
      -Host path:/app
Point (2): Register the values required for postgres settings in advance in the api environment variables. This will allow nest.js (server side) to get the information it needs from environment variables.
  api:
    build:
      context: ./server
      dockerfile: Dockerfile.dev
    volumes:
      - /app/node_modules
      - ./server:/app
    environment:
      - PGUSER=postgres
      - PGHOST=postgres
      - PGDATABASE=postgres
      - PGPASSWORD=postgres_password
      - PGPORT=5432
On the server side, you can get it like `process.env.PGUSER`.
Point ③: Associate nginx with client and api.
  nginx:
    depends_on:
      - client
      - api
    restart: always
By specifying always, you can keep restarting until the other containers have finished starting.
## Let's start it!

 Thank you to everyone who has read this far. And thank you!

 It's finally time for fate ...

 Let's do it!
docker-compose up --build
#You may not be able to start nginx at one time. In that case, hit the following command again!
docker-compose down && docker-compose up
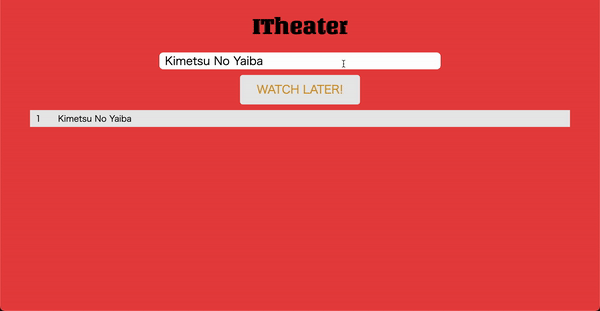
If you succeed, you should be able to register your movie!
# At the end
Everyone who has been with us so far! thank you for your hard work!
You are now a full stack engineer w
By writing this blog this time, I feel that I have deepened my understanding of this field considerably.
I hope this blog post will help anyone thinking about developing with NextJS, NestJS, Typescript, Docker, etc.
To be honest, NestJS is still deep. It also supports the hottest tech stacks such as GraphQL, MicroService, Prisma, etc.
I would like to write an article that digs deeper in one shot.
This is a hands-on series, but next time I will write an article about a version using Kubernetes. To be honest, I think this is more practical than Docker!
See you next time!
Recommended Posts