[Practice! ] Java database linkage (Connector / J 8.0.20)
1. Prior knowledge
-[Latest] How to build Java environment on Ubuntu
-[Even beginners can do it! ] How to create a Java environment on Windows 10 (JDK14.0.1)
-[Easy-to-understand explanation! ] How to use Java instance
-[Even beginners can do it! ] How to install Eclipse on Windows 10 (Java environment construction)
-[Even beginners can do it! ] How to install MySQL on Windows 10 (MySQL Server 8.0.20)
As prior knowledge, the contents of the above link are required.
2. Preparation

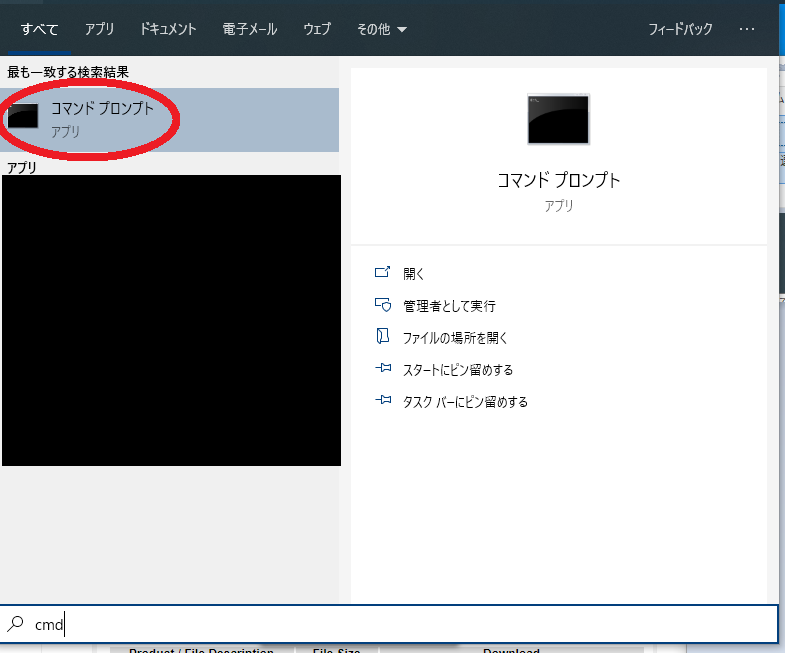
- Type
cmdin the search box to launchCommand Prompt.
Loginwithmysql -u username -p.

test.sql
create database test DEFAULT CHARACTER SET utf8 COLLATE utf8_general_ci;

use test;

CREATE TABLE test1(
    id TINYINT ZEROFILL NOT NULL AUTO_INCREMENT,
    name VARCHAR(50),
    PRIMARY KEY(id));

INSERT INTO `test1`(`name`) VALUES ("test1");
INSERT INTO `test1`(`name`) VALUES ("test2");
INSERT INTO `test1`(`name`) VALUES ("test3");
INSERT INTO `test1`(`name`) VALUES ("test4");
- Copy the above
SQL statementand execute it in thecommand prompt. - Success if
Query OKappears as shown in the image.
3. Install Connector

- Go to MySQL :: Download Connector / J.
- Select
Platform Independentand click theDownloadsbutton.
- Click
No thanks, just start my download..
Extractthe ZIP file.
- Make sure the ZIP file is
extractedandmysql-connector-java-8.0.20exists.
- Move
mysql-connector-java-8.0.20toC: \ Program Files \ MySQL.
4. Java database linkage

- After restarting Eclipse, select
[New] → [Java Project].
- Enter
TestDBfor the project name, selectJavaSE-1.8to use the execution environment JRE, and click theFinishbutton.
- Select
[New (N)] → [Class].
- Enter
dbin the package andTest1in the name, checkpublic static void main (String [] args), and click theFinishbutton.
- Right-click on the project and select
[Build Path (B)] → [Add External Archive (V)].
- Select
mysql-connector-java-8.0.20.jarinC: \ Program Files \ MySQL \ mysql-connector-java-8.0.20.
Test1.java
package db;
import java.sql.Connection;
import java.sql.DriverManager;
import java.sql.ResultSet;
import java.sql.SQLException;
import java.sql.Statement;

public class Test1 {
	public static void main(String[] args) {
		try {
		       Class.forName("com.mysql.cj.jdbc.Driver");
		       Connection conn = DriverManager.getConnection(
		               "jdbc:mysql://localhost/test?characterEncoding=UTF-8&serverTimezone=JST",
		               "test",
		               "test"
		               );
		       Statement st = conn.createStatement();
		       ResultSet rs = st.executeQuery("select * from test1");

		       while(rs.next()) {
		           int id = rs.getInt("id");
		           String name = rs.getString("name");
		           System.out.println("ID:"+id+"name:"+name);
		       }
		       rs.close();
		       st.close();
		       conn.close();
		       System.exit(0);
		   } catch (ClassNotFoundException e) {
		       System.out.println("The driver could not be loaded"+ e);
		   } catch (SQLException e) {
		       System.out.println("Database connection error"+ e);
		   }
	}
}
- Copy the above sentence, specify
S-JISas the character code, and save the file name asTest1.java.
- Select
[Run]-> [Run]-> [Java Application].
- Success if it looks like the image.
5. Basic way of writing Java database linkage
Java database linkage
public class class name{
    public static void main(String[] args) {
        try {
               //JDBC driver class name
               Class.forName("com.mysql.cj.jdbc.Driver");
               //Get a connection
Connection Connection type variable name= DriverManager.getConnection(
                       "jdbc:mysql:URL",
                       "DB user name",
                       "password"
                       );
               //Get an object of Statement class
Statement Statement type variable name=Connection type variable name.createStatement();
               //Execute SQL
ResultSet ResultSet type variable name=Statement type variable name.executeQuery("SQL statement");

               while(rs.next()) {
                   //SQL display
               }
ResultSet type variable name.close();
Statement type variable name.close();
Connection type variable name.close();
               System.exit(0);
           } catch (ClassNotFoundException e) {
               //Driver loading failure
           } catch (SQLException e) {
               //Database connection failed
           }
    }
}
--Basic Java database linkage is described as above.
6. Related
-[Useful to remember !!!] Easy creation of constructor and getter / setter in Eclipse -[Useful to remember !!!] Easy creation of inherited class in Eclipse -[Useful to remember !!!] Change MySQL character code -[Even beginners can do it! ] How to write Javadoc -[Easy-to-understand explanation! ] How to use Java overload -[Easy-to-understand explanation! ] How to use Java encapsulation -[Easy-to-understand explanation! ] How to use Java inheritance [Override explanation] -[Easy-to-understand explanation! ] Type conversion of reference type in Java -[Easy-to-understand explanation! ] How to use Java polymorphism -[Easy-to-understand explanation! ] How to use ArrayList [Java] -[Practice! ] Introduction of JFrame (explanation up to screen creation)
Recommended Posts