[RUBY] Make an instagram clone app ①
Introduction
As the title suggests, we will create a simplified Instagram app. I will write the article in the following steps, so I hope you will read it step by step.
① App creation-Implementation of login function ← Imakoko ② Implementation of photo posting function ③ [Implementation of user page] (https://qiita.com/maca12vel/items/c716702b02f977303011) ④ [Implementation of follow function] (https://qiita.com/maca12vel/items/2760d33f3683fac91de5) ⑤ Implementation of post deletion function
First, create an application
Open a terminal and type the following command. Since the database uses mysql, The option is ** "-d mysql" **.
Terminal
rails new instaclone -d mysql
Once created, launch the editor and edit "datebase.yml".
Modify ʻencoding`` to ʻutf8``.
datebase.yml
default: &default
  adapter: mysql2
  encoding: utf8  #← Correction part
  pool: <%= ENV.fetch("RAILS_MAX_THREADS") { 5 } %>
  username: root
  password:
  socket: /tmp/mysql.sock
If you can fix it, go back to the terminal and change to the `ʻinstaclonedirectory. Run rails db: create``.
Terminal
instaclone % rails db:create
Now that the preparations are complete, we will implement the login function from now on.
Introducing devise
What is devise ... For applications created with Rails It is one of the gems that can easily implement the authentication function. You can create login functions such as login and sign-up.
Add the following gem to the Gemfile. (Bottom)
Then do a bundle install in the terminal.
Gemfile
gem 'devise'
Terminal
instaclone % bundle install
After adding the gem, create a devise configuration file.
Terminal
instaclone % rails g devise:install
Next, create a User model.
Terminal
instaclone % rails g devise User
Since the migration file is also created
Run rails db: migrate.
Terminal
instaclone % rails db:migrate
Now that you have a login function, create a home screen for confirmation. Execute the following command in the terminal to create a controller for the home screen.
Terminal
instaclone % rails g controller homes
Once created, add the index method to homes_controller and
Describe the route settings in routes.rb.
homes_controller.rb
class HomesController < ApplicationController
  def index
  end
end
routes.rb
Rails.application.routes.draw do
  root 'homes#index' #← here
  devise_for :users
end
When I created the controller earlier, the view file was also created with it. The location is `ʻapp / views / homes``. Create a view file for the home screen here and write the characters for display.
erb:app/views/homes/index.html.erb
<h3>home</h3>
Run rails s in the terminal, launch a local server,
Check at http: // localhost: 3000 /.
If you can display home, you are successful.
Guide to login screen with before_action
In the state so far, anyone can access the home screen, so
Add before_action to the controller.
Now, users who are not logged in (or registered) will be automatically taken to the login screen.
homes_controller.rb
class HomesController < ApplicationController
  before_action :authenticate_user! #← here
  def index
  end
end
If you refresh the screen with this, you should see the screen below.
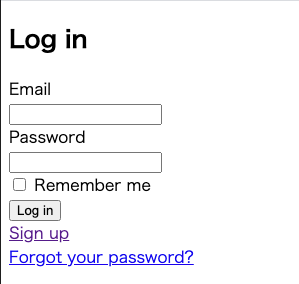
On this screen, enter your Email and Password and click Sign up. You can move to the screen displayed as home earlier.
This is almost complete, but finally we need to create a button to log out.
Logout implementation
Use the link_to method to create a link that allows you to log out of the home screen.
erb:app/views/homes/index.html.erb
<h3>home</h3>

<div>
  <%= link_to 'logout', destroy_user_session_path, method: :delete %>
</div>
You can find the destroy_user_session_path in the terminal rails routes.
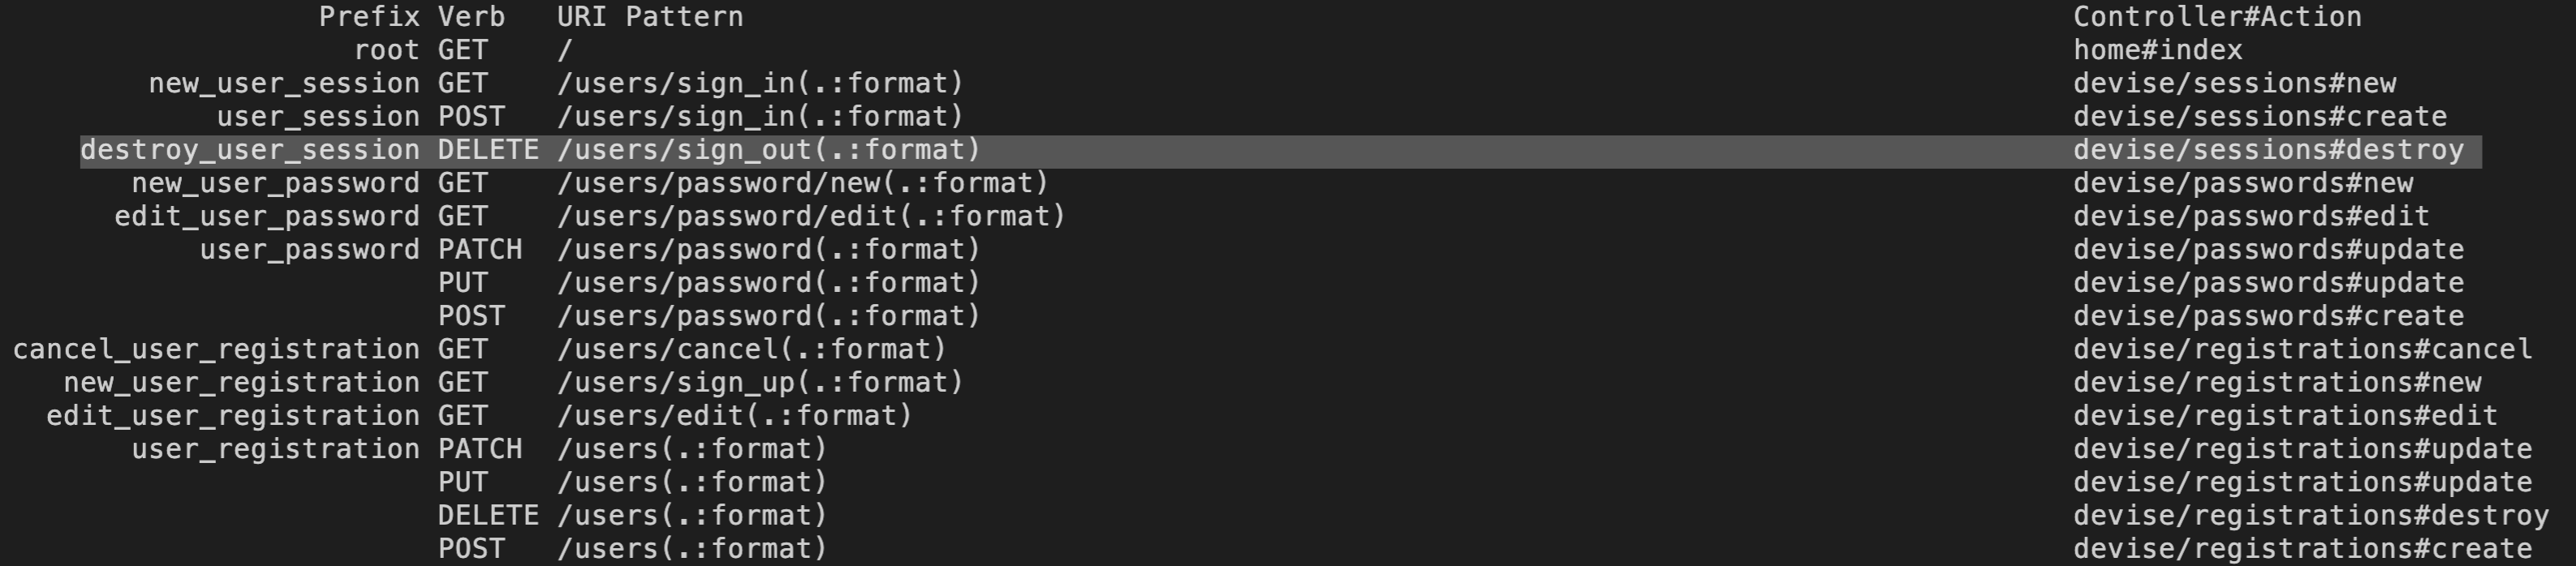
The Prefix of devise / sessions # destroy (sign_out)
You can see that it is destroy_user_session.
Add _path after Prefix.
Then, method is changed to delete and it is completed.
If it looks like this, you are successful.
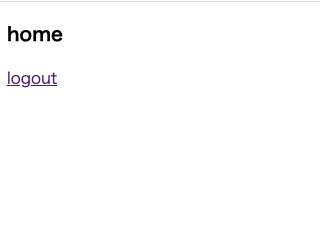
Click logout to move to the login screen, and you're done.
that's all. Thank you for your hard work.
Next → ② Implementation of photo posting function
Recommended Posts