[Introduction to Docker] Official Tutorial (Japanese translation)
Introduction
The official docker tutorial was pretty organized and easy to understand, so I went through it. However, I thought that the tutorials tend to hesitate in English, so I translated it into Japanese so that it would be helpful to someone. Since we are in a windows environment, we explain it in the windows UI.
Premise
・ Docker installed ・ Git installed
Start the tutorial
If you want to start the tutorial from the installed state, click the docker icon and click Learn to start the tutorial. Before the installation, the tutorial should start automatically when the installation is completed.

The following screen will appear, so start it.

clone Clone the code for the tutorial
git clone https://github.com/docker/getting-started.git
Build
docker build -t docker101tutorial .
Use this build command when creating a Docker image from Dokerfile. -t docker 101 tutorial specifies the tag name of the Docker image. t is an acronym for tag. . Indicates that the Dockerfile is in the current directory.
In summary, the above command means to create a Docker image from the Dokerfile in the current directory with the tag name docker101tutorial. A Docker image is a directory that contains files needed to run an application and is the source of a container.
Run
docker run -d -p 80:80 --name docker-tutorial docker101tutorial
The run command is a command used to create and start a container from a Docker image, which can be created and started at the same time. There is also a command to create docker create and a command to start docker start, and creating and then starting has the same behavior as running.
-d specifies to start in detach mode, and if this is specified, it can be started in the background. If you start without specifying this, information will be output to the terminal and it will be occupied, so specify it if you want to avoid this.
The above command launches a container named docker-tutorial from a Docker image named docker101 tutorial.
If docker fails to start at this time, try changing the port on the host side to 8080.
1. 1. Let's get started
If you access localhost: 80 and the following screen is displayed, you can access the container for the tutorial. From here, we will translate it into Japanese according to this tutorial. I also include my comments here and there.
(Supplement) The place described like this is my comment (supplement).

About the executed command
I will explain the following command that created and started the container.
docker run -d -p 80:80 docker/getting-started
---d: Create / start container in background mode
---p 80: 80: Map port 80 on the host side to port 80 on the container side
--docker / getting-started: Image to use
This command can be abbreviated as shown below.
docker run -dp 80:80 docker/getting-started
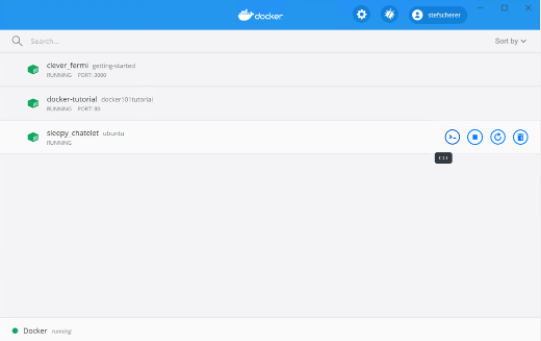
The Docker Dashboard Here, I will explain about Docker Dashboard once. By starting the Dashboard, you can check the container log and start the shell inside the container. In addition to this, you can open it in the browser, restart it, delete it, and perform various operations intuitively with the UI.
When you access the Dashboard, the following screen will open and you can confirm that the container is RUNNING. "Jolly_bouman" will be a random name, so it should be a different name.

What is a container?
What is a container? Simply put, it is a process on the host machine that is isolated from the rest of the process. A process is a program running on a machine. Process isolation makes use of Linux's namespaces and cgroups features.
What is a container image?
What is a container image? The image is the source (template) of the container that runs in the execution environment. The identity of the container image is the directory that contains the files needed to run the application. It contains environment variables, commands to run by default, and other metadata.
2. application
The application you run in this tutorial is a todo app that runs on Node.js. You don't have to be familiar with Node.js. Here, we will prepare a todo application that works at a minimum. Follow the steps below to start the app and check the operation.
Get the application
- Download the source code from
http: // localhost: 80 / assets / app.zip.
(Supplement) Enter the above address in your browser to download the source code. Change the port accordingly.
- Unzip the zip and you will see package.json and two subdirectories (src and spec).
Build container image
To build the application, we will use Dockerfile here. Dockerfile is a text-based script, like instructions for generating a container image.
Follow the steps below to create a Docker image.
-
Create
Dockerfilein the same directory hierarchy as package.json and write the following. Thedockerfiledoes not require an extension.
FROM node:12-alpine WORKDIR /app COPY . . RUN yarn install --production CMD ["node", "src/index.js"]
 2. Open a terminal, move to the app directory and execute the following command.

    ```
docker build -t getting-started .
Use this command to generate a new container image from a Dockerfile. If you check the terminal after running, you can see that many "layers" are downloaded. This is because I used the node: 12-alpie image as the base image and if I don't have this image on my machine I need to download it.
When the download is complete, copy it into your application (COPY ..) and use yarn to install the application dependencies (RUN yarn install --production). Dependency installation is done with the command RUN yarn install --production, which installs anything other than those listed in devDependencies in package.json within your application. The package described in devDependencies is a package required at the time of development and is not required in the product version (--production), so --production is specified.
CMD is the command that is executed by default when the container is started from the container image. This means that when you run docker run XXXX, the node src / index.js command will be executed.
The . at the end of the docker build command means that the Dockerfile is in the current directory.
(Supplement) By default docker looks for the name
Dockerfile, but you can specify an alias with -f. If you want to name itDockerfile.base, use the following commanddocker build -t sample -f Dockerfile.base .
Start the container
Now that the image is ready, use the docker run command to run the application.
-
Specify the image and start the container with the
docker runcommand
docker run -dp 3000:3000 getting-started
`-d` means to start the container in the background, and` -p` maps port 3000 on the host side to port 3000 on the container side. You will not be able to access the application without this port mapping.
2. You can access the application by accessing [http: // localhost: 3000](http: // localhost: 3000).
3. You should see the item added as expected. You can add a completion mark, and you can also delete the added item.
We'll make a few changes here to learn about container management.
## 3. 3. Application update
Follow the steps below to update your application.
1. Change the 56th line of `src / static / js / app.js` as follows.

2. Build the updated version of the image. Execute the following command.
`docker build -t getting-started .`
3. Launch a new container with the updated code.
`docke run -dp 3000:3000 getting-started`
When I run this code, I should see an error similar to the following:
`docker: Error response from daemon: driver failed programming external connectivity on endpoint laughing_burnell
(bb242b2ca4d67eba76e79474fb36bb5125708ebdabd7f45c8eaf16caaabde9dd): Bind for 0.0.0.0:3000 failed: port is already allocated.`
The cause of this error is that the old container is still running on port 3000. Only one process can be occupied by one port on the host side.
The solution is to delete the old container.
### Replace old container
First stop to delete the container. It cannot be deleted without stopping.
There are two ways to delete an old container, so delete it as you like.
#### Delete container (using CLI)
1. Get the container ID with the `docker ps` command
```
docker ps
-
Use
docker stopto stop the container
Please replace the place with the container ID obtained by docker ps
docker stop
 3. Delete the stopped container with the `docker rm` command

    ```
docker rm <the-container-id>
You can use the command below to stop and delete a container with a single line command.
docker rm -f <the-container-id>
Delete container (using Docker Dashboard)
With Docker dashboard, you can delete a container with 2 clicks. You can delete a container more easily and intuitively than using the CLI.
- Open the dashboard and hover over the container you want to delete and you will see an action button on the right
- Click the trash can icon to delete the container

- Confirm that the container is gone
Start the updated application
-
Launch the updated application
docker run -dp 3000:3000 getting-started
2. Go to [http: // localhost: 3000](http: // localhost: 3000) and make sure the text is updated

### (Summary of Chapter 3)
I updated the application, but I think you noticed the following two points.
1. All the items registered at the beginning have disappeared. This is not good for a todo list app, so we'll talk about this in a later chapter.
2. For small changes, it took a lot of steps to update the app. We'll see in a later chapter how to rebuild and not have to start a new container each time.
Before we talk about how items are held, let's take a quick look at how to share images.
## 4. Application sharing
Now that the image is complete, let's share it. To share a Docker image, you need to use the Docker repository. Let's use `Docker Hub`, which contains all the images we use.
### Creating a repository
Let's create a repository on Docker Hub to push the image.
1. Log in to [Docker Hub](https://hub.docker.com/)
2. Click ** Create a Repository **
3. The repository name is `getting-started`. Also make sure the Visibility is `Public`.
4. Click the Create button
Looking to the right of the page, there is a ** Docker commands ** section that shows a sample command to run to push the image.
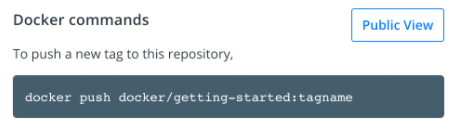
### Image push
1. Open the command line and enter the push command you just checked. At this time, replace `docker` with your own Docker ID.
```
$ docker push docker/getting-started
The push refers to repository [docker.io/docker/getting-started]
An image does not exist locally with the tag: docker/getting-started
I have failed. The push command should have looked for an image named docker / getting-started, but couldn't find it. Try running the docker image ls command to check the REPOSITORY. Certainly there is no image of such a name.
To solve this, give the image an alias with "tag".
2. Log in to Docker Hub. docker login -u YOUR-USER-NAME (Enter password after execution)
3. Replace YOUR-USER-NAME with your Docker ID.
```
docker tag getting-started YOUR-USER-NAME/getting-started
 4. Execute the push command again. If you are copying the command from Docker Hub, do not enter any `tagname`. If you don't specify a tag in Docker, the `latest` tag will be used.

    ```
docker push YOUR-USER-NAME/getting-started
Launch the image in a new instance
At this point, you have built the image and pushed it to the registry. I would like to launch the pushed image in a completely new environment. Let's use Play with Docker here.
-
Open Play with Docker (http://play-with-docker.com/)
-
Log in with your Docker Hub account
-
Once you are logged in, click
+ ADD NEW INSTANCEin the left sidebar. (If it is not displayed, try reducing the size of the browser a little.) After a while, the following screen will be displayed on the browser.
-
Let's launch the application you pushed earlier on the terminal
docker run -dp 3000:3000 YOUR-USER-NAME/getting-started -
When you start it, a button labeled
3000will be displayed, so click it. You can see that the application pushed to Docker Hub has been launched. If you don't have a button, click ** OPEN PORT ** and enter 3000.
(Summary of Chapter 4)
This chapter explained how to push the created image to the registry and share it. I tried launching a new application using the image pushed using Play with Docker. It's the same as what's called a CI pipeline, where you can create and push images to get the latest images in your production environment.
5. DB persistence
As you may not have noticed, the TODO app loses data every time you start the container. Let's understand why this happens and how the container works.
Container file system
The container is launched using various layers of the image.
(Supplement) The docker image is a state in which the instructions of each docker file are overlapped as an image, and here it seems that those overlapping states are expressed as "layer". docker keeps each instruction of dockerfile as an image and uses those images to start the container.
Each container gets its own "scratch space" in which files are created, updated and deleted. No changes can be seen from other containers, even for the same image.
(Supplement) Scratch space: Imagine a memory space isolated from other processes here.
Let's actually move your hand and check
To check the above, let's start two containers and edit the file in each. You can see that the files edited in one container are not available in the other container.
-
Start the ʻubuntu` container. This container outputs a random number from 1 to 10000 to /data.txt
docker run -d ubuntu bash -c "shuf -i 1-10000 -n 1 -o /data.txt && tail -f /dev/null"
This command launches a bash shell and calls two commands (&& connects the two commands). The first command writes a random number to /data.txt. The second command simply monitors the file to keep the container running.
> (Supplement)
Try removing the second command and && and running, the container you started will stop immediately and you will not be able to see the files in the container.
2. Check the output value. Open the Dashboard, hover over the container running the ʻubuntu` image and click the leftmost button (CLI).
Once inside the container, execute the following command to check the contents of /data.txt.
```
cat /data.txt
If you want to use the command line, you can do the same with the docker exec command. After getting the container ID with docker ps, execute the following command.
```
docker exec
 You can see that the random numbers are displayed.
 3. Next, let's start another container using the same ʻubuntu` image. Then you can see that /data.txt does not exist.

    ```
docker run -it ubuntu ls /
/data.txt does not exist because this file was written to the scratch space of the first container.
4. Delete unnecessary containers with the docker rm -f command.
Container Volumes
As we have seen, a container is the one that starts according to the contents of the image when it is started. Even if you create a container and update or delete the files, those changes will be lost once the container is deleted. All changes are independent for each container. You can use Volumes to prevent it from disappearing.
Volumes allows you to connect a specific file system path of a container to a host machine. If the directory on the container side is mounted, the change can be confirmed on the host machine side as well. If you mount the same directory when you start the container, you can check the same file on the container side. In other words, the data will not be lost.
There are two types of volumes. First, let's check from ** named volumes **.
Do not erase TODO data
By default, TODO application data is stored in the SQLite Database in /etc/todos/todo.db. You don't have to be familiar with SQLite. It's just a relational database, where all the data is stored in one file. This method is not suitable for large applications, but it works well for small apps like this TODO app. Later, we'll see how to switch to another database engine.
If the database is a single file, you should be able to restart the container from where it left off by keeping that file on the host side so that it can be used in the next new container. By creating a volume and attaching the volume to the directory that stores the data (this is called "mounting"), the data can be used continuously. When the container writes the data to the todo.db file, the data is stored in the volume on the host side.
As I said earlier, we will use ** named volume ** here. Think of the named volume as just a bucket of data. When using this, it is enough to remember only the volume name, you do not need to be aware of where the physical storage area is, and Docker manages the association between the volume name and the storage area. Each time you use volume, Docker will locate the actual data.
-
Create a volume using the
docker volume createcommand.
docker volume create todo-db
 2. Delete the TODO application that does not use this named volumes on the Dashboard. (Or remove it with `docker rm -f <container-id>`)
 3. Next, I will start the TODO application container, but this time, specify volume mount with the `-v` flag. This will take advantage of the named volume and mount it in `/ etc / todos`. This allows all files generated in the `/ etc / todos` path to be saved on the host side.

    ```
docker run -dp 3000:3000 -v todo-db:/etc/todos getting-started
- After launching the container, try adding some items.
- Delete the TODO app container. Use Dashboard or get the container ID with
docker psand then delete it withdocker rm -f <id>. - Re-enter and run the same command as shown above
- Open the app and you should see that you have the item you just added
- After confirming, delete the container as before.
Now you know how to retain the data.
(Supplement) Two types of volumes, ** named volumes ** and ** bind mount **, are available as standard. The main difference between them is the data management location on the host side. As seen above, named volumes were OK if the user was aware of only the volume name. In other words, it is up to docker to decide where to store the actual data. Then ** bind mount ** allows you to specify which directory on the host side should be mounted on which directory on the container side. In other words, you can choose any data management location on the host side.
(Information) Pro-tip named volumes and bind mounts (explained in the next chapter) are the two main volumes that are supported by default when you install the Docker engine, but they also support NFS, SFTP, NetApp, and many more .. There is a volume driver plugin. This is a technology that is especially important when launching containers on multiple hosts in a cluster environment such as Swarm or Kubernetes.
Check the details of Volume
You may be wondering, "Where is the stored data when using named volume?" If you want to know it, you can solve it by executing the following command.
docker volume inspect todo-db
[
    {
        "CreatedAt": "2019-09-26T02:18:36Z",
        "Driver": "local",
        "Labels": {},
        "Mountpoint": "/var/lib/docker/volumes/todo-db/_data",
        "Name": "todo-db",
        "Options": {},
        "Scope": "local"
    }
]
Mountpoint indicates where the data is actually stored. Many machines require administrator privileges to access this directory from the host, but the data is certainly there.
(Information) To access Volume data directly on Docker Desktop When you look at the Mountpoint in todo-db above, you might think that it doesn't exist anywhere in this directory. While running Docker Desktop, the Docker commands are actually running inside a small VM on your machine. So if you want to see the data in the Mountpoint directory, you need to connect inside the VM. There are many ways to do this when you google.
(Summary of Chapter 5)
I was able to create an application that retains data even if I delete the container and restart it. However, as we saw in the previous chapter, it takes some time to make changes to the image and rebuild it. You can build your app in a better way with bind mounts. In the next chapter we will look at bind mounts.
6. Use Bind Mounts
In the previous chapter, we looked at how to retain data using ** named volume **. ** named volumes ** is very useful if you just want to store the data because you don't have to worry about where the actual data is stored.
You can use ** bind mounts ** to ensure that you have control over where on your host you want to mount. Approximately this is used to hold the data, but it is also used if you want to add new data to the container. You can mount the source code on the container side when starting the application, and use bind mounts to change the source code and check the operation in real time.
Node-based applications have a tool called nodemon that monitors file changes and restarts the app when it changes, other languages and frameworks. Has an equivalent tool.
Volume type comparison table
Bind mounts and named volumes are the main volumes that can be used by default with the Docker engine, but in addition to this, other use cases (SFTP, Ceph, [NetApp](https://netappdvp.readthedocs.io/en/ Various volume drivers are available to support stable /), [S3](https: //github.com/elementar/docker-s3-volume), etc ...).

Start the development mode container
To launch a container that supports the development workflow, do the following:
--Mount the source code in a container --Install all dependencies (including "dev" dependencies) --Launch nodemon to monitor file changes
- Make sure the
getting-startedcontainer is not started - Execute the following command. The meaning of the command will be explained later
docker run -dp 3000:3000 \
    -w /app -v "$(pwd):/app" \
    node:12-alpine \
    sh -c "yarn install && yarn run dev"
If you are using PowerShell, please use the following command.
docker run -dp 3000:3000 `
    -w /app -v "$(pwd):/app" `
    node:12-alpine `
    sh -c "yarn install && yarn run dev"
---dp 3000: 3000: Start with background and map port 3000 on the host side and port 3000 on the container side.
---w / app: Setting the working directory. When the command is executed, the directory specified here becomes the current directory.
---v "$ (pwd): / app" : Mount the current directory on the host side and the / app directory on the container side.
--node: 12-plpine: Image to use. Note that this is an application-based image from the Dockerfile.
--sh -c "yarn install && yarn run dev: Use sh to start the shell (alpine doesn't have bash), then do yarn install to install all dependencies and Run yarn run dev. As you can see by looking at package.json, running the dev script starts nodemon.
-
- Check the logs using
docker logs -f <container-id>. If the display looks like the one below, you are ready to go.
- Check the logs using
docker logs -f <container-id>
$ nodemon src/index.js
[nodemon] 1.19.2
[nodemon] to restart at any time, enter `rs`
[nodemon] watching dir(s): *.*
[nodemon] starting `node src/index.js`
Using sqlite database at /etc/todos/todo.db
Listening on port 3000
If you can see the log, press Ctrl + C to exit.
-
Now let's modify the app. Change line 109 of
src / static / js / app.jsas follows.
-
Refresh (or open) the page to see the changes take effect immediately. It takes a few seconds for the Node server to restart. If you get an error, try refreshing.

-
Feel free to make changes. When you're happy, stop the container and build a new image with
docker build -t getting-started ..
Bind mounts are often used to build a local development environment. The advantage is that you don't need any build tools on your development machine. Simply docker run and the development environment will be pulled and ready. We'll talk about Docker Compose in the future, which can simplify the command.
(Chapter 6 Summary)
We've seen how to persist your database and respond more quickly to your needs and demands. To prepare for the production environment, you need to move your database from SQLite to something that can be scaled more easily. For the sake of simplicity, we'll use a relational database here and update it to use MySQL in our application. We will see how containers allow communication with each other from the next chapter.
7. Multi-container application
So far we've been dealing with single container applications, but now we want to add MySQL to our TODO apps. You may have questions such as "Where do you start MySQL?" "Install in the same container? Or start them independently?" In general, one thing should be done within each container. The reason is as follows.
――It is quite possible that you want to scale the API and front end regardless of the database. --By making each container independent, you can perform updates and version control independently. ――It is suitable when you do not need to build a database in your application and want to use managed services for the database in the production environment. --A separate process manager is required to start multi-process (container can only start one process). This complicates startup and shutdown.
There are many other reasons.
So here, let's configure the application as follows.

Container networking
By default, containers run independently of other processes and cannot be connected to other containers / processes even on the same machine. How can I connect a container to other containers? The answer is ** networking **. You don't need to have the same knowledge as a network engineer, just remember the following.
If two containers are on the same network, they can connect to each other
Start MySql
There are two ways to place the container on the network. 1) Place the network at startup 2) Connect to the started container. Here we first create a network and attach it when the MySQL container starts.
-
Create a network
docker network create todo-app
 2. Start MySQL and attach the network. Some environment variables are set to make the initial settings of the database. (Check [MuSQL Docker Hub listing](https://hub.docker.com/_/mysql/) for more details.)

    ```
docker run -d \
    --network todo-app --network-alias mysql \
    -v todo-mysql-data:/var/lib/mysql \
    -e MYSQL_ROOT_PASSWORD=secret \
    -e MYSQL_DATABASE=todos \
    mysql:5.7
If you are using PowerShell, use the command below.
```
docker run -d --network todo-app --network-alias mysql
-v todo-mysql-data:/var/lib/mysql -e MYSQL_ROOT_PASSWORD=secret
-e MYSQL_DATABASE=todos `
mysql:5.7
 You can see that there is a `--network-alias` flag in addition to the environment variables for database initialization. We'll talk about this later.

    > (Pro-tip)
 In the above command, the named volume `todo-mysql-data` is used and mounted in / var / lib / mysql which is the data storage destination of MYSQL. However, I haven't created the volume by running the `docker volume create` command. Docker will automatically create a new named volume name if you specify it.

 3. Let's connect to make sure the database is running

    ```
docker exec -it <mysql-container-id> mysql -p
You will be asked for a password, so enter secret. Check the todos database when you enter the MySQL shell.
```
mysql> SHOW DATABASES;
 You should get output similar to the following:

    ```
+--------------------+
| Database           |
+--------------------+
| information_schema |
| mysql              |
| performance_schema |
| sys                |
| todos              |
+--------------------+
5 rows in set (0.00 sec)
You know that the todo database is ready.
Connect to MySQL
Now that we have confirmed that MySQL is running, let's use it. Just how ...? If you have another container running on the same network, how do you find that container (although I remember that each container has an IP)?
To understand this, use the nicolaka / netshoot container. This container has a set of useful tools installed for network troubleshooting and debugging.
-
Start a new container with the nicolaka / netshoot image. Don't forget to connect to the same network.
docker run -it --network todo-app nicolaka/netshoot
 2. If you type the above command, it will enter the container, so let's execute the `dig` command (this command is a convenient DNS tool). Check the IP address of the host name `mysql`.

    ```
dig mysql
You will get the following output:
```
; <<>> DiG 9.14.1 <<>> mysql ;; global options: +cmd ;; Got answer: ;; ->>HEADER<<- opcode: QUERY, status: NOERROR, id: 32162 ;; flags: qr rd ra; QUERY: 1, ANSWER: 1, AUTHORITY: 0, ADDITIONAL: 0 ;; QUESTION SECTION: ;mysql. IN A ;; ANSWER SECTION: mysql. 600 IN A 172.23.0.2 ;; Query time: 0 msec ;; SERVER: 127.0.0.11#53(127.0.0.11) ;; WHEN: Tue Oct 01 23:47:24 UTC 2019 ;; MSG SIZE rcvd: 44
 If you look at "ANSWER SECTION", you can see the ʻA` record of the host name `mysql` resolved to the IP address 172.23.0.2. (The IP address depends on your environment). Normally `mysql` is not a valid hostname, but Docker can resolve the IP address of a container with a network alias (remember the` --network-alias` flag, right?).
 What this means is that you can connect to the database simply by connecting to the host name `mysql` from the TODO app. It's never easier!

### Connect the TODO app to MySQL and launch it
 The TODO app supports setting some environment variables for MySQL connections. The following four.

 --`MYSQL_HOST`: The name of the host running the MySQL server
 --`MYSQL_USER`: Username used to connect
 --`MYSQL_PASSWORD`: Password used to connect
 --`MYSQL_DB`: Database name to use

 > Attention!
 Using environment variables to set up connections is fine in a development environment, but it's definitely not recommended when running your app in a production environment. Former Docker security leader Diogo Monica explains why [great blog post](https://diogomonica.com/2017/03/27/why-you-shouldnt-use-env-variables-for-secret-data/ ).

 Now let's start the development environment container.

 1. Connect the MySQL container to the TODO app network by specifying the above environment variables.

    ```
docker run -dp 3000:3000 \
  -w /app -v "$(pwd):/app" \
  --network todo-app \
  -e MYSQL_HOST=mysql \
  -e MYSQL_USER=root \
  -e MYSQL_PASSWORD=secret \
  -e MYSQL_DB=todos \
  node:12-alpine \
  sh -c "yarn install && yarn run dev"
If you are using PowerShell, use the following command.
```
docker run -dp 3000:3000 -w /app -v "$(pwd):/app"
--network todo-app -e MYSQL_HOST=mysql
-e MYSQL_USER=root -e MYSQL_PASSWORD=secret
-e MYSQL_DB=todos node:12-alpine
sh -c "yarn install && yarn run dev"
 2. If you check the container logs with the `docker logs <container-id>` command, you can see that it says that you are using the mysql database.

    ```
# Previous log messages omitted
$ nodemon src/index.js
[nodemon] 1.19.2
[nodemon] to restart at any time, enter `rs`
[nodemon] watching dir(s): *.*
[nodemon] starting `node src/index.js`
Connected to mysql db at host mysql
Listening on port 3000
```
 3. Open the TODO app in your browser and try adding some items.
 4. Try connecting to the mysql database and make sure the item you added is definitely added to the database. The password is ** secret **.

    ```
docker exec -ti <mysql-container-id> mysql -p todos
Once in the mysql shell, run the following command.
```
mysql> select * from todo_items; +--------------------------------------+--------------------+-----------+ | id | name | completed | +--------------------------------------+--------------------+-----------+ | c906ff08-60e6-44e6-8f49-ed56a0853e85 | Do amazing things! | 0 | | 2912a79e-8486-4bc3-a4c5-460793a575ab | Be awesome! | 0 | +--------------------------------------+--------------------+-----------+
The name changes depending on the added item, but I was able to confirm that it was saved.
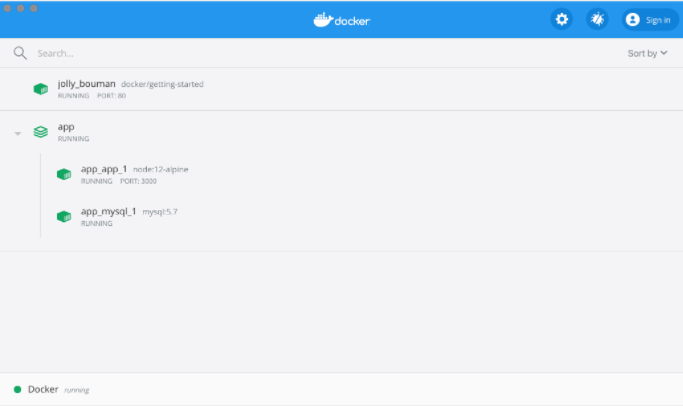
Check out the Docker Dashboard. You can see that the two containers are running, but they are not grouped into one app. Each container is launched independently, but the TODO app is connected to the mysql container.
### (Chapter 7 Summary)
I saved the TODO app data in a separate external mysql container. And learn a little about container networking, Service Discovery (https://ja.wikipedia.org/wiki/%E3%82%B5%E3%83%BC%E3%83%93%E3%82%B9) Use DNS to see how% E3% 83% 87% E3% 82% A3% E3% 82% B9% E3% 82% AB% E3% 83% 90% E3% 83% AA) is implemented. I confirmed it.
However, I was a little overwhelmed by having to create a network, start a container, specify environment variables, open ports, and do many other things just to start an application. It may have been. I can't remember so many things and it's hard to tell someone.
The next chapter describes Docker Compose. With Docker Compose, you can share your application with others in a much easier way, and you'll be able to launch the apps covered in this chapter with simple commands.
## 8. Use Docker Compose
[Docker Compose](https://docs.docker.com/compose/) is a tool developed to help you define and share multi-container applications. With Docker Compose, you can define a service in a YAML file and start or destroy the service with a single command.
The advantage of using Docker Compose is that you can define your application in one file (put the file in the root directory of your project) and make it easy for someone else to join your project. If you want to join the project, all you have to do is clone the repository and launch the application with Docker Compose commands. There are many projects using this on Github and GitLab.
### Install Docker Compose
If you have Docker Desktop / Toolbox installed on Windows or Mac, you already have Docker Compose installed. Docker Compose is already installed for Play-with-Docker as well. If you are using Linux, follow the steps here (https://docs.docker.com/compose/install/) to install.
After installation, you can check the version information with the following command.
docker-compose version
### Create a Docker Compose file

 1. Create a `docker-compose.yml` file (compose file) in the root directory of your project
 2. First, write the schema version in the compose file. In most cases it is best to use the latest version. The Compose file reference (https://docs.docker.com/compose/compose-file/) contains the current schema version and compatibility table.

    ```
version: 3.7
-
Next, define the list of services (or containers) you want to start as an application.
version: "3.7" services:
 Next, I will explain the compose file service.

### Define your app's services
 Recall the command below that we used to define the container for our app.
docker run -dp 3000:3000
-w /app -v "$(pwd):/app"
--network todo-app
-e MYSQL_HOST=mysql
-e MYSQL_USER=root
-e MYSQL_PASSWORD=secret
-e MYSQL_DB=todos
node:12-alpine
sh -c "yarn install && yarn run dev"
If you are using PowerShell, it was the following command.
docker run -dp 3000:3000 -w /app -v "$(pwd):/app"
--network todo-app -e MYSQL_HOST=mysql
-e MYSQL_USER=root -e MYSQL_PASSWORD=secret
-e MYSQL_DB=todos node:12-alpine
sh -c "yarn install && yarn run dev"
 1. First, let's register the service and define the container image. You can set the name of the service to your liking, and that name will automatically become a network alias. This alias is useful for defining MySQL services.

    ```
version: "3.7"
services:
  app:
    image: node:12-alpine
-
Normally, the
commandis placed near the definition of ʻimage`, but there is no restriction on the order.
version: "3.7" services: app: image: node:12-alpine command: sh -c "yarn install && yarn run dev"
 3. Next, let's take a look at the `-p 3000 3000` command defined in` ports`. The one described here is [short syntax](https://docs.docker.com/compose/compose-file/#short-syntax-1), which is more detailed [long syntax](https: //). There is also a docs.docker.com/compose/compose-file/#long-syntax-1) variable.

    ```
version: "3.7"
services:
  app:
    image: node:12-alpine
    command: sh -c "yarn install && yarn run dev"
    ports:
      - 3000:3000
-
Next is the working directory defined by
working_dir(-w / app) and the volume mapping defined byvolumes(-v "$ (pwd): / app"). Volume also Short and Long / # long-syntax-3) There is a syntax.
version: "3.7" services: app: image: node:12-alpine command: sh -c "yarn install && yarn run dev" ports: - 3000:3000 working_dir: /app volumes: - ./:/app
 5. The last is ʻenvironment`, which defines environment variables.

    ```
version: "3.7"
services:
  app:
    image: node:12-alpine
    command: sh -c "yarn install && yarn run dev"
    ports:
      - 3000:3000
    working_dir: /app
    volumes:
      - ./:/app
    environment:
      MYSQL_HOST: mysql
      MYSQL_USER: root
      MYSQL_PASSWORD: secret
      MYSQL_DB: todos
MySQL service definition
Let's define the MySQL service. When I made the container, I used the following command.
docker run -d \
  --network todo-app --network-alias mysql \
  -v todo-mysql-data:/var/lib/mysql \
  -e MYSQL_ROOT_PASSWORD=secret \
  -e MYSQL_DATABASE=todos \
  mysql:5.7
In the case of PowerShell, it is as follows.
docker run -d `
  --network todo-app --network-alias mysql `
  -v todo-mysql-data:/var/lib/mysql `
  -e MYSQL_ROOT_PASSWORD=secret `
  -e MYSQL_DATABASE=todos `
  mysql:5.7
-
First, let's define a new service with the name
mysql. At this time,mysqlwill automatically become a network alias. Let's specify the image as when defining the app.
version: "3.7" services: app: # The app service definition mysql: image: mysql:5.7
 2. Next is the definition of volume mapping. The named volume is created automatically when you start the container with the `docker run` command. However, in the case of `docker compose`, it is not created automatically. You need to define `volumes:` and specify the mount point. Simply specify the volume name and the default options will be used. There are also many options (https://docs.docker.com/compose/compose-file/#volume-configuration-reference).

    ```
version: "3.7"
services:
  app:
    # The app service definition
  mysql:
    image: mysql:5.7
    volumes:
      - todo-mysql-data:/var/lib/mysql
volumes:
  todo-mysql-data:
-
Finally, specify the environment variables.
version: "3.7" services: app: # The app service definition mysql: image: mysql:5.7 volumes: - todo-mysql-data:/var/lib/mysql environment: MYSQL_ROOT_PASSWORD: secret MYSQL_DATABASE: todos volumes: todo-mysql-data:
 Summarizing up to this point, `docker-compose.yml` is as follows.

    ```
version: "3.7"
services:
  app:
    image: node:12-alpine
    command: sh -c "yarn install && yarn run dev"
    ports:
      - 3000:3000
    working_dir: /app
    volumes:
      - ./:/app
    environment:
      MYSQL_HOST: mysql
      MYSQL_USER: root
      MYSQL_PASSWORD: secret
      MYSQL_DB: todos
  mysql:
    image: mysql:5.7
    volumes:
      - todo-mysql-data:/var/lib/mysql
    environment:
      MYSQL_ROOT_PASSWORD: secret
      MYSQL_DATABASE: todos
volumes:
  todo-mysql-data:
Let's start the application
Now that you have created docker-compose.yml, let's start the app.
-
Make sure that no other app or database copy is running. (Check the id with
docker psand delete it withrm if <ids>) -
Start the application using the
docker compose upcommand. At this time, add the-dflag to start it in the background.
docker-compose up -d
 You will get the following output.

    ```
Creating network "app_default" with the default driver
Creating volume "app_todo-mysql-data" with default driver
Creating app_app_1   ... done
Creating app_mysql_1 ... done
You can see that the volume is created as well as the network. Docker Compose automatically creates the network by default. So I didn't define network creation in docker-compose.yml.
3. Check the logs with the docker-compose logs -f command. You can see that the log is output on one line for each service. This log is useful when you want to monitor time-related glitches. The -f flag is to" follow "to the log, which will be output immediately when the log is generated.
```
mysql_1 | 2019-10-03T03:07:16.083639Z 0 [Note] mysqld: ready for connections. mysql_1 | Version: '5.7.27' socket: '/var/run/mysqld/mysqld.sock' port: 3306 MySQL Community Server (GPL) app_1 | Connected to mysql db at host mysql app_1 | Listening on port 3000
The service name is listed at the beginning to distinguish the messages from each service. If you want to log only a specific service, add the service name at the end, for example with the command `docker-comopse log -f app`.
> (Useful information) Wait for DB until the app starts
When the application is running, the app waits for MySQL to start and be ready before starting the connection. Docker doesn't have built-in support for waiting for another container to fully start and be ready before starting another container. For Node-based projects, you can take advantage of wait-port dependencies. Similar projects exist in other languages and frameworks.
4. At this point, you can see that the application is running. You can see that it can be executed with just one command!
### Check the app on the Docker Dashboard
If you open the Docker Dashboard, you can see what is grouped under the name ** app **. This is the project name assigned by Docker Compose, which combines multiple containers into one. The project name defaults to the directory name where `docker-compose.yml` is located.

If you expand the app, you can see the two containers defined in the compose file. Each name is written in an easy-to-understand manner and is in the format of `<project name> _ <service name> _ <replica number>`, so which is the container of app and which is the database of mysql You can tell at a glance.
### Stop and delete the container
If you want to stop and delete the container, use the `docker-compose down` command or click the trash can icon in Docker Dashboard. The container will be stopped and the network will be deleted.
> Delete volume
With the default settings, named volume is ** not deleted ** when stopped with the `docker-compose down` command. If you want to remove it, you need to add the `--volumes` flag.
The named volume is not deleted even if it is deleted by Docker Dashboard.
Once stopped and deleted, you can start another project with `docker-compose up`.
### (Summary of Chapter 8)
In this section you learned about Docker Compose and found it dramatically easier to define and share multi-service applications. I also created a compose file by writing commands according to the appropriate compose format.
This is the end of the tutorial. However, the Dockerfiles we've used so far have major problems, so we'll discuss image building best practices in the following chapters to learn about them.
For the time being, that's all.
I will add the next chapters 9 and 10 as needed.
Chapter 9: Image Build Best Practices
Chapter 10: What to do next
Recommended Posts