Merry Christmas with JavaFX !!
Adventure Co., Ltd., which operates the airline ticket reservation site skyticket: bow:
skyticket provides various services related to reservations centered on travel from various devices (computers, smartphones, tablets).
We are also developing apps for smartphones: iphone:
[skyticket: Android version app] </ b>

It's a very refreshing site based on blue </ font>: airplane: Tina Tamashiro is very nice: relaxed :: relaxed :: relaxed:
1. What should I do?
By the way, this blue </ font> keynote skyticket: airplane: Since it's an Advent calendar story, I think it will look like Christmas </ font>: christus_tree:
Use JavaFX to create a skyticket desktop app: computer :.
That said, the screen display is a webview ...
Glitter looks like: star :: star :: star:
2. Environment
- OpenJDK 11
I will use
Java11released in September 2018. https://jdk.java.net/11/
openjdk version "11.0.1" 2018-10-16
OpenJDK Runtime Environment 18.9 (build 11.0.1+13)
OpenJDK 64-Bit Server VM 18.9 (build 11.0.1+13, mixed mode)
- OpenJFX 11
Since
Java11is no longer included in OpenJDK (also in Oracle JDK), we will prepare it separately: computer:
https://openjfx.io/openjfx-docs/
↑ Environment settings and execution procedures are written easily. There is also a procedure using Maven`` Gradle: relaxed:
javafx.version=11.0.1
javafx.runtime.version=11.0.1+1
javafx.runtime.build=1
- Scene Builder 11
Use
gluon. XML handwriting is hard: older_man_tone1: Since the RC version forJava 11was released, I will use this. https://gluonhq.com/products/scene-builder/
Version 11.0.0
- IDE ʻEclipse` is used. https://www.eclipse.org/downloads/
Eclipse IDE for Java Developers
Version: 2018-09 (4.9.0)
Build id: 20180917-1800
- Also include the Eclipse plug-in. It's easy because it creates a template for JavaFX projects. Chin: ok_woman_tone1:
e(fx)clipse 3.4.1
3. I made it
1. JavaFX project creation
Create a JavaFX project in ʻEclipse`.
Click here for the procedure (: beach_umbrella: Press to open / close the procedure: beach_umbrella :)
・ Procedure 1. Project selection
`File` → `New Project...`

`Java FX Project` → **Next >**

・ Procedure 2. Enter the project name

Project name:`application` → **Next >**
・ Step 3. Java settings
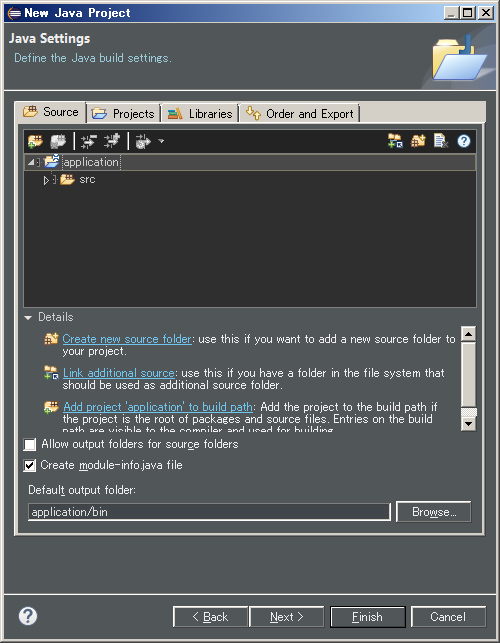
Sonomama ** Next> **
・ Procedure 4. JavaFX setting

Enter the following ** Finish **
Project settings
Set value
Application type
Desktop
Package Name
jp.skytikcet
Declarative UI
-
├Language
FXML
├Root-Type
javafx.scene.layout.AnchorPane
├File Name
Skyticket
└Controller Name
SkyticketController
・ Procedure 2. Enter the project name  Project name:`application` → **Next >**
・ Step 3. Java settings  Sonomama ** Next> **
・ Procedure 4. JavaFX setting 
Enter the following ** Finish **
| Project settings | Set value |
|---|---|
| Application type | Desktop |
| Package Name | jp.skytikcet |
| Declarative UI | - |
| ├Language | FXML |
| ├Root-Type | javafx.scene.layout.AnchorPane |
| ├File Name | Skyticket |
| └Controller Name | SkyticketController |
-Configuration of directories and files after creating a JavaFX project
application
│  .classpath
│  .project
│  build.fxbuild
│
├─.settings
│      org.eclipse.jdt.core.prefs
│
├─bin
│  └─jp
│      └─skyticket
│              Main.class
│              SkyticketController.class
│              Skyticket.fxml
│              application.css
│
└─src
    └─jp
        └─skyticket
                Main.java
                SkyticketController.java
                Skyticket.fxml
                application.css
2. FXML modification
We will modify the layout of Skyticket.fxml using Scene Builder (GUI).
Also set fx: id (corresponding to fields) and ʻOn Action` (corresponding to methods) to operate with the controller.
↓ The layout structure we are aiming for is like this.

Click here for the procedure (: beach_umbrella: Press to open / close the procedure: beach_umbrella :)
・ Procedure 1. Start Screen Builder
Select Skyticket.fxml and right-click to launch ScreenBuilder with ʻOpen with ScreenBuilder. (If ScreenBuilder does not start, it will work by setting the path from Window → Preferences→JavaFX` to" SceneBuilder.exe ".)

The default is this.

・ Step 2. Anchor Pane layout
First from ʻAnchor Pane`. Set the width and height.
By default, the minimum region (USE_COMPUTED_SIZE) is set, so rewrite it.
I set the size like a smartphone.

And fx: id. Set the id to access the component on the controller side.
(If you do not operate the component from the controller, no setting is required.)

- The association between FXML and controller
fx: controller is already set by default.
・ Step 3.webView layout
Then webView
Place by dragging and dropping from Controls on the left.

Give the width and height for WebView as well and set fx: id.

・ Step 4. button layout
Similarly, place it by dragging and dropping from the Controls on the left.

Give width and height as well and set fx: id.

In addition, set the event handler (method name) when the button is pressed in ʻOn Action`.
Set the remaining buttons in the same way. (Miscellaneous: older_man_tone1:
・ Final layout

Select Skyticket.fxml and right-click to launch ScreenBuilder with ʻOpen with ScreenBuilder. (If ScreenBuilder does not start, it will work by setting the path from Window → Preferences→JavaFX` to" SceneBuilder.exe ".)
The default is this.
・ Step 2. Anchor Pane layout
First from ʻAnchor Pane`. Set the width and height.
By default, the minimum region (USE_COMPUTED_SIZE) is set, so rewrite it.
I set the size like a smartphone.
And fx: id. Set the id to access the component on the controller side.
(If you do not operate the component from the controller, no setting is required.)
- The association between FXML and controller
fx: controlleris already set by default.
・ Step 3.webView layout
Then webView
Place by dragging and dropping from Controls on the left.
Give the width and height for WebView as well and set fx: id.
・ Step 4. button layout Similarly, place it by dragging and dropping from the Controls on the left. 
Give width and height as well and set fx: id.
In addition, set the event handler (method name) when the button is pressed in ʻOn Action`.
Set the remaining buttons in the same way. (Miscellaneous: older_man_tone1:
・ Final layout
· Final FXML
Skyticket.fxml
<?xml version="1.0" encoding="UTF-8"?>
<?import javafx.scene.layout.AnchorPane?>
<?import javafx.scene.control.Button?>
<?import javafx.scene.web.WebView?>

<AnchorPane fx:id="ap" maxHeight="-Infinity" maxWidth="-Infinity" minHeight="-Infinity" minWidth="-Infinity" prefHeight="812.0" prefWidth="375.0" xmlns="http://javafx.com/javafx/10.0.1" xmlns:fx="http://javafx.com/fxml/1" fx:controller="jp.skyticket.SkyticketController">
   <children>
      <WebView fx:id="webView" layoutX="0" layoutY="34.0" prefHeight="802.0" prefWidth="365.0" AnchorPane.bottomAnchor="5.0" AnchorPane.leftAnchor="5.0" AnchorPane.rightAnchor="5.0" AnchorPane.topAnchor="5.0" />
      <Button text="Reservation" fx:id="btnToppage" onAction="#toppage" layoutX="0" layoutY="712.0" prefHeight="100.0" prefWidth="125.0" mnemonicParsing="false" />
      <Button text="My page" fx:id="btnMypage" onAction="#mypage" layoutX="125.0" layoutY="712.0" prefHeight="100.0" prefWidth="125.0" mnemonicParsing="false"  />
      <Button text="Don't push" fx:id="btnSetting" onAction="#setting" layoutX="250.0" layoutY="712.0" prefHeight="100.0" prefWidth="125.0" mnemonicParsing="false"  />
   </children>
</AnchorPane>
This is the layout creation.
3. CSS fix
Then modify the CSS.
application.css
/*Normal style*/
.button {
  -fx-border-color: white;
  -fx-background-color: #0896ff;
}
/*Christmas style*/
.button.christmas {
  -fx-background-color: #b79e00;
  -fx-font-family: 'Fuuji'
}
Also, create a new skyticket.css for decoration of the webview.
4. Main and controller class modifications
Then modify the Java files (mainly the controller).
First of all, the main class. It's a JavaFX entry point. I just left the defaults and just resized the scene and set the title.
Main.java
package jp.skyticket;

import javafx.application.Application;
import javafx.stage.Stage;
import javafx.scene.Scene;
import javafx.scene.layout.AnchorPane;
import javafx.fxml.FXMLLoader;


public class Main extends Application {
    @Override
    public void start(Stage primaryStage) {
        try {
        	AnchorPane root = FXMLLoader.load(getClass().getResource("Skyticket.fxml"));
            Scene scene = new Scene(root, 375, 812); //Fix size
            scene.getStylesheets().add(getClass().getResource("application.css").toExternalForm());
            primaryStage.setTitle("Merry Christmas!!"); //Added title settings
            primaryStage.setScene(scene);
            primaryStage.show();
        } catch(Exception e) {
            e.printStackTrace();
        }
    }

    public static void main(String[] args) {
        launch(args);
    }
}
Then the controller class. Describe fields (screen components) and methods (events). By adding @FXML </ font> annotation, it is related to FXML and can be operated on the controller side. (But I wonder if the controller source can be automatically generated from FXML: santa_tone2:
SkyticketController.java
package jp.skyticket;

import javafx.event.ActionEvent;
import javafx.fxml.FXML;
import javafx.scene.control.Button;
import javafx.scene.layout.AnchorPane;
import javafx.scene.web.WebEngine;
import javafx.scene.web.WebView;

public class SkyticketController  {
        //Screen components
        @FXML private AnchorPane ap;
        @FXML private WebView webView;
        @FXML private Button btnMypage;
        @FXML private Button btnToppage;
        @FXML private Button btnSetting;

        private WebEngine webEngine;

        /**
         *Initialization
         *-Set the UA and draw the top screen.
         *
         * @param event
         */
	    @FXML
	    private void initialize() {
	    	this.webEngine = this.webView.getEngine();
	    	//I want to display the page for smartphones, so UA settings
	    	this.webEngine.setUserAgent("Mozilla/5.0 (iPhone; CPU iPhone OS 11_0 like Mac OS X) AppleWebKit/603.1.30 (KHTML, like Gecko) CriOS/61.0.3163.73 Mobile/15A372 Safari/602.1");
	    	this.webEngine.load("https://skyticket.jp");
	    }
        /**
         *Event handler when btnMypage is pressed
         *-Draw my page.
         *
         * @param event
         */
	    @FXML
	    private void mypage(ActionEvent event) {
	    	this.webEngine.load("https://skyticket.jp/user/");
	    }
        /**
         *Event handler when btnToppage is pressed
         *-Draw the top screen.
         *
         * @param event
         */
	    @FXML
	    private void toppage(ActionEvent event) {
	    	this.webEngine.load("https://skyticket.jp");
	    }
        /**
         *Event handler when btnSetting is pressed
         *-Add a decoration class to the button.
         *-Apply CSS for Christmas.
         *-Draw the top screen.
         *
         * @param event
         */
	    @FXML
	    private void setting(ActionEvent event) {
	    	//Set a class for Christmas decoration style on various buttons
	    	this.btnMypage.getStyleClass().add("christmas");
	    	this.btnToppage.getStyleClass().add("christmas");
	    	this.btnSetting.getStyleClass().add("christmas");

	    	//webview Christmas CSS application
	    	this.webEngine.setUserStyleSheetLocation(getClass().getResource("skyticket.css").toString());

	    	this.webEngine.load("https://skyticket.jp");
	    }
}
This completes the creation.
4. I tried to move
First of all, the initial display.
The webview is working normally.

The bottom buttons " Yoyaku " button and " My Page " button are also nice.
You can also apply for tickets normally: airplane:

Finally, the " Don't press " button

At all ...
Don't push ... With Santa
Oyakusoku At all ...
: no_good: Don't push it here at all: no_good_tone3:
:christmas_tree::christmas_tree::christmas_tree:Merry Christmas:christmas_tree::christmas_tree::christmas_tree:

The actor who appears is Adven's Harutan, Director Haruki.
Ossan's Love: heart_eyes :: heart_eyes :: heart_eyes:
Then everyone, have a nice Christmas ~: christus_tree :: santa_tone2 :: christus_tree:
that's all!
The actor who appears is Adven's Harutan, Director Haruki.
Ossan's Love: heart_eyes :: heart_eyes :: heart_eyes:
Then everyone, have a nice Christmas ~: christus_tree :: santa_tone2 :: christus_tree:
that's all!
Recommended Posts