<For super beginners> Why don't you make a chatbot using "Talk API"? ?? [Ruby on Rails]
◆ Target audience of this article
☆ Beginners who started learning Rails on Rails
☆ Those who want to create a LINE BOT in hands-on format
☆ Those who have been frustrated by WEB system development (* Frustration on the front end side)
◆ Introduction Hello! As the title suggests, we have developed a chatbot, so we describe the process. It's connected to the process of posting this article, but in the old days, I was motivated to go around Progate and proceed with WEB development at once. However, it is frustrated as if it was inevitable. The cause was " I can't reach the front end side ". For the purpose of learning the back-end programming language, I felt like learning the basics of Ruby and Rails and trying to make something to deepen my understanding, but it was difficult to create a new wall called "front-end". is. I tried to use Bootstrap to cut corners as much as possible, but I can't stand it, I'm a generous generation. I was frustrated once, changed my mind and tried again, but I experienced the second frustration ... At that time, I noticed LINE BOT .
I thought, "The development of LINE BOT does not need to be aware of the front end, and the fact that you can check the results immediately with the LINE app is perfect for me who wants to feel like doing something!"
This article specializes in " Anyone can create deliverables by doing the same work in the same environment as this article! </ B>". Therefore, the explanation of the technical content is thin. (I'm a beginner in the first place, so I can't explain in detail.)
I would like this article to be read by those who have been frustrated by web development due to the front end being a neck. Would you like to make a chatbot together? ??
◆ Prerequisites
The article is created on the assumption that it is described below. ・ Being able to register with AWS (credit card information registration is required) * I was using Cloud9, so I made it a prerequisite. It's okay to use the development environment locally, but we recommend using Cloud9 because we don't want beginners to suffer from environmental error errors.
◆ Work procedure
◇ Register with LINE Developers and create a channel for LINE BOT
① Register with LINE Developers and create a channel
I will omit the explanation here. You can jump to the official website page from the URL listed below. Please work while checking this. The name of the channel doesn't matter, but it's the name you see when you register as a friend. If you are not particular about it, you can use "Chatbot-kun". ..
https://developers.line.biz/ja/docs/messaging-api/getting-started/#using-console
① Register with LINE Developers and create a channel I will omit the explanation here. You can jump to the official website page from the URL listed below. Please work while checking this. The name of the channel doesn't matter, but it's the name you see when you register as a friend. If you are not particular about it, you can use "Chatbot-kun". .. https://developers.line.biz/ja/docs/messaging-api/getting-started/#using-console
I think that the channel creation is completed by this point, so I will continue to change the channel settings.
② Channel access token (long-term) issuance
Please issue an access token through the button in the red frame.
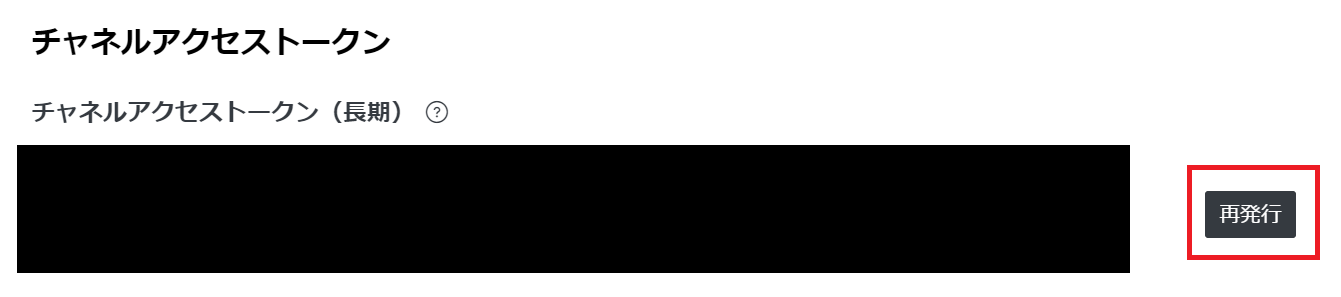
What is a channel access token? ?? If it is, please check the following page.
https://developers.line.biz/ja/docs/messaging-api/channel-access-tokens/
In other words, in summary, it is " Information for calling the API from the app ".
③ Change response settings
Next, we will change the response settings. Please change the settings as shown in the image without thinking about anything for the time being.

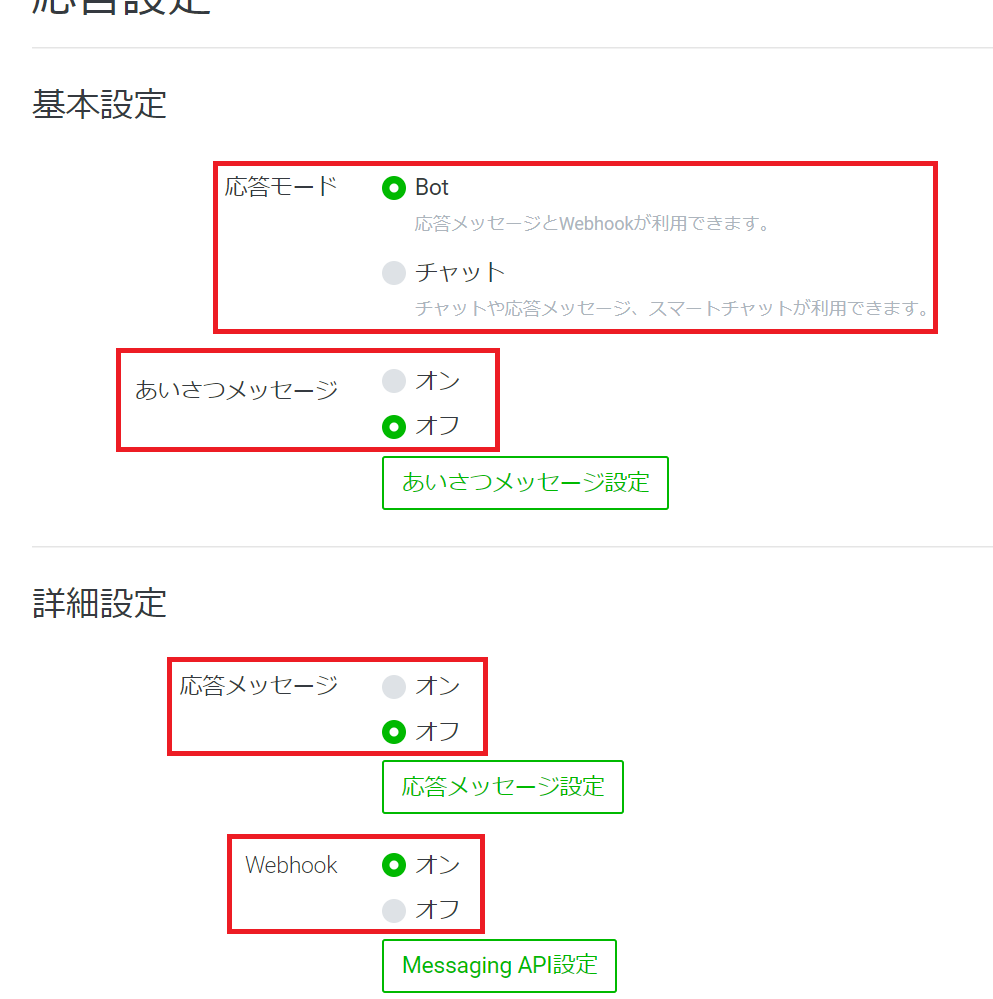
What is a webhook? ?? If you are curious, please read this article. You can teach me so carefully that it is not an exaggeration to say that even a child can understand it.
https://kintone-blog.cybozu.co.jp/developer/000283.html
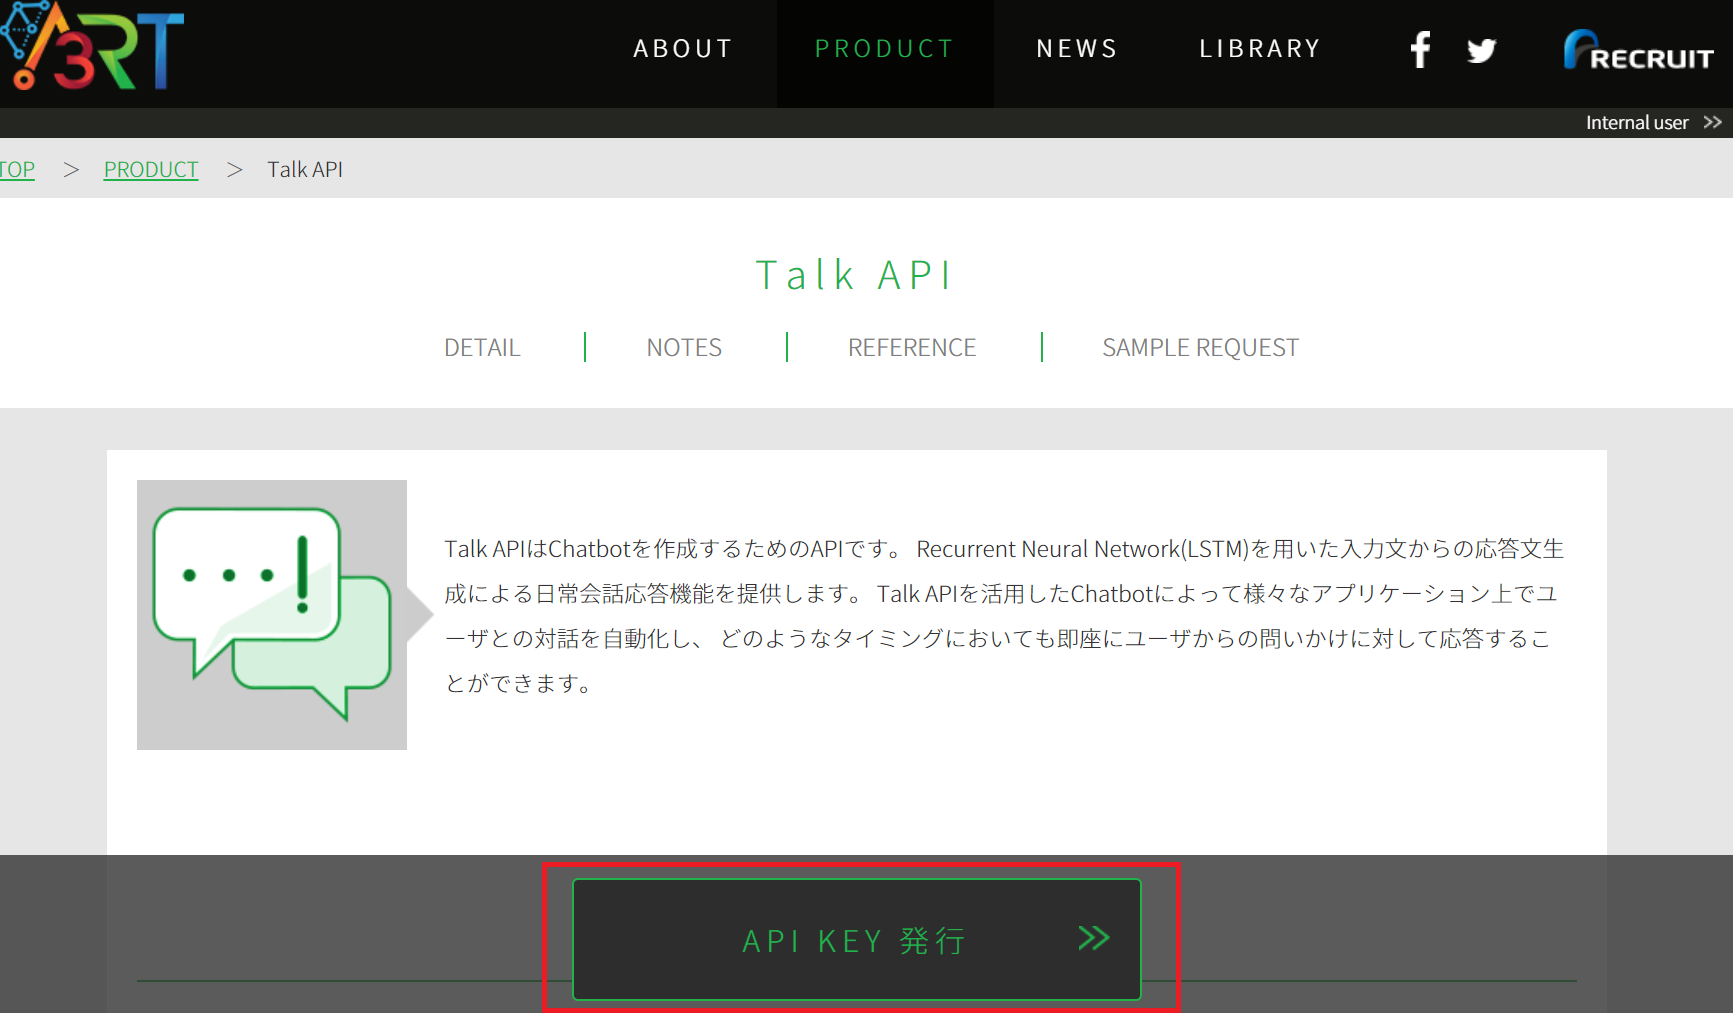
◇ Get the API key for "Talk API"
As the title suggests, we are developing a chatbot using an API called "Talk API" developed by Recruit Technologies Co., Ltd. I could have returned the parrot or the questionnaire BOT, but I would like to use the API! !! I made it a chatbot from my own perspective as a beginner.
① Access the official website and issue an API key
To use the API, you need an API key. This time, you can get the key just by registering your e-mail address.
I think you can get it from the official website below without any clogging, so please try it.
https://a3rt.recruit-tech.co.jp/product/talkAPI/
Building a development environment
① Create an AWS account
This is also summarized on the official website, so please check here for details and work.
https://aws.amazon.com/jp/register-flow/
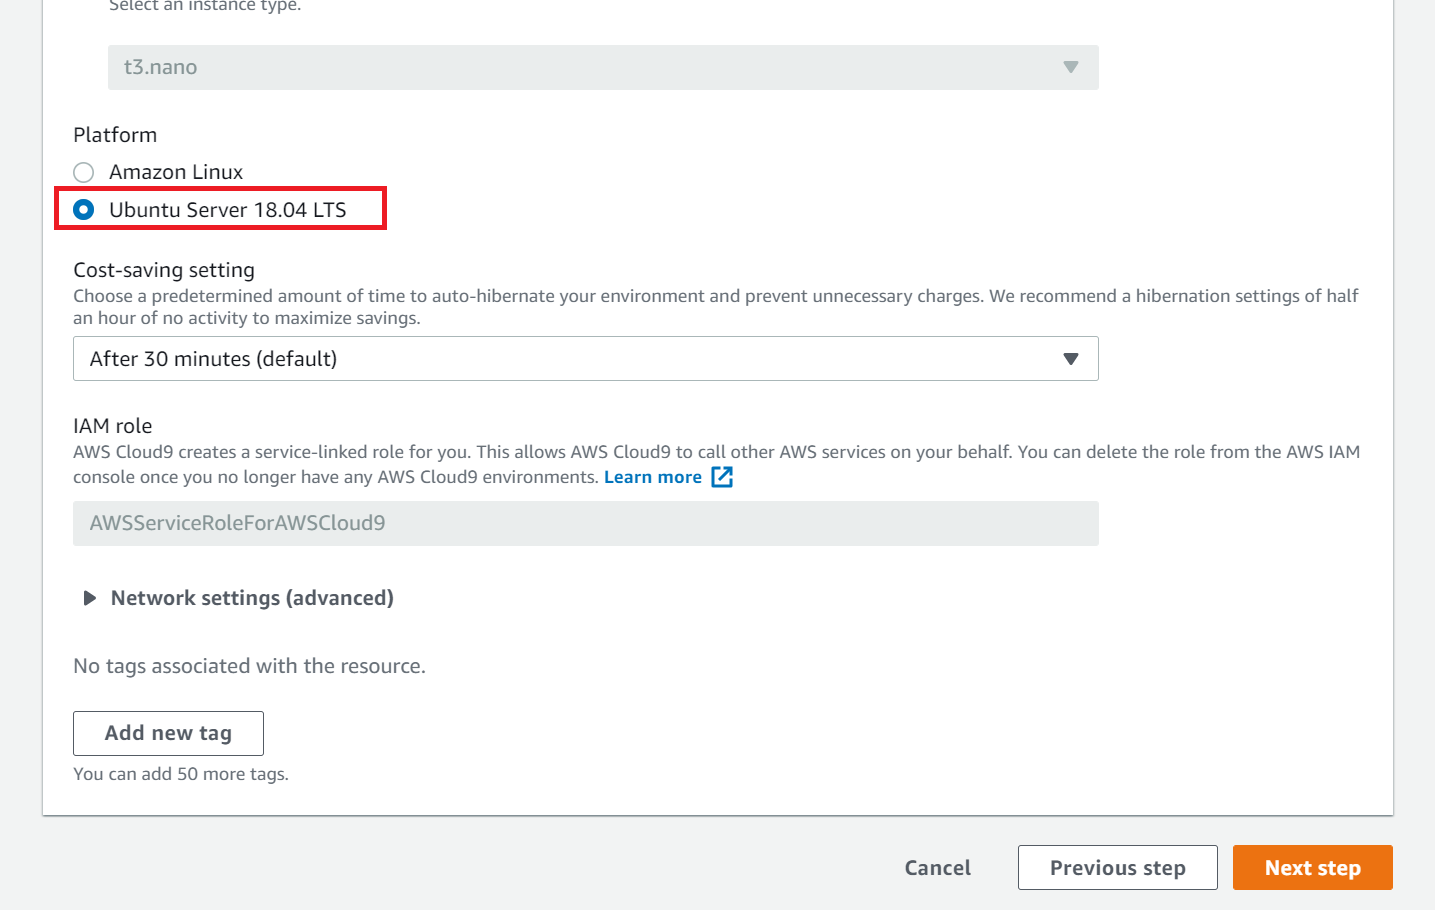
② Create a development environment with Cloud9
Basically, the default is fine, but please change only the platform to " Ubuntu Server 18.04 LTS ".
◇ Get the API key for "Talk API"
As the title suggests, we are developing a chatbot using an API called "Talk API" developed by Recruit Technologies Co., Ltd. I could have returned the parrot or the questionnaire BOT, but I would like to use the API! !! I made it a chatbot from my own perspective as a beginner.
① Access the official website and issue an API key
To use the API, you need an API key. This time, you can get the key just by registering your e-mail address.
I think you can get it from the official website below without any clogging, so please try it.
https://a3rt.recruit-tech.co.jp/product/talkAPI/

Building a development environment
① Create an AWS account
This is also summarized on the official website, so please check here for details and work.
https://aws.amazon.com/jp/register-flow/
② Create a development environment with Cloud9
Basically, the default is fine, but please change only the platform to " Ubuntu Server 18.04 LTS ".

② Create a development environment with Cloud9 Basically, the default is fine, but please change only the platform to " Ubuntu Server 18.04 LTS ". 
From now on, we'll modify the code to implement the chatbot. Please proceed using the development environment created here.
◇ Chatbot development
①Installation of packages for PostgreSQL
This time, we will use PostgreSQL as the database to deploy to Heroku, which can be used for free. Execute the following command.
bash
sudo apt install libpq-dev
② Create a new Rails project
Create a project by specifying the database to be installed with the following command.
bash
rails new <Project name> -d postgresql
③ Create a controller for LINE BOT
Move to the project hierarchy created in step "②" and execute the following command.
bash
rails generate controller linebot
④ Modify Gemfile
Add the following to the end of the Gemfile and run "bundle install".
Gemfile
gem 'line-bot-api'
gem 'dotenv-rails'
bash
bundle install
⑤ Routing settings
Please copy and paste the following contents to the target file.
config/routes.rb
Rails.application.routes.draw do
  post '/callback' => 'linebot#callback'
end
bash
sudo apt install libpq-dev
② Create a new Rails project
Create a project by specifying the database to be installed with the following command.
bash
rails new <Project name> -d postgresql
③ Create a controller for LINE BOT
Move to the project hierarchy created in step "②" and execute the following command.
bash
rails generate controller linebot
④ Modify Gemfile
Add the following to the end of the Gemfile and run "bundle install".
Gemfile
gem 'line-bot-api'
gem 'dotenv-rails'
bash
bundle install
⑤ Routing settings
Please copy and paste the following contents to the target file.
config/routes.rb
Rails.application.routes.draw do
post '/callback' => 'linebot#callback'
end
bash
rails new <Project name> -d postgresql
bash
rails generate controller linebot
④ Modify Gemfile
Add the following to the end of the Gemfile and run "bundle install".
Gemfile
gem 'line-bot-api'
gem 'dotenv-rails'
bash
bundle install
⑤ Routing settings
Please copy and paste the following contents to the target file.
config/routes.rb
Rails.application.routes.draw do
post '/callback' => 'linebot#callback'
end
Gemfile
gem 'line-bot-api'
gem 'dotenv-rails'
bash
bundle install
config/routes.rb
Rails.application.routes.draw do
post '/callback' => 'linebot#callback'
end
⑥ Controller setting Please copy and paste the following contents to the target file.
app/controllers/linebot_controller.rb
class LinebotController < ApplicationController
  require 'line/bot'

  protect_from_forgery except: [:callback]

  def client
    @client ||= Line::Bot::Client.new do |config|
      config.channel_secret = ENV['LINE_CHANNEL_SECRET']
      config.channel_token = ENV['LINE_CHANNEL_TOKEN']
    end
  end

  def callback
    body = request.body.read

    signature = request.env['HTTP_X_LINE_SIGNATURE']
    head :bad_request unless client.validate_signature(body, signature)

    events = client.parse_events_from(body)

    events.each do |event|
      case event
      when Line::Bot::Event::Message
        case event.type
        when Line::Bot::Event::MessageType::Text
          require 'net/http'
          require 'uri'
          require 'json'

          key = ENV['TALK_API_KEY']
          uri = 'https://api.a3rt.recruit-tech.co.jp/talk/v1/smalltalk'

          params = { apikey: key, query: event.message['text'] }
          uri = URI.parse(uri)
          response = Net::HTTP.post_form(uri, params)

          data = JSON.parse(response.body)

          message = {
            type: 'text',
            text: data['results'][0]['reply']
          }
          client.reply_message(event['replyToken'], message)
        end
      end
    end

    head :ok
  end
end
◇ Set up Git
① Confirmation of installation status
Execute the following command to check the installation status of Git. If it is not installed, please install it.
bash
git --version
② Add Git settings
Execute the following command to add Git settings.
bash
git config --global user.name "User name"
git config --global user.email "mail address"
git init
◇ Create an app on Heroku
⓪ Create a Heroku account
This time, we will deploy the created application to Heroku. First of all, please create an account from the following site.
https://id.heroku.com/login
① Install Heroku
Check the installation status with the following command.
bash
heroku --version
bash
git config --global user.name "User name"
git config --global user.email "mail address"
git init
⓪ Create a Heroku account
This time, we will deploy the created application to Heroku. First of all, please create an account from the following site.
https://id.heroku.com/login
① Install Heroku
Check the installation status with the following command.
bash
heroku --version
bash
heroku --version
If it is not installed, execute the following command and check the installation status again.
bash
curl https://cli-assets.heroku.com/install-ubuntu.sh | sh
② Log in to Heroku
Execute the following command to log in. You'll be asked for your email address and password when you registered with Heroku, so enter them.
bash
heroku login --interactive
③ App creation
Execute the following command to create an app. If the application name is omitted, it will be created with a random name.
bash
heroku create <Application name>
- Please make a note of the URL of the app as it will be created here.
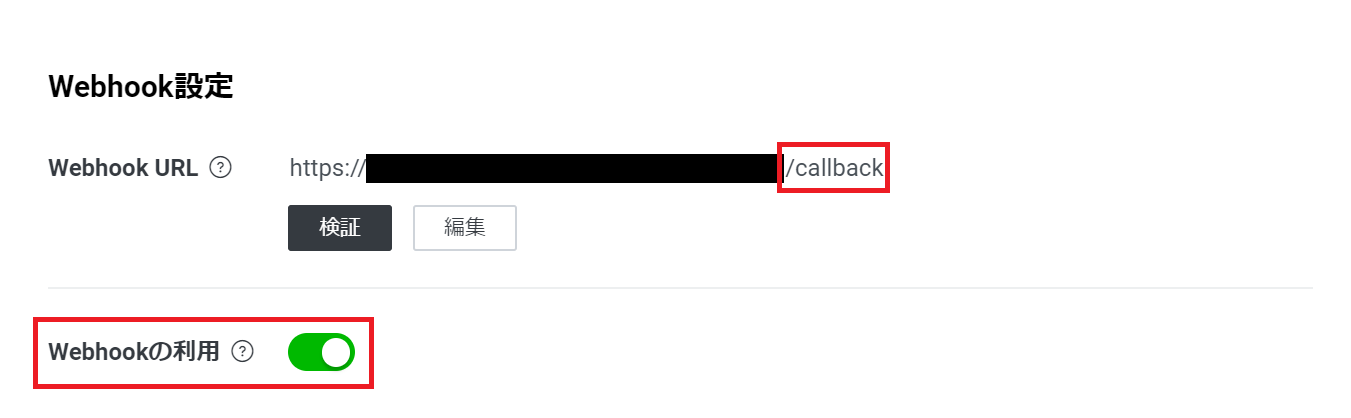
◇ Add app information to channel settings
① Add the URL you wrote down earlier to the channel settings
② Add / callback to the end of the URL to call the callback action
◇ Deploy to Heroku
① Add environment variables
Execute the following command to add environment variables.
bash
heroku config:set LINE_CHANNEL_SECRET=Channel Secret that can be confirmed on the channel setting screen
heroku config:set LINE_CHANNEL_TOKEN=Access token that can be confirmed on the channel setting screen
heroku config:set TALK_API_KEY=Key obtained by applying for Talk API
② Deploy to Heroku
Execute the following command to deploy to Heroku.
bash
git add .
git commit -m "linebot"
git push heroku master
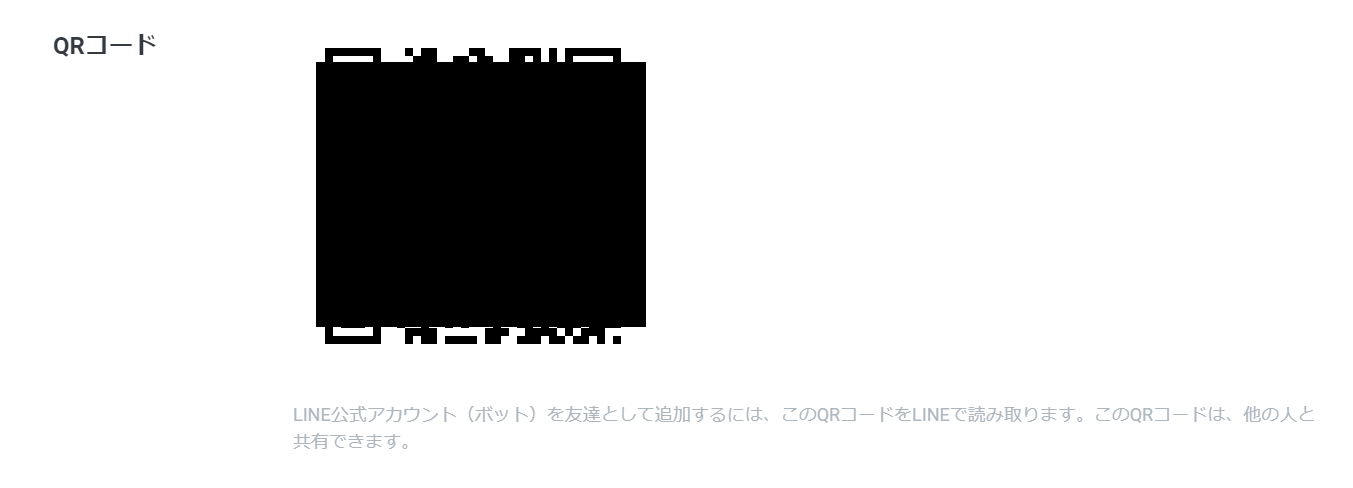
◇ Let's check the operation
① Add friend
Add a chatbot created from the QR code as a friend.
bash
heroku login --interactive
bash
heroku create <Application name>
- Please make a note of the URL of the app as it will be created here.
◇ Add app information to channel settings
① Add the URL you wrote down earlier to the channel settings
② Add / callback to the end of the URL to call the callback action

◇ Deploy to Heroku
① Add environment variables
Execute the following command to add environment variables.
bash
heroku config:set LINE_CHANNEL_SECRET=Channel Secret that can be confirmed on the channel setting screen
heroku config:set LINE_CHANNEL_TOKEN=Access token that can be confirmed on the channel setting screen
heroku config:set TALK_API_KEY=Key obtained by applying for Talk API
② Deploy to Heroku
Execute the following command to deploy to Heroku.
bash
git add .
git commit -m "linebot"
git push heroku master
◇ Let's check the operation
① Add friend
Add a chatbot created from the QR code as a friend.

bash
heroku config:set LINE_CHANNEL_SECRET=Channel Secret that can be confirmed on the channel setting screen
heroku config:set LINE_CHANNEL_TOKEN=Access token that can be confirmed on the channel setting screen
heroku config:set TALK_API_KEY=Key obtained by applying for Talk API
bash
git add .
git commit -m "linebot"
git push heroku master
◇ Let's check the operation ① Add friend Add a chatbot created from the QR code as a friend. 
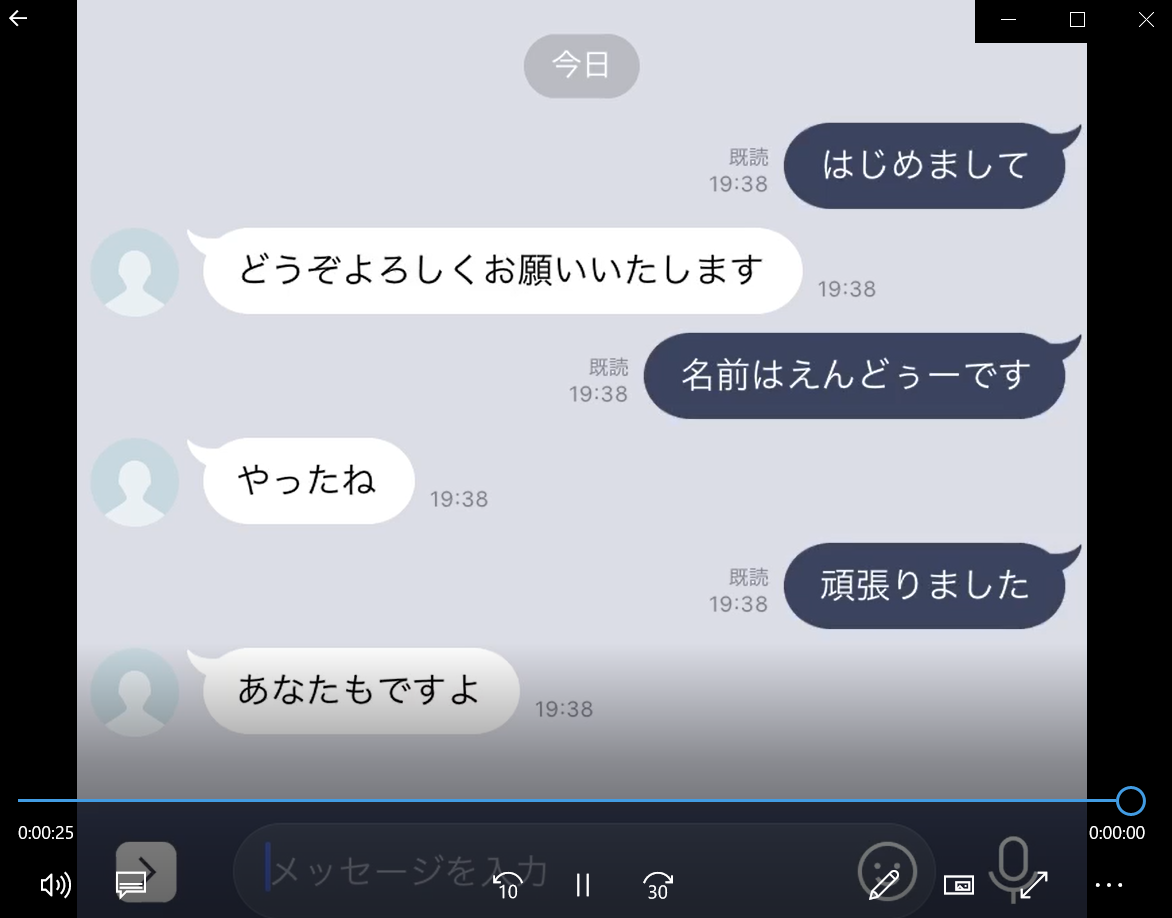
② Operation check
If you get a reply in response to the message as below, you are successful! !!
◆ Referenced articles Here are some articles and materials that were very useful information when I was creating LINE BOT.
□ [Rails] Let's easily develop LINE bots in about an hour-Questionnaire tabulation Bot basics-[With images] https://qiita.com/noriya1217/items/00d6461e9f54900377a3 □ LINE Messaging API SDK repository (Ruby) https://github.com/line/line-bot-sdk-ruby □ Implement Ruby HTTP request as simple as possible https://qiita.com/takano-h/items/dd10818eb7e09161bc29
Finally
Thank you for watching until the end. I would appreciate it if you could point out any points of concern in the comments.
Recommended Posts
Recommended Posts