Set up Softether Server on GCP (Connect from iPhone / Raspberry Pi) (NAT traversal Wake on LAN [2])
Introduction
This is a continuation of Last time. This is what I want to do for the time being.

This time, "Set up Softether Server on GCP (connect from iPhone / Raspberry Pi)".
-[1] Obtain a domain using GCP and MyDNS -[2] Set up Softether Server on GCP (Connect from iPhone / Raspberry Pi) -[3] Reverse proxy from Apache on GCP to local Raspberry Apache -[4] Make Raspberry Pi a router -[5] Create a Python script for Wake on LAN.
Softether Client
Install Softether Client on GCP
First, install Softether Client. (* Maybe it is not necessary.) SSH to GCP and install the required modules.
sudo apt update
sudo apt-get install -y gcc make wget tzdata git libreadline-dev libncurses-dev libssl-dev bridge-utils
Acquires CPU information for the CPU specified by Softher.
$ lscpu
Architecture:        x86_64 <<< bit info
CPU op-mode(s):      32-bit, 64-bit <<< which bit cpu can handle
Byte Order:          Little Endian
CPU(s):              1
On-line CPU(s) list: 0
Thread(s) per core:  1
Core(s) per socket:  1
Socket(s):           1
NUMA node(s):        1
Vendor ID:           GenuineIntel
CPU family:          6
Model:               79
Model name:          Intel(R) Xeon(R) CPU @ 2.20GHz
Stepping:            0
CPU MHz:             2200.000
Based on the above information, get the URL for downloading Client from Official Site.
# Download and Install
mkdir tmp
cd /tmp
wget https://github.com/SoftEtherVPN/SoftEtherVPN_Stable/releases/download/v4.34-9745-beta/~~~~.tar.gz
tar -xvf ~~~.tar.gz
cd vpnclient
make # >> Enter 1

# move to usr/local
cd ../
sudo mv vpnclient/ /usr/local/

# set permission
cd /usr/local/vpnclient/
sudo chmod 600 *
sudo chmod 700 vpncmd vpnclient
Create a service so that Softether Client will start when you restart.
sudo vi /etc/systemd/system/vpnclient.service
/etc/systemd/system/vpnclient.service
[Unit]
Description=SoftEther VPN Client
After=network.target network-online.target

[Service]
ExecStart=/usr/local/vpnclient/vpnclient start
ExecStop=/usr/local/vpnclient/vpnclient stop
Type=forking
RestartSec=3s

[Install]
WantedBy=multi-user.target
Enable the service you just created.
sudo systemctl daemon-reload
sudo systemctl start vpnclient
sudo systemctl enable vpnclient
Softether Server
Set up Softether Server on GCP
As with Client, get the URL for downloading Server from Official Site. * Install both Client and Server on GCP.
# Download and Install
mkdir tmp
cd /tmp
wget https://github.com/SoftEtherVPN/SoftEtherVPN_Stable/releases/download/v4.34-9745-beta/~~~~.tar.gz #Paste the obtained URL here
tar -xvf ~~~.tar.gz
cd vpnserver
make # >> Enter 1

# move to usr/local
cd ../
sudo mv vpnserver/ /usr/local/

# set permission
cd /usr/local/vpnserver/
sudo chmod 600 *
sudo chmod 700 vpncmd vpnserver
Create a service so that Softether server will start when you restart.
sudo vi /etc/systemd/system/vpnserver.service
/etc/systemd/system/vpnserver.service
[Unit]
Description=SoftEther VPN Server
After=network.target network-online.target

[Service]
ExecStart=/usr/local/vpnserver/vpnserver start
ExecStop=/usr/local/vpnserver/vpnserver stop
Type=forking
RestartSec=3s

[Install]
WantedBy=multi-user.target
Enable the service you just created.
# read service
sudo systemctl daemon-reload

# enable and start
sudo systemctl enable vpnserver.service
sudo systemctl start vpnserver.service
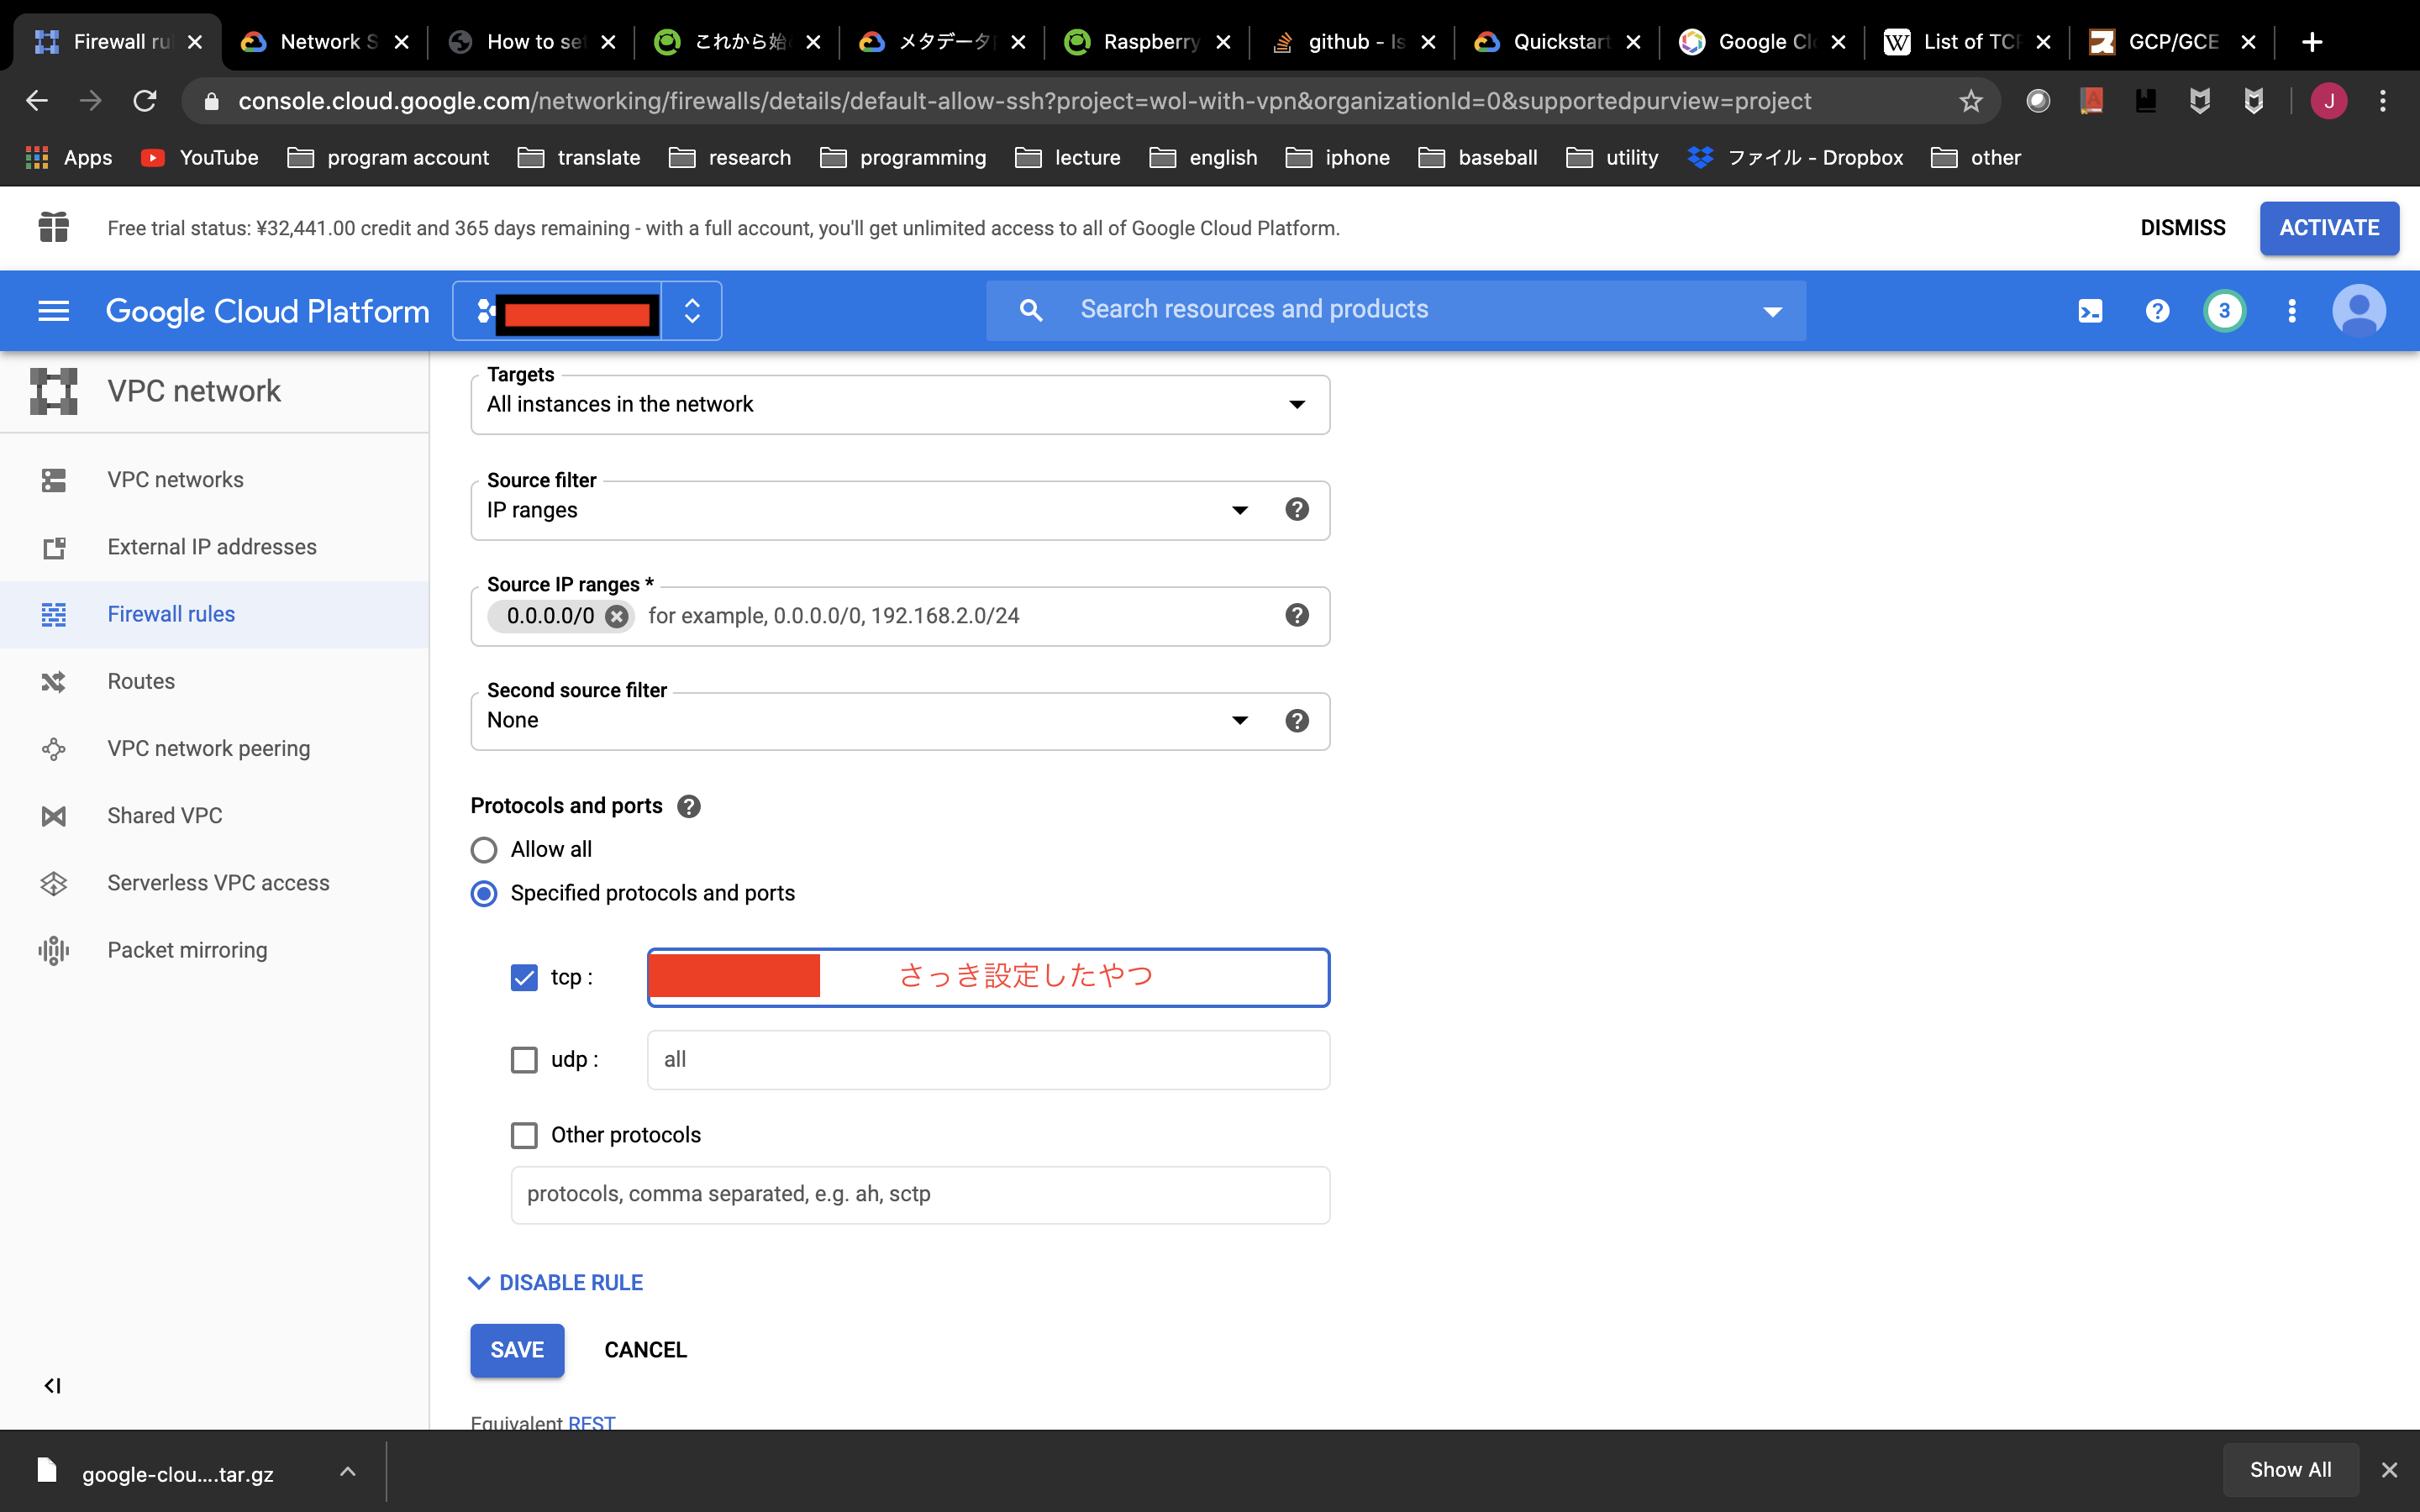
Release the port for server
You need to open the GCP port (TCP992,1194,5555, UDP500,4500,1701) for VPN connection.
The procedure is [Procedure to open the port for SSH](https://qiita.com/jjjkkkjjj/items/d0370573fcb04deeb91f#ssh%E7%94%A8%E3%81%AE%E3%83%95%E3%82% A1% E3% 82% A4% E3% 82% A2% E3% 82% A6% E3% 82% A9% E3% 83% BC% E3% 83% AB% E3% 81% AE% E8% A8% AD% Same as E5% AE% 9A).

Enter "TCP 992, 1194,5555" and "UDP500, 4500, 1701 (for iPhone L2TP)" in the "the one you set earlier" in the image and save.
Make detailed settings for softether server
For Windows or Mac, GUI tools are distributed from Official Site, so install them.
The installation is complete and it will run. Create a new host from the initial screen> New Setting. Enter the domain obtained by DDNS for the host name. The password at this time can be empty.

Select OK and click the created host. You will be asked to set a password, so set it.

Create a virtual hub.

Since DDNS has already been set, the blue circles can be texto. (I will disable it later.)

VPN Azure is not used.

Select Create User to create the user.

Set the user name and password.

Next, disable DDNS.

Output the configuration file, edit the file from false to true as shown below, and save it.

You can read the file you edited earlier and apply it.
⚠️ ** Also, I want to use port 443 for the Apache server, so stop 443 from the Listener List. ** **

Secure NAT settings
Assign your favorite private address from Manage Virtual Hub> Virtual NAT and Virtual DHCP Server (Secure NAT)> Secure NAT Configuration.
This time, I want to configure the configuration as shown above, so I will build a network of 192.168.0.0/24.

Connect to Server from Client
Client settings
Since there is no GUI tool in Client, it is operated by command.
cd /usr/local/vpnclient/
./vpncmd
Create a virtual NIC. This time, we will name it vpn_nic.
NicCreate {name}
Create an account. This time, let's call it test.
AccountCreate test
> host and port: {ip address or host name}:{port number} #Last acquired domain: Port number is 992, 1194 or 5555
> virtual hub name: {server's hub name} #Hub name set in Server Manager
> username: {username} #Username set in Server Manager
> LAN card name: vpn_nic #The one I just created

AccountPassword test (Name created by AccountCreate)
> Password: *****
> standard or radius: standard

AccountConnect test
It is OK if it says that it is already connected below.
# check connection status
AccountList
Also, set to connect automatically when restarting.
AccountStartupSet test
This completes the Client settings.
Routing table settings
Assign an IP address to the virtual NIC created earlier. Probably, even if you type the ʻip a` command, it has not been assigned yet.
sudo vi /etc/sysctl.conf
/etc/sysctl.conf
net.ipv4.ip_forward=1
sudo sysctl -p
sudo dhclient vpn_{name} #This time{name}=vpn_nic
ip a
OK if IP is assigned in
Finally, make DHCP work at startup.
sudo vi /home/{user}/vpn/dhcp.sh
/home/{user}/vpn/dhcp.sh
dhclient vpn_{name}
Connect from iPhone
Although it deviates from the main subject, I will do it for the time being.
First, set up L2TP for iPhone. There is a first screen> IPSec / L2TP Setting, so click it. Then, make it as shown in the screen below.

The ip address part should be the DDNS domain name.

It is OK if you can connect with. 192.168.0.11 is assigned and you can connect properly!

Connect from Raspberry Pi
softether client Basically, Install Softether Client on GCP and Client Settings / 824998a6106eff941347 # client% E3% 81% AE% E8% A8% AD% E5% AE% 9A) Do the same with Rasppie.
IP fixed
It is easier to use Raspberry Pi if you fix the IP (∵GCP → I want to reverse proxy to Raspberry Pi), so fix it.
Add the following to /etc/dhcpcd.conf. The name of the created virtual NIC is entered in {name}.
/etc/dhcpcd.conf
interface {name}
static ip_address=*.*.*.*/~
Reboot and it is OK if ping passes to the host (GCP softether server interface)!
- This time,
pingis sent to192.168.0.10specified in the Secure NAT settings.
sudo reboot
ping 192.168.0.10 # check host's interface
in conclusion
For the time being, it's long, so it ends here.
reference
-Building SoftEther VPN Server on Ubuntu
Recommended Posts