[JAVA] Let's build a NEM node (supernode is possible) Ubuntu 18.04
Introduction
In order to harvest with NEM, it is necessary to connect to the full node of NEM, The capacity is set by the node, and it may not be available easily. So this time I will try to build a NEM node by myself. You can also use this procedure to build a NEM Supernode that will be rewarded on a regular basis.
procedure
Domain preparation
Obtaining a domain
This time it can be an ipv4 address. Get the domain only if you need it.
Server preparation
Preparing the server
Start the Linux server.
This time, I chose "VPS L SSD" from CONTABO in Germany, and "Ubuntu 18.04" as the OS.
You will receive a root / password by email, so please log in with it.
With 8 cores, 30GB of RAM, 800GB of SSD, 600Mbit / s bandwidth, unlimited bandwidth usage, and DDoS protection, I think 15 euros a month is a cheap category for VPS.

Server initialization
Enter with root / password and perform the initial settings.
Time zone, NTP settings
Set the server to Japan time.
timedatectl set-timezone Asia/Tokyo
Set up an NTP server. This time the server is in Germany, so it's better to use a German NTP server.
sed -i 's/#NTP=/NTP=2.de.pool.ntp.org/g' /etc/systemd/timesyncd.conf
Swap file settings
In the case of CONTABO, 2GB swap is already set from the beginning, but if you want to increase it, delete the existing swap file and recreate it.
Clear the current allocation and allocate 10GB.
swapoff /swapfile && sudo rm /swapfile
fallocate -l 10G /swapfile && sudo chmod 600 /swapfile && sudo mkswap /swapfile && sudo swapon /swapfile
Firewall settings
SSH restrictions
The SSH port is vulnerable to attack, so use a firewall to restrict connections. The connection source should be a fixed IP at home or a fixed IP of the bastion server.
ufw allow from xxx.xxx.xxx.xxx to any port 22
It is also effective to change the port number to further restrict connections.
Added Port yyyyy```. (yyyyy is any port number)
In that case, don't forget to set the firewall.
`ufw allow from xxx.xxx.xxx.xxx to any port yyyyy`
##### Port open
This time we need to expose TCP 7778, 7880, 7890 to the outside world.
`ufw allow 7778/tcp`
`ufw allow 7880/tcp`
`ufw allow 7890/tcp`
##### Launch firewall
Start the firewall.
`sudo ufw enable`
#### Ubuntu update
Update Ubuntu to the latest version.
`sudo apt update`
`sudo apt -y dist-upgrade`
#### Creating a user for a node
Create a user called nem.
`adduser nem`
You will be asked for the password twice, so enter it and omit it with the enter key.
Give user nem sudo
`gpasswd -a nem sudo`
#### Java 8 installation
Install Java 8.
`apt install -y openjdk-8-jre`
Version confirmation
`java -version`
#### unzip installation
`apt install unzip`
#### DNS settings
Not required if you do not specify a domain.
### Server settings
#### Change the user to nem.
`su - nem`
#### Download and deploy NIS and servant
Download nis and servant from [NEM Server](http://bob.nem.ninja/).
* As of December 08, 2019, nis-0.6.97 and servant_0_0_4 are the latest versions.
`wget http://bob.nem.ninja/nis-0.6.97.tgz`
`wget http://bob.nem.ninja/servant_0_0_4.zip`
Expand each
`tar xzf nis-0.6.97.tgz`
`unzip -q servant_0_0_4.zip`
Put them together in one folder called nemServer
`mv servant package`
`mv package nemServer`
`chmod -R g-w nemServer`
#### Configuration file settings
Here we use the information from NEM's nano wallet.
Please activate your delegate account in advance.
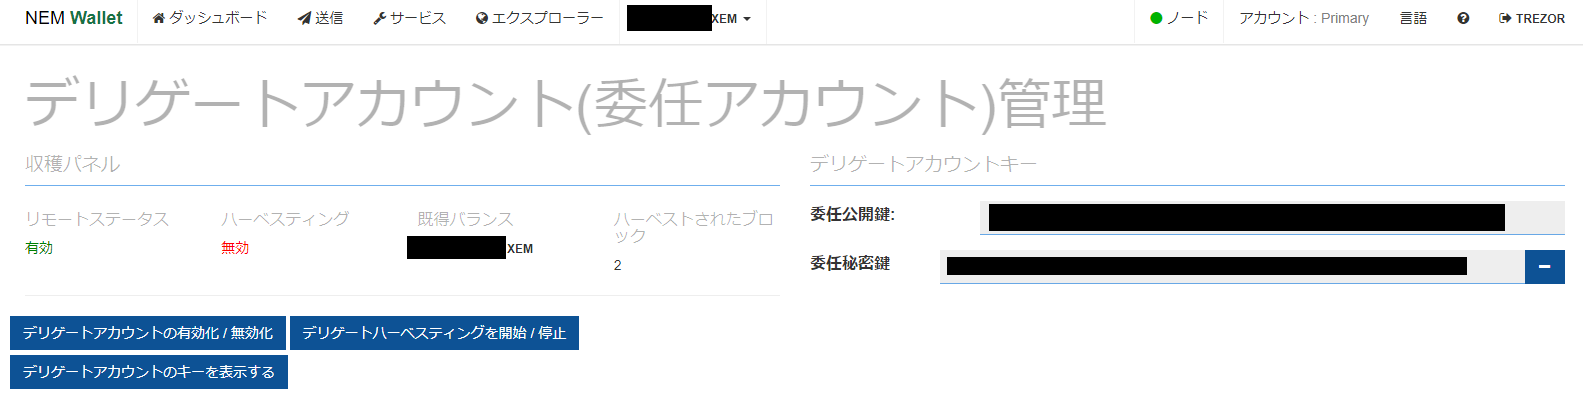
##### NIS server settings
`cd nemServer/nis`
Save the configuration file pack-up just in case
`cp -p config.properties config.properties.org`
`vi config.propaties` around lines 46-47 and around lines 77
#### **`config.propaties`**
```propaties
#nis.bootKey = #0123456789abcdef0123456789abcdef0123456789abcdef0123456789abcdef
#nis.bootName = foobar
↓
nis.bootKey = <Delegated private key>
nis.bootName = <Any name>
nis.unlockedLimit = 4
↓
nis.unlockedLimit = 30
We plan to allocate 3GB of memory to the NIS server, so we are increasing the number of harvest connections to 30.
NIS server startup settings
cd ~/nemServer
vi nix.runNis.sh
Recently, it seems that the minimum standard configuration of the server is 4GB or more, so for the time being, allocate 3GB of memory to the NIS server. We have also added a "G1GC" option for Java 8 optimization.
nix.runNis.sh
#!/bin/bash

cd nis
java -Xms3G -Xmx3G -XX:+UseG1GC -XX:MaxGCPauseMillis=200 -cp ".:./*:../libs/*" org.nem.deploy.CommonStarter
cd -
If you increase the allocated memory, you can further increase the number of harvest connections mentioned above, and the operation will be stable.
Temporary startup of NIS server
cd ~/nemServer
Temporarily start the NIS server
nohup ./nix.runNis.sh < /dev/null &
You can check it with tail -f nohup.out
Exit with Ctrl + C
Servant server settings
cd ~/nemServer/servant
Save the configuration file pack-up just in case
cp -p config.properties config.properties.org
vi config.properties
config.properties.org
nem.host = <put vps ip address here>
↓
nem.host = <Enter the IP or domain name of the server>

servant.key = <put your NIS boot key here>
↓
servant.key = <Delegated private key>
Temporary startup of Servant server
cd ~/nemServer/servant
Give execute permission
chmod u+x startservant.sh
Temporarily start the Servant server
nohup ./startservant.sh < /dev/null &
You can check it with tail -f nohup.out
Exit with Ctrl + C
Stop NIS and Servant servers
sudo pkill -SIGTERM -f org.nem
NIS server database download
Database download
To shorten the initial startup time, download and unzip the database prepared in advance.
cd ~/nemServer
wget http://bob.nem.ninja/nis5_mainnet.h2-2293k.db.zip
unzip -q nis5_mainnet.h2-2293k.db.zip
Erase the files created when the NIS server was temporarily started
rm ~/nem/nis/data/*
Move the unzipped data
mv nis5_mainnet.h2.db ~/nem/nis/data/
Auto start settings
Set the NIS and Servant servers to start automatically.
NIS server auto-start
sudo vi /etc/systemd/system/nem-nis.service
/etc/systemd/system/nem-nis.service
[Unit]
Description = NEM NIS Server
After = network.target

[Service]
WorkingDirectory = /home/nem/nemServer
ExecStart = /home/nem/nemServer/nix.runNis.sh
Restart = always
Type = simple
User = nem
Group = nem
LimitNOFILE=100000

[Install]
WantedBy = multi-user.target
Automatic startup of Servant server
sudo vi /etc/systemd/system/nem-servant.service
/etc/systemd/system/nem-servant.service
[Unit]
Description = NEM Servant program
After = network.target nem-nis.target

[Service]
WorkingDirectory = /home/nem/nemServer/servant
ExecStart = /home/nem/nemServer/servant/startservant.sh
Restart = always
Type = simple
User = nem
Group = nem
LimitNOFILE=100000

[Install]
WantedBy = multi-user.target
Register and start systend
Register NIS and Servant servers with systemd
sudo systemctl daemon-reload
sudo systemctl enable nem-nis.service
sudo systemctl enable nem-servant.service
Start the NIS server and Servant server
sudo systemctl start nem-nis.service
sudo systemctl start nem-servant.service
Operation check
NIS server operation check
http://xxx.xxx.xxx.xxx:7890/node/extended-info ("Service Unavailable" error occurred for a while) shows the delegated public key and NIS version If the block height is displayed at http://xxx.xxx.xxx.xxx:7890/chain/height, the NIS server is running.
Servant server operation check
If http://xxx.xxx.xxx.xxx:7880/nr/metaData shows the version of the delegated public key and Servant, it is working.
Register as supernode
Supernode registration method
If you have a balance of 3 million XEM or more in your account, you can register as a Supernode and you will receive a Supernode reward. Registration is required in advance. Send a message from NEM's Nano Wallet to a dedicated account.
To the destination NAFUND-BUKIOS-TMD4BN-XL7ZFE-735QHN-7A3FBS-6CMY
In the message
ʻEnroll (IP address or domain name of nemServer / servant / config.propertie) (arbitrary name of nemServer / nis / config.propertie) (delegation public key) `
And send it.

Soon it will be registered in Nem Node Rewards and you can check the status. If you make a mistake, you will need to report it to NEM FORUM for correction.
in conclusion
The above is how to build NEM node and super node. NEM is also easier to obtain than it was at one time, so it may be a chance to build a supernode that will be rewarded on a regular basis. However, it is also necessary to pay close attention to security to prevent hacking for yourself and your users. We also recommend that you use a hardware wallet such as TREZOR for your NEM account.
Reference site
Minarin * Blog --NEM Supernode TecAdmin.net - How to Install JAVA 8 on Ubuntu 18.04/16.04, Linux Mint 19/18