Make an Ev3 radio control with JavaFx and leJOS [Part 2]
Introduction
This article assumes that you have a leJOS development environment in place. Please refer to this article for details.
[LeJOS] Let's program mindstorm-EV3 in Java [Environment construction first part]
[LeJOS] Let's program mindstorm-EV3 in Java [Environment construction part 2]
Overview
This article is a sequel to the following article: I will explain the development of a GUI application that controls Ev3 using leJOS's remote control class remoteEv3 and JavaFx.
Making an Ev3 radio control with JavaFx and leJOS [Part 1]
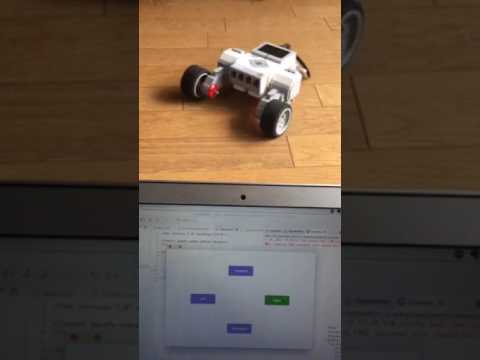
The one created this time is a simple radio control application.
(Click to play video)
program
The file structure is as follows.
The project name is JavaFxEv3.

Form.fxml Write the GUI here. You can edit it using SceneBuilder.
Form.fxml
<?xml version="1.0" encoding="UTF-8"?>

<?import javafx.scene.control.Button?>
<?import javafx.scene.layout.Pane?>

<Pane maxHeight="-Infinity" maxWidth="-Infinity" minHeight="-Infinity" minWidth="-Infinity" prefHeight="400.0" prefWidth="600.0" xmlns="http://javafx.com/javafx/8.0.111" xmlns:fx="http://javafx.com/fxml/1" fx:controller="application.FormController">
   <children>
      <Button fx:id="LeftButton" layoutX="100.0" layoutY="180.0" mnemonicParsing="false" onMousePressed="#LeftButtonPressed" onMouseReleased="#LeftButtonReleased" prefHeight="40.0" prefWidth="100.0" text="Left" />
      <Button fx:id="RightButton" layoutX="400.0" layoutY="180.0" mnemonicParsing="false" onMousePressed="#RightButtonPressed" onMouseReleased="#RightButtonReleased" prefHeight="40.0" prefWidth="100.0" text="Right" />
      <Button fx:id="ForwardButton" layoutX="250.0" layoutY="62.0" mnemonicParsing="false" onMousePressed="#ForwardButtonPressed" onMouseReleased="#ForwardButtonReleased" prefHeight="40.0" prefWidth="100.0" text="Forward" />
      <Button fx:id="BackwardButton" layoutX="250.0" layoutY="300.0" mnemonicParsing="false" onMousePressed="#BackwardButtonPressed" onMouseReleased="#BackwardButtonReleased" prefHeight="40.0" prefWidth="100.0" text="Backward" />
   </children>
</Pane>
Commentary
Each button has a registered method that is called when the mouse is pressed and when the mouse is released. Register the method when the button is pressed in onMousePressed and the method when the button is released in onMouseReleased.

application.css You can set the GUI style.
application.css
/*Background color setting*/
.root{
	-fx-background-color: white;
}
/*Button color setting*/
.button {
    -fx-background-color: slateblue; -fx-text-fill: white;
}
/*Color setting when the button mouse is over*/
.button:hover{
    -fx-background-color: green; -fx-text-fill: white;
}
Main.java
Main.java
package application;

import java.net.MalformedURLException;
import java.rmi.NotBoundException;
import java.rmi.RemoteException;

import javafx.application.Application;
import javafx.event.EventHandler;
import javafx.stage.Stage;
import javafx.stage.WindowEvent;
import lejos.remote.ev3.RMIRegulatedMotor;
import lejos.remote.ev3.RemoteEV3;
import javafx.scene.Scene;
import javafx.scene.layout.Pane;
import javafx.fxml.FXMLLoader;


public class Main extends Application {
	public RemoteEV3 ev3 = null;
	public RMIRegulatedMotor leftMotor = null;
	public RMIRegulatedMotor rightMotor = null;

	@Override
	public void start(Stage primaryStage) {
		try {
			//Instantiation for remote control
			ev3 = new RemoteEV3("192.168.2.91");
			ev3.setDefault();
			//Motor object creation
			leftMotor = ev3.createRegulatedMotor("A", 'L');
			rightMotor = ev3.createRegulatedMotor("B", 'L');
		} catch (RemoteException | MalformedURLException | NotBoundException e) {
			// TODO Auto-generated catch block
			e.printStackTrace();
		}

		try {
			FXMLLoader loader = new FXMLLoader(getClass().getResource("Form.fxml"));
			Pane root = (Pane)loader.load();
			Scene scene = new Scene(root,600,400);
			scene.getStylesheets().add(getClass().getResource("application.css").toExternalForm());

			//Pass the motor object to the controller
			FormController controller = loader.getController();
			controller.setThisLeftMotor(leftMotor);
			controller.setThisRightMotor(rightMotor);

			//Screen display
			primaryStage.setScene(scene);
			primaryStage.show();

			//Processing when the screen is closed
			primaryStage.setOnCloseRequest(new EventHandler<WindowEvent>() {
		          public void handle(WindowEvent we) {
		              System.out.println("Stage is closing");
		              try {
						leftMotor.close();
						rightMotor.close();
		              } catch (RemoteException e) {
						// TODO Auto-generated catch block
						e.printStackTrace();
		              }
		          }
		     });
		} catch(Exception e) {
			e.printStackTrace();
		}
	}

	public static void main(String[] args) {
		launch(args);
	}
}
Commentary
Create an object to access the motor using the RemoteEv3 class.
			ev3 = new RemoteEV3("192.168.2.91");
			ev3.setDefault();
			//Motor object creation
			leftMotor = ev3.createRegulatedMotor("A", 'L');
			rightMotor = ev3.createRegulatedMotor("B", 'L');
Pass the motor object to the controller.
            //Pass the motor object to the controller
            FormController controller = loader.getController();
            controller.setThisLeftMotor(leftMotor);
            controller.setThisRightMotor(rightMotor);
Make sure to close access to the motor at the end of the program. If this is not set, an error will occur when the program is restarted.
            primaryStage.setOnCloseRequest(new EventHandler<WindowEvent>() {
                  public void handle(WindowEvent we) {
                      System.out.println("Stage is closing");
                      try {
                        leftMotor.close();
                        rightMotor.close();
                      } catch (RemoteException e) {
                        // TODO Auto-generated catch block
                        e.printStackTrace();
                      }
                  }
             });
FormController.java This is the controller part. Associate the GUI with the method.
FormController.java
package application;

import java.rmi.RemoteException;
import javafx.fxml.FXML;
import javafx.scene.control.Button;
import javafx.scene.input.MouseEvent;
import lejos.remote.ev3.RMIRegulatedMotor;

public class FormController {
	public RMIRegulatedMotor thisLeftMotor = null;
	public RMIRegulatedMotor thisRightMotor = null;

	public void setThisLeftMotor(RMIRegulatedMotor leftMotor) {
        thisLeftMotor = leftMotor;
    }

	public void setThisRightMotor(RMIRegulatedMotor rightMotor) {
        thisRightMotor = rightMotor;
    }

	@FXML
	Button LeftButton;
	@FXML
	Button RightButton;
	@FXML
	Button ForwardButton;
	@FXML
	Button BackwardButton;

	@FXML
    void initialize() {
        System.out.println("Initialization process");
    }

	@FXML
	public void LeftButtonPressed(MouseEvent actionEvent) {
		try {
            thisLeftMotor.forward();
            thisRightMotor.backward();
        } catch (RemoteException e) {
            // TODO Auto-generated catch block
            e.printStackTrace();
        }
	}

	@FXML
	public void LeftButtonReleased(MouseEvent actionEvent) {
		try {
            thisLeftMotor.stop(true);
            thisRightMotor.stop(true);
        } catch (RemoteException e) {
            // TODO Auto-generated catch block
            e.printStackTrace();
        }
	}

	@FXML
	public void RightButtonPressed(MouseEvent actionEvent) {
		try {
			thisLeftMotor.backward();
            thisRightMotor.forward();
        } catch (RemoteException e) {
            // TODO Auto-generated catch block
            e.printStackTrace();
        }
	}

	@FXML
	public void RightButtonReleased(MouseEvent actionEvent) {
		try {
			thisLeftMotor.stop(true);
            thisRightMotor.stop(true);
        } catch (RemoteException e) {
            // TODO Auto-generated catch block
            e.printStackTrace();
        }
	}

	@FXML
	public void ForwardButtonPressed(MouseEvent actionEvent) {
		try {
            thisLeftMotor.forward();
            thisRightMotor.forward();
        } catch (RemoteException e) {
            // TODO Auto-generated catch block
            e.printStackTrace();
        }
	}

	@FXML
	public void ForwardButtonReleased(MouseEvent actionEvent) {
		try {
            thisLeftMotor.stop(true);
            thisRightMotor.stop(true);
        } catch (RemoteException e) {
            // TODO Auto-generated catch block
            e.printStackTrace();
        }
	}

	@FXML
	public void BackwardButtonPressed(MouseEvent actionEvent) {
		try {
            thisLeftMotor.backward();
            thisRightMotor.backward();
        } catch (RemoteException e) {
            // TODO Auto-generated catch block
            e.printStackTrace();
        }
	}

	@FXML
	public void BackwardButtonReleased(MouseEvent actionEvent) {
		try {
            thisLeftMotor.stop(true);
            thisRightMotor.stop(true);
        } catch (RemoteException e) {
            // TODO Auto-generated catch block
            e.printStackTrace();
        }
	}

}
Commentary
Define a setter to access the motor object from within the controller.
	public void setThisLeftMotor(RMIRegulatedMotor leftMotor) {
        thisLeftMotor = leftMotor;
    }

	public void setThisRightMotor(RMIRegulatedMotor rightMotor) {
        thisRightMotor = rightMotor;
    }
For example, the following code defines a LeftButtonPressed method that is called when the LeftButton is pressed and a LeftButtonReleased method that is called when the LeftButton is released.
    @FXML
    public void LeftButtonPressed(MouseEvent actionEvent) {
        try {
            thisLeftMotor.forward();
            thisRightMotor.backward();
        } catch (RemoteException e) {
            // TODO Auto-generated catch block
            e.printStackTrace();
        }
    }

    @FXML
    public void LeftButtonReleased(MouseEvent actionEvent) {
        try {
            thisLeftMotor.stop(true);
            thisRightMotor.stop(true);
        } catch (RemoteException e) {
            // TODO Auto-generated catch block
            e.printStackTrace();
        }
    }
Summary
I introduced how to develop a GUI application using the RemoteEv3 class of JavaFx and leJOS. If you use this, you can also get the sensor value and visualize it on the GUI. Please also refer to this article regarding the RemoteEv3 class.
[LeJOS] Let's remotely control the EV3 motor with Java
[LeJOS] Get EV3 sensor value remotely with Java
Recommended Posts