[AWS] Link memory usage of Ubuntu EC2 instance to CloudWatch
The memory usage of EC2 is not acquired as a standard metric, and additional settings are required to check it with CloudWatch.
The procedure is organized on the Official Page, but all target distributions are on the same page. Since it is written, I will summarize the procedure set in Ubuntu on this page.
The following are the steps confirmed for the newly launched Ubuntu 20.04 instance. You can install it from the command line or from SSM.
1. 1. Install on command line
1-1. Create and attach an IAM role
Before installation, you need to create a role to put metrics into CloudWatch and attach it to your instance. Select "Create Role" from IAM → Roles on the console.
 |
|---|
Select AWS Service, EC2 and proceed to the next step.
 |
|---|
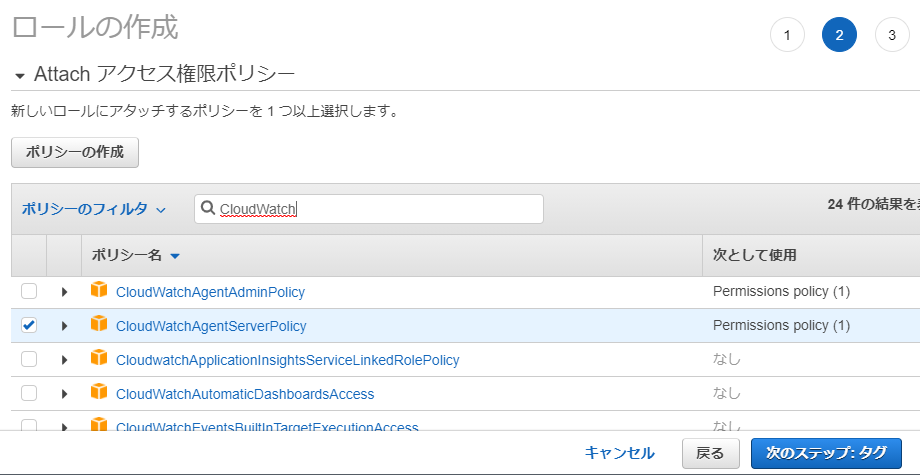
In the policy selection, check CloudWatchAgentServerPolicy </ b> </ font> and proceed to the next step.
 |
|---|
The next screen is for entering tags, so enter any tag to proceed. Finally, enter a name ( CloudWatchAgentServerRole </ font>, etc.) to create the role.
 |
|---|
After creating, attach the role to your instance. Select Actions → Security → Change IAM Role from the Instance menu.
 |
|---|
Select the role you created earlier and save it to complete.
 |
|---|
1-2. Installation and confirmation
The rest is command execution on the instance.
First download and install the installer
$ sudo wget https://s3.amazonaws.com/amazoncloudwatch-agent/ubuntu/amd64/latest/amazon-cloudwatch-agent.deb

$ sudo dpkg -i -E ./amazon-cloudwatch-agent.deb
* The Tokyo region can also be downloaded from the following.
https://s3.ap-northeast-1.amazonaws.com/amazoncloudwatch-agent-ap-northeast-1/ubuntu/amd64/latest/amazon-cloudwatch-agent.deb
Then run the wizard to create the configuration file. There are many setting items, but if you want to get the memory usage rate, you can proceed with the default setting (Enter). Only two places where I changed are marked with ★.
$ sudo /opt/aws/amazon-cloudwatch-agent/bin/amazon-cloudwatch-agent-config-wizard
=============================================================
= Welcome to the AWS CloudWatch Agent Configuration Manager =
=============================================================
On which OS are you planning to use the agent?
1. linux
2. windows
default choice: [1]:

Trying to fetch the default region based on ec2 metadata...
Are you using EC2 or On-Premises hosts?
1. EC2
2. On-Premises
default choice: [1]:

Which user are you planning to run the agent?
1. root
2. cwagent
3. others
default choice: [1]:

Do you want to turn on StatsD daemon?
1. yes
2. no
default choice: [1]:

Which port do you want StatsD daemon to listen to?
default choice: [8125]

What is the collect interval for StatsD daemon?
1. 10s
2. 30s
3. 60s
default choice: [1]:

What is the aggregation interval for metrics collected by StatsD daemon?
1. Do not aggregate
2. 10s
3. 30s
4. 60s
default choice: [4]:

Do you want to monitor metrics from CollectD?
1. yes
2. no
default choice: [1]:

Do you want to monitor any host metrics? e.g. CPU, memory, etc.
1. yes
2. no
default choice: [1]:

Do you want to monitor cpu metrics per core? Additional CloudWatch charges may apply.
1. yes
2. no
default choice: [1]:

Do you want to add ec2 dimensions (ImageId, InstanceId, InstanceType, AutoScalingGroupName) into all of your metrics if the info is avai                          lable?
1. yes
2. no
default choice: [1]:

Would you like to collect your metrics at high resolution (sub-minute resolution)? This enables sub-minute resolution for all metrics, b                          ut you can customize for specific metrics in the output json file.
1. 1s
2. 10s
3. 30s
4. 60s
default choice: [4]:

Which default metrics config do you want?
1. Basic
2. Standard
3. Advanced
4. None
default choice: [1]:

Current config as follows:
{
* Display of setting contents is omitted *
}
Are you satisfied with the above config? Note: it can be manually customized after the wizard completes to add additional items.
1. yes
2. no
default choice: [1]:

Do you have any existing CloudWatch Log Agent (http://docs.aws.amazon.com/AmazonCloudWatch/latest/logs/AgentReference.html) configuratio                          n file to import for migration?
1. yes
2. no
default choice: [2]:

Do you want to monitor any log files?
1. yes
2. no
default choice: [1]:
2 ★ Enter 2 ★
Saved config file to /opt/aws/amazon-cloudwatch-agent/bin/config.json successfully.
Current config as follows:
{
* Display of setting contents is omitted *
}
Please check the above content of the config.
The config file is also located at /opt/aws/amazon-cloudwatch-agent/bin/config.json.
Edit it manually if needed.
Do you want to store the config in the SSM parameter store?
1. yes
2. no
default choice: [1]:
2 ★ Enter 2 ★
Program exits now.
After execution, the configuration file will be output to /opt/aws/amazon-cloudwatch-agent/bin/config.json, so specify it and start the agent.
$ sudo /opt/aws/amazon-cloudwatch-agent/bin/amazon-cloudwatch-agent-ctl -a fetch-config -m ec2 -s -c file:/opt/aws/amazon-cloudwatch-agent/bin/config.json
/opt/aws/amazon-cloudwatch-agent/bin/config-downloader --output-dir /opt/aws/amazon-cloudwatch-agent/etc/amazon-cloudwatch-agent.d --download-source file:/opt/aws/amazon-cloudwatch-agent/bin/config.json --mode ec2 --config /opt/aws/amazon-cloudwatch-agent/etc/common-config.toml --multi-config default
Successfully fetched the config and saved in /opt/aws/amazon-cloudwatch-agent/etc/amazon-cloudwatch-agent.d/file_config.json.tmp
Start configuration validation...
* Omitted on the way *
======== Error Log ========
2020-11-10T07:48:25Z E![telegraf] Error running agent: Error parsing /opt/aws/amazon-cloudwatch-agent/etc/amazon-cloudwatch-agent.toml, open /usr/share/collectd/types.db: no such file or directory
I got a startup error. It seems that the collectd module is not installed, so install it.
$ sudo apt-get update
$ sudo apt install collectd
After installation, I was able to launch the CloudWatch agent.
$ sudo /opt/aws/amazon-cloudwatch-agent/bin/amazon-cloudwatch-agent-ctl -a fetch-config -m ec2 -s -c file:/opt/aws/amazon-cloudwatch-agent/bin/config.json
/opt/aws/amazon-cloudwatch-agent/bin/config-downloader --output-dir /opt/aws/amazon-cloudwatch-agent/etc/amazon-cloudwatch-agent.d --download-source file:/opt/aws/amazon-cloudwatch-agent/bin/config.json --mode ec2 --config /opt/aws/amazon-cloudwatch-agent/etc/common-config.toml --multi-config default
Successfully fetched the config and saved in /opt/aws/amazon-cloudwatch-agent/etc/amazon-cloudwatch-agent.d/file_config.json.tmp
Start configuration validation...
* Omitted on the way *
Configuration validation second phase succeeded
Configuration validation succeeded
Created symlink /etc/systemd/system/multi-user.target.wants/amazon-cloudwatch-agent.service → /etc/systemd/system/amazon-cloudwatch-agent.service.

$ ps -ef | grep amazon-cloudwatch-agent
root       25666       1  0 08:04 ?        00:00:00 /opt/aws/amazon-cloudwatch-agent/bin/amazon-cloudwatch-agent -config /opt/aws/amazon-cloudwatch-agent/etc/amazon-cloudwatch-agent.toml -envconfig /opt/aws/amazon-cloudwatch-agent/etc/env-config.json -pidfile /opt/aws/amazon-cloudwatch-agent/var/amazon-cloudwatch-agent.pid
root       25694    1807  0 08:08 pts/0    00:00:00 grep --color=auto amazon-cloudwatch-agent
After the agent starts, you can check the metrics on CloudWatch after a short wait. You can see that the memory usage (mem_used_percent) of the target instance is displayed in CloudWatch → All → CWAgent → ImageId, InstanceId, InstanceType (the name is a little confusing by default).
 |
|---|
2. Install with SSM
From here, it is the setting procedure in SSM.
2-1. Create and attach an IAM role
First procedure 1. Create a role to put metrics into CloudWatch in the same way as above. The procedure is the same, but the policy to attach is different because the setting is via SSM. Select "Create Role" from IAM → Roles on the console.
|
|---|
Select AWS Service, EC2 and proceed to the next step.
|
|---|
In the policy selection, check AmazonSSMManagedInstanceCore </ b> </ font> and CloudWatchAgentAdminPolicy </ b> </ font> And proceed to the next step. There are many policies displayed here, so search and select one by one. (* The screenshot below was created for the sake of clarity. Actually, there are many policies in between, so this state will not occur </ font>.)
 |
|---|
The next screen is for entering tags, so enter any tag to proceed. Finally, enter a name ( AmazonSSMManagedInstanceRole </ font>, etc.) to create the role.
 |
|---|
After creating, attach the role to your instance. Select Actions → Security → Change IAM Role from the Instance menu.
|
|---|
Select the role you created earlier and save it to complete.
 |
|---|
2-2. Installation and confirmation
Setting up the SSM will continue to work in the console. Select SSM → Run Command → Run Command.

Check AWS-ConfigureAWSPackage.
 |
|---|
In the command parameters at the bottom of the same screen, enter AmazonCloudWatchAgent for Name and latest for Version.
 |
|---|
In the target further down, select the instance manually → Check the target instance.
 |
|---|
Finally (this screen is very portrait), check the output options and press the "Run" button.
 |
|---|
Confirm that the execution result is normal.
 |
|---|
Then log in to your instance and run the wizard to create the configuration file. step 1. Almost the same as with the default setting (Enter), but in the case of SSM, the selection may change. Only one place where I changed it is marked with a star.
$ sudo /opt/aws/amazon-cloudwatch-agent/bin/amazon-cloudwatch-agent-config-wizard
=============================================================
= Welcome to the AWS CloudWatch Agent Configuration Manager =
=============================================================
On which OS are you planning to use the agent?
1. linux
2. windows
default choice: [1]:

Trying to fetch the default region based on ec2 metadata...
Are you using EC2 or On-Premises hosts?
1. EC2
2. On-Premises
default choice: [1]:

Which user are you planning to run the agent?
1. root
2. cwagent
3. others
default choice: [1]:

Do you want to turn on StatsD daemon?
1. yes
2. no
default choice: [1]:

Which port do you want StatsD daemon to listen to?
default choice: [8125]

What is the collect interval for StatsD daemon?
1. 10s
2. 30s
3. 60s
default choice: [1]:

What is the aggregation interval for metrics collected by StatsD daemon?
1. Do not aggregate
2. 10s
3. 30s
4. 60s
default choice: [4]:

Do you want to monitor metrics from CollectD?
1. yes
2. no
default choice: [1]:

Do you want to monitor any host metrics? e.g. CPU, memory, etc.
1. yes
2. no
default choice: [1]:

Do you want to monitor cpu metrics per core? Additional CloudWatch charges may apply.
1. yes
2. no
default choice: [1]:

Do you want to add ec2 dimensions (ImageId, InstanceId, InstanceType, AutoScalingGroupName) into all of your metrics if the info is available?
1. yes
2. no
default choice: [1]:

Would you like to collect your metrics at high resolution (sub-minute resolution)? This enables sub-minute resolution for all metrics, but you can customize for specific metrics in the output json file.
1. 1s
2. 10s
3. 30s
4. 60s
default choice: [4]:

Which default metrics config do you want?
1. Basic
2. Standard
3. Advanced
4. None
default choice: [1]:

Current config as follows:
{
* Display of setting contents is omitted *
}
Are you satisfied with the above config? Note: it can be manually customized after the wizard completes to add additional items.
1. yes
2. no
default choice: [1]:

Do you have any existing CloudWatch Log Agent (http://docs.aws.amazon.com/AmazonCloudWatch/latest/logs/AgentReference.html) configuration file to import for migration?
1. yes
2. no
default choice: [2]:

Do you want to monitor any log files?
1. yes
2. no
default choice: [1]:
2 ★ Enter 2 ★
Saved config file to /opt/aws/amazon-cloudwatch-agent/bin/config.json successfully.
Current config as follows:
{
* Display of setting contents is omitted *
}
Please check the above content of the config.
The config file is also located at /opt/aws/amazon-cloudwatch-agent/bin/config.json.
Edit it manually if needed.
Do you want to store the config in the SSM parameter store?
1. yes
2. no
default choice: [1]:

What parameter store name do you want to use to store your config? (Use 'AmazonCloudWatch-' prefix if you use our managed AWS policy)
default choice: [AmazonCloudWatch-linux]

Trying to fetch the default region based on ec2 metadata...
Which region do you want to store the config in the parameter store?
default choice: [ap-northeast-1]

Which AWS credential should be used to send json config to parameter store?
1. ASxxxxxxxxxxxxxxx4D(From SDK)
2. Other
default choice: [1]:

Successfully put config to parameter store AmazonCloudWatch-linux.
Program exits now.
After setting, return to SSM and start the agent. Select Managed Instance → Select Instance → Set Inventory → Execute Command.
 |
|---|
Select Amazon CloudWatch-ManageAgent from the command documentation. Due to the large number of command types, this will not be displayed unless you advance the page with the > button on the right.
 |
|---|
Enter AmazonCloudWatch-linux in the command parameters at the bottom of the same screen.
 |
|---|
In the target further down, select the instance manually → Check the target instance.
 |
|---|
Finally (this screen is very portrait), check the output options and press the "Run" button.
|
|---|
step 1. I got a startup error as well.
 |
|---|
If you check / var / log / amazon / ssm, you can see that the same error message is output (only the relevant part is excerpted).
"standardOutput": "======== Error Log ========\n2020-11-10T09:31:25Z E![telegraf] Error running agent:
 Error parsing /opt/aws/amazon-cloudwatch-agent/etc/amazon-cloudwatch-agent.toml, open /usr/share/collectd/types.db:
 no such file or directory\n",
"standardError": "2020/11/10 09:31:25 Reading json config file path: /opt/aws/amazon-cloudwatch-agent/etc/amazon-cloudwatch-agent.d/ssm_AmazonCloudWatch-linux.tmp ...\nfailed to run commands: exit status 1"
Install the collectd module.
$ sudo apt-get update
$ sudo apt install collectd
After installation, I was able to start the agent by pressing the re-execute command button.
 |
|---|
 |
|---|
After that, you can check the metrics on CloudWatch as well.
 |
|---|
This completes the setting procedure. (SSM seems to have room for review so that the work can be completed only with SSM) It was confirmed that each procedure can be linked to CloudWatch.
Reference material
-Collect metrics and logs from Amazon EC2 instances and on-premises servers using CloudWatch Agent
Recommended Posts