[DOCKER] Fastest PC setup for deep learning from scratch
Introduction
I've set up a PC for deep learning many times, but I forgot to do it, and I forgot to do it repeatedly. I will be doing the same thing over and over again, so I decided to leave a work note for myself in the future.
This article is a note on the fastest setup of a Linux machine with a GPU for deep learning. My goal is
--Building an environment that does not use NVIDIA Docker (Anaconda, PyTorch, TensorFlow) --NVIDIA Docker setup
There are two. Of course, it doesn't matter which one.
In addition, it is installed in the university, and unfortunately it is a proxy environment nowadays. The following explanation shows proxy settings in several places, but if you are a lucky reader who does not need a proxy, you can skip it.
Buy a machine
This time from SyCom. RTX 2080 Ti 2 piece stab model. Of course there is no OS. I regret forgetting to remove the optical drive.
OS image download
Since it is for deep learning, the OS is Ubuntu. I've used the desktop version so far, but the server version may be faster to install because it doesn't require a separate desktop. So, this time I will use the server version.
This time, instead of installing the latest version 20.04 of Ubuntu, we will install the dead version 18.04, so from the Past releases on the Alternative downloads page Select an of 18.04 Go to the image page.
Since the CPU is Intel Core i7, select 64-bit PC (AMD64) server install image And download.
Preparing a USB memory for booting
The method is described in Create a bootable USB stick on Ubuntu of the Ubuntu tutorial, so you can afford it. When I thought about it, there was one addictive point.
Since I am a Mac, after formatting the USB memory with Disk Utility, start Etcher and select the Ubuntu ISO image downloaded above. When you press "Flash!" ...
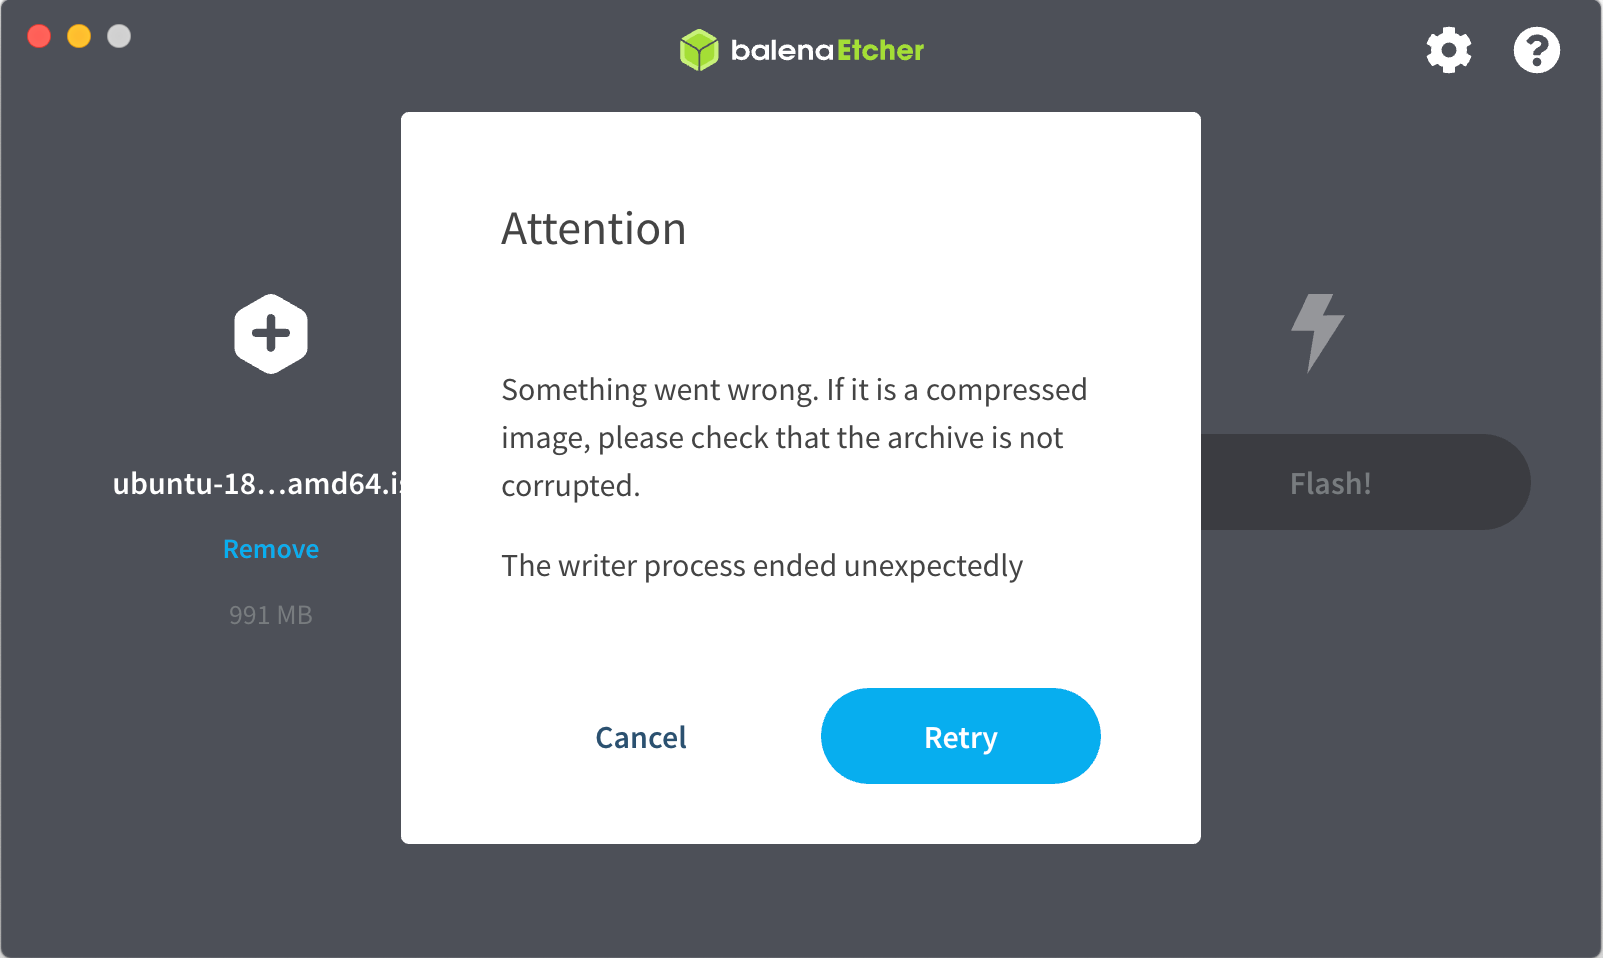
Gumu.
I couldn't help it, so I decided to copy the image to a USB memory with dd, though it was a little tricky. Check the diskutil list for the correct path to your USB stick before doing the following! In my case, it happened to be / dev / disk2, but I don't know if I do eraseDisk without checking it carefully and lose important data.
sudo diskutil eraseDisk FAT32 NAME MBRFormat /dev/disk2
diskutil unmountdisk /dev/disk2
sudo dd if=$HOME/Downloads/ubuntu-18.04.5-live-server-amd64.iso \
  of=/dev/rdisk2 bs=2m conv=sync
When it's done, Disk Utility will get angry that you can't read it, but you don't have to worry about it because you can't read it.
Boot your PC from a USB stick
Connect the power cable and network cable to the PC, and turn on the power with the USB memory inserted. Press F11 or something to bring up the boot menu and boot from the installation disc in the USB stick. In my case, I booted from the USB memory without permission while I was confused, and the result was all right.
After starting, it is almost as described in [Ubuntu 18.04 LTS Server] Install. If you want to fix the IP address, you can skip [Next section](change the IP address to fixed) by setting it here. If you set the proxy here, it will be installed in the state where the proxy setting of apt is completed, so it is easy. Also, if you put OpenSSH here, it is convenient to be able to work remotely after this.
The installation was completed in 50 seconds!
Change the IP address to fixed
Find out the IP address assigned by DHCP. If you don't know, log in from the console and run ʻip addr` to look for an Ethernet-like interface.
Execute ssh (IP address) -l (created user name) from another machine on the network to log in remotely. Run ʻip addr` to find out the name of the interface and make a note of it. It should have a name like eth0 or en0. The following is the case when the name of the interface is eno1.
Back up the original file under / etc / netplan and use some editor to create a file called 01-netcfg.yaml. I used vi. The following example is when the address assigned to this machine is 192.168.1.18, the netmask is 24-bit, the IP address of the default router is 192.168.1.3, and the DNS server is 192.168.1.83.
cd /etc/netplan
sudo mv 00-installer-config.yaml 00-installer-config.yaml.org
sudo vi 01-netcfg.yaml
01-netcfg.yaml
network:
  ethernets:
    eno1:
      dhcp4: no
      addresses: [192.168.1.18/24]
      gateway4: 192.168.1.3
      nameservers:
        addresses: [192.168.1.83]
      dhcp6: no
  version: 2
After saving the file, run sudo netplan apply. If you have logged in remotely, you will not be able to operate it at this moment, so log in again with ssh 192.168.1.18.
At this point, you can remove the display and keyboard.
Setting proxy-related environment variables
The proxy server is specified at the time of installation, but environment variables need to be set separately. Open a file called / etc / environment in an editor and add the following:
/etc/environment
HTTP_PROXY=http://Proxy server address:port/
HTTPS_PROXY=http://Proxy server address:port/
FTP_PROXY=http://Proxy server address:port/
ALL_PROXY=http://Proxy server address:port/
http_proxy=http://Proxy server address:port/
https_proxy=http://Proxy server address:port/
ftp_proxy=http://Proxy server address:port/
Log in again to reflect the above settings.
NVIDIA driver installation
[What's going on with NVIDIA Docker now? (19.11 version) bonus article](https://qiita.com/ksasaki/items/b20a785e1a0f610efa08#bonus-nvidia-driver installation).
wget https://developer.download.nvidia.com/compute/cuda/repos/ubuntu1804/x86_64/cuda-ubuntu1804.pin
sudo mv cuda-ubuntu1804.pin /etc/apt/preferences.d/cuda-repository-pin-600
wget https://developer.download.nvidia.com/compute/cuda/11.0.3/local_installers/cuda-repo-ubuntu1804-11-0-local_11.0.3-450.51.06-1_amd64.deb
sudo dpkg -i cuda-repo-ubuntu1804-11-0-local_11.0.3-450.51.06-1_amd64.deb
sudo apt-key add /var/cuda-repo-ubuntu1804-11-0-local/7fa2af80.pub
sudo apt-get update
sudo apt-get -y install cuda-drivers
Once installed, reboot as sudo reboot.
Log in again and run nvidia-smi to check.
+-----------------------------------------------------------------------------+
| NVIDIA-SMI 450.51.06    Driver Version: 450.51.06    CUDA Version: 11.0     |
|-------------------------------+----------------------+----------------------+
| GPU  Name        Persistence-M| Bus-Id        Disp.A | Volatile Uncorr. ECC |
| Fan  Temp  Perf  Pwr:Usage/Cap|         Memory-Usage | GPU-Util  Compute M. |
|                               |                      |               MIG M. |
|===============================+======================+======================|
|   0  GeForce RTX 208...  On   | 00000000:01:00.0 Off |                  N/A |
| 32%   42C    P8    22W / 250W |      1MiB / 11011MiB |      0%      Default |
|                               |                      |                  N/A |
+-------------------------------+----------------------+----------------------+
|   1  GeForce RTX 208...  On   | 00000000:02:00.0 Off |                  N/A |
| 31%   39C    P8    21W / 250W |      1MiB / 11019MiB |      0%      Default |
|                               |                      |                  N/A |
+-------------------------------+----------------------+----------------------+

+-----------------------------------------------------------------------------+
| Processes:                                                                  |
|  GPU   GI   CI        PID   Type   Process name                  GPU Memory |
|        ID   ID                                                   Usage      |
|=============================================================================|
|  No running processes found                                                 |
+-----------------------------------------------------------------------------+
Download and install Miniconda
If you plan to use Anaconda, you don't need to have Anaconda in your system. Miniconda is fine. Because no one updates Anaconda installed on the system → no one uses it.
The following installs Miniconda on your system, but this is just for the purpose of creating your own environment with the conda command.
You don't have to put the Miniconda in the system separately, you can put it under your own home.
wget https://repo.anaconda.com/miniconda/Miniconda3-latest-Linux-x86_64.sh
sudo sh Miniconda3-latest-Linux-x86_64.sh -p /usr/local/miniconda3 -s -b
If you do this, you'll be in trouble because the owner of the .conda directory under your home will be root, so do the following to change it to yours:
sudo chown -R $USER ~/.conda
Environment construction with Conda
Each user adds the following to the configuration file directly under his / her home. Now you can use the conda command.
.bash_profile
. /usr/local/miniconda3/etc/profile.d/conda.sh
Building an Anaconda environment
If you can use [PyTorch](building #PyTorch environment) or [TensorFlow](building #TensorFlow environment), you can skip this section and put it in Jupyter Notebook as appropriate.
Create your own Anaconda environment with the conda command. I named it myanaconda.
conda create -n myanaconda python=3.6 anaconda
Once you have an Anaconda environment, activate it.
conda activate myanaconda
Now that you're in your own environment, you can do whatever you want with pip install.
Building a PyTorch environment
Follow the steps in Quick Start Locally at Official. There is no need to install CUDA or cuDNN in advance.
Create your own PyTorch environment with the conda command. I named it mytorch.
conda create -n mytorch pytorch torchvision cudatoolkit=10.2 -c pytorch
When you have a new environment, activate it.
conda activate mytorch
For testing, try running Deep Convolution Generative Adversarial Networks (https://github.com/pytorch/examples/tree/master/dcgan).
git clone https://github.com/pytorch/examples.git
cd examples/dcgan
pip install -r requirements.txt
python main.py --dataset cifar10 --dataroot /var/tmp/cifar10 --cuda
If you enjoy watching a lot of strange images generated, you're done.
Building a TensorFlow environment
This section is the content of Tensorflow GPU Installation Made Easy: Use conda instead of pip. There is no need to install CUDA or cuDNN in advance.
Create your own TensorFlow environment with the conda command. This is a TensorFlow 2 test environment, so I named it tf2.
conda create -n tf2 tensorflow-gpu
When you have a new environment, activate it.
conda activate tf2
For testing, try running TensorFlow 2.0 Tutorial 01: Basic Image Classification.
git clone https://github.com/lambdal/TensorFlow2-tutorial.git
cd TensorFlow2-tutorial/01-basic-image-classification/
python resnet_cifar.py
Open another terminal, log in remotely with ssh, and check GPU usage with nvidia-smi -l. It seems that TensorFlow 2 can use all GPUs at the same time! Oh! It feels good.
+-----------------------------------------------------------------------------+
| NVIDIA-SMI 450.51.06    Driver Version: 450.51.06    CUDA Version: 11.0     |
|-------------------------------+----------------------+----------------------+
| GPU  Name        Persistence-M| Bus-Id        Disp.A | Volatile Uncorr. ECC |
| Fan  Temp  Perf  Pwr:Usage/Cap|         Memory-Usage | GPU-Util  Compute M. |
|                               |                      |               MIG M. |
|===============================+======================+======================|
|   0  GeForce RTX 208...  On   | 00000000:01:00.0 Off |                  N/A |
| 40%   75C    P2   218W / 250W |  10952MiB / 11011MiB |     75%      Default |
|                               |                      |                  N/A |
+-------------------------------+----------------------+----------------------+
|   1  GeForce RTX 208...  On   | 00000000:02:00.0 Off |                  N/A |
| 38%   70C    P2   216W / 250W |  10960MiB / 11019MiB |     77%      Default |
|                               |                      |                  N/A |
+-------------------------------+----------------------+----------------------+

+-----------------------------------------------------------------------------+
| Processes:                                                                  |
|  GPU   GI   CI        PID   Type   Process name                  GPU Memory |
|        ID   ID                                                   Usage      |
|=============================================================================|
|    0   N/A  N/A      4977      C   python                          10949MiB |
|    1   N/A  N/A      4977      C   python                          10957MiB |
+-----------------------------------------------------------------------------+
NVIDIA Docker setup
This section is generally based on [How to install NVIDIA Docker (latest version)](https://qiita.com/ksasaki/items/b20a785e1a0f610efa08#nvidia-docker-How to install-latest version).
Installation of Docker itself
Follow here.
sudo apt-get update
sudo apt-get install \
  apt-transport-https \
  ca-certificates \
  curl \
  gnupg-agent \
  software-properties-common
curl -fsSL https://download.docker.com/linux/ubuntu/gpg | sudo apt-key add -
sudo add-apt-repository \
 "deb [arch=amd64] https://download.docker.com/linux/ubuntu \
 $(lsb_release -cs) \
 stable"
sudo apt-get update
sudo apt-get install docker-ce docker-ce-cli containerd.io
Docker proxy settings
How to do it is described in Control Docker with systemd.
Follow the steps below to create a directory called docker.service.d under / etc / systemd / system / and a file called http-proxy.conf under it.
sudo mkdir -p /etc/systemd/system/docker.service.d
sudo vi /etc/systemd/system/docker.service.d/http-proxy.conf
http-proxy.conf
[Service]
Environment="HTTP_PROXY=http://Proxy server address:port/" "HTTPS_PROXY=http://Proxy server address:port/" "NO_PROXY=localhost,127.0.0.1,.lab"
Restart Docker for the settings to take effect.
sudo systemctl daemon-reload
sudo systemctl restart docker
Docker testing
So far, download the hello-world image from Docker Hub and run it.
sudo docker run hello-world
If you get a message like that, it's OK.
Install NVIDIA Container Toolkit
distribution=$(. /etc/os-release;echo $ID$VERSION_ID)
curl -s -L https://nvidia.github.io/nvidia-docker/gpgkey | sudo apt-key add -
curl -s -L https://nvidia.github.io/nvidia-docker/$distribution/nvidia-docker.list | sudo tee /etc/apt/sources.list.d/nvidia-docker.list
sudo apt-get update
sudo apt-get install -y nvidia-docker2
sudo systemctl restart docker
Follow the guide to do the following: OK if the output of nvidia-smi comes out.
sudo docker run --rm --gpus all nvidia/cuda:11.0-base nvidia-smi
Allow non-root user to run Docker
sudo usermod -aG docker `whoami`
Test if you can run the docker command as non-root after rebooting once with sudo reboot.
$ docker ps
CONTAINER ID        IMAGE               COMMAND             CREATED             STATUS              PORTS               NAMES
NVIDIA Docker test
Try running Tacotron 2 And WaveGlow v1.10 For PyTorch.
git clone https://github.com/NVIDIA/DeepLearningExamples.git
cd DeepLearningExamples/PyTorch/SpeechSynthesis/Tacotron2
bash scripts/prepare_dataset.sh
bash scripts/docker/build.sh
Enter the Docker environment with the following command.
bash scripts/docker/interactive.sh
Preprocessing
bash scripts/prepare_mels.sh
The rest is learning, but in my environment it will drop due to lack of GPU memory, so I rewrote the place to specify the batch size of scripts / train_tacotron2.sh to -bs 32.
bash scripts/train_tacotron2.sh
It takes time, so after about 100 epochs, I stopped with ctrl + C.
Synthetic test. I did not train the model of WaveGlow, but downloaded and used the trained one. The following command creates a synthetic voice audio_0_.wav under output.
python inference.py --tacotron2 output/checkpoint_Tacotron2_last.pt --waveglow waveglow_1076430_14000_amp --wn-channels 256 -o output/ -i phrases/phrase.txt --fp16
in conclusion
It turns out that the setup of a deep learning PC does not actually require the installation of CUDA or cuDNN. The environment for deep learning can be prepared by each user in their own conda environment or Docker can be used. Conversely, if CUDA or cuDNN is installed in the system, it will be difficult to operate due to version problems. I feel so much better.
Recommended Posts