Set a signed cookie (for CloudFront) with a custom policy using the AWS SDK for Java
If you want to restrict access to content under CloudFront
- Signed URL using prescriptive policy
- Signed URL with custom policy
- Signed cookie with prescriptive policy
- Signed cookie with custom policy
Can be used.
[Reference: Link to documents in AWS] ** Use signed URL ** ** · [Create a signed URL using the default policy](http://docs.aws.amazon.com/ja_jp/AmazonCloudFront/latest/DeveloperGuide/private-content-creating-signed-url-canned- policy.html) ** ** · [Create a signed URL using a custom policy](http://docs.aws.amazon.com/ja_jp/AmazonCloudFront/latest/DeveloperGuide/private-content-creating-signed-url-custom- policy.html) ** ** Using signed cookies ** ** · [Setting Signed Cookies Using Default Policy](http://docs.aws.amazon.com/ja_jp/AmazonCloudFront/latest/DeveloperGuide/private-content-setting-signed-cookie-canned-policy. html) ** ** · [Setting Signed Cookies Using Custom Policies](http://docs.aws.amazon.com/ja_jp/AmazonCloudFront/latest/DeveloperGuide/private-content-setting-signed-cookie-custom-policy. html) **
But,
- If you use a signed URL, you need to sign each link of the resource you want to access.
- When using the default policy, wildcards (** "?" "*" **) cannot be used to specify the access permission target.
So
- 1 Give access to each file
- Dynamically generate links to resources one by one from the application side
In that case, the default policy or signed URL is fine,
- Content subject to access restrictions consists of HTML files + .css + images + videos
In that case, it is not realistic to sign the links to the .css, image, and video files that are read with the signed URL, so this time ** Signed cookie using custom policy * I experimented with *.
0. Contents of this experiment
- The application issues a signed cookie and sets it in the browser.
- Content subject to access restrictions is stored in the S3 bucket ** "testmatsusignedcookie" **.
- The application is published at ** "https://hmatsu47.site/" ** (cookie set is executed at ** "/ set-cookie" **).
- Content subject to access restrictions will be published on ** "https://www.hmatsu47.site/" ** (CloudFront distribution).
- Specify the Domain attribute ** "hmatsu47.site" ** for the signed cookie to be issued so that you do not have to worry about the issuing method and acceptance restrictions of third-party cookies.
- At the same time, enable the Secure attribute (disabled when publishing with non-SSL / TLS) and HttpOnly attribute (disabled when processing cookies with JavaScript).
1. CloudFront + S3 side settings
Set according to the following flow.
1-1. Create a CloudFront key pair in the AWS Management Console
Below, IAM users cannot create it, so use ** a user with root authentication information ** to perform the operation.
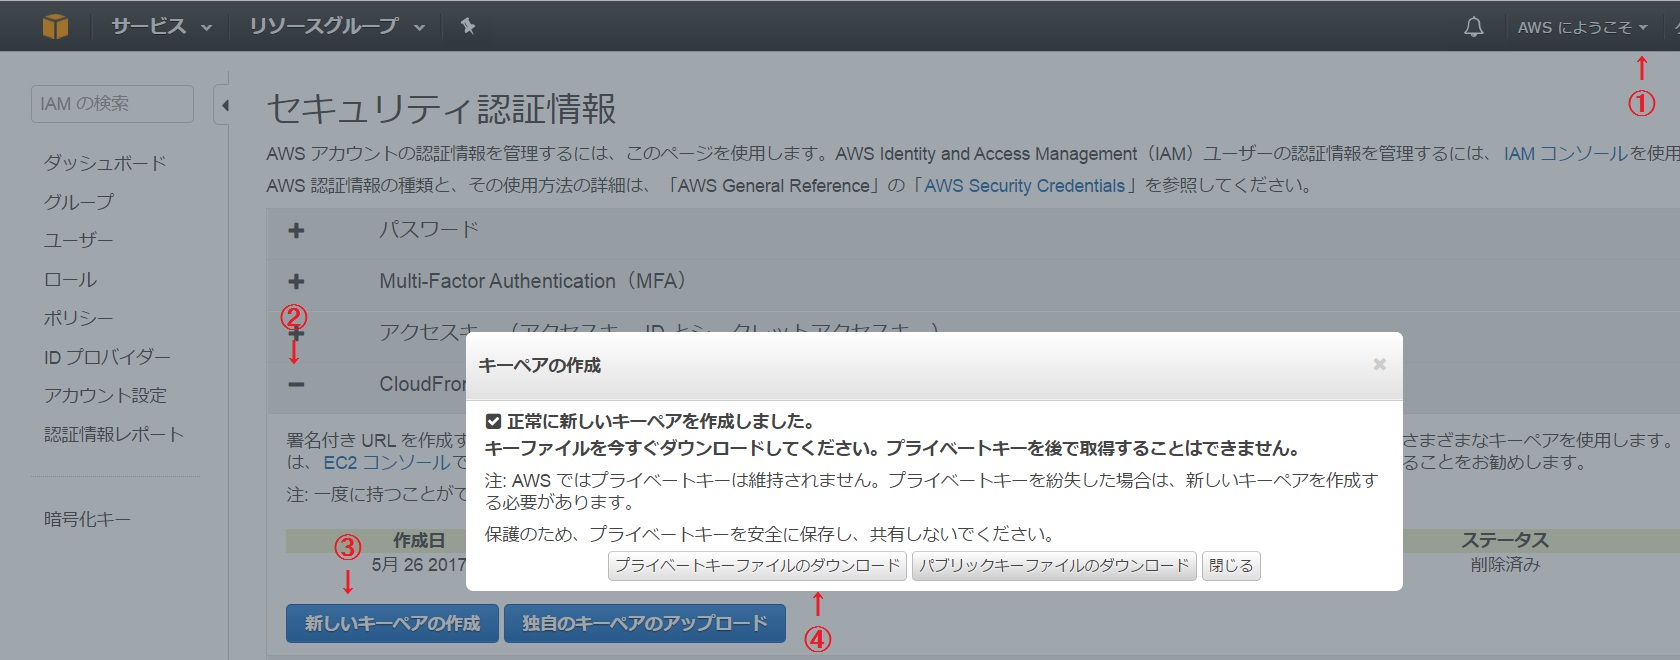 ① Select ** "Security Credentials" ** from the user menu on the upper right.
② Expand ** "CloudFront key pair" **
③ Click ** [Create new key pair] **
④ Click ** [Download Private Key File] ** to download the private key file.
⑤ Confirm and record the key pair ID on the screen with the pop-up closed.
① Select ** "Security Credentials" ** from the user menu on the upper right.
② Expand ** "CloudFront key pair" **
③ Click ** [Create new key pair] **
④ Click ** [Download Private Key File] ** to download the private key file.
⑤ Confirm and record the key pair ID on the screen with the pop-up closed.
- You can also check the key pair ID from the character string between ** "pk-" ** and ** ".pem" ** in the downloaded private key file. ⑥ Convert private key file (.pem format) to .der format with OpenSSL, referring to the link below. ** [Change CloudFront private key format (.NET and Java only)](http://docs.aws.amazon.com/ja_jp/AmazonCloudFront/latest/DeveloperGuide/private-content-trusted-signers.html# private-content-reformatting-private-key) **
- There is a site that provides OpenSSL binary (.exe) for Windows environment, so you can use it.
openssl command
openssl pkcs8 -topk8 -nocrypt -in [Private key file name].pem -inform PEM -out [output file name].der -outform DER
1-2. Create a CloudFront distribution
 ① Click ** [Create Distribution] ** in CloudFront → Distribution on the console.
 ② Click ** [Get Started] ** on the Web
 ③ Set items related to Origin's S3 bucket
④ Select ** "Yes" ** in ** "Restrict Bucket Access" **
⑤ Select ** "Create a New Identity" ** in ** "Origin Access Identity" **
⑥ Select ** "Yes,…" ** in ** "Grant Read Permissions on Bucket" **
③ Set items related to Origin's S3 bucket
④ Select ** "Yes" ** in ** "Restrict Bucket Access" **
⑤ Select ** "Create a New Identity" ** in ** "Origin Access Identity" **
⑥ Select ** "Yes,…" ** in ** "Grant Read Permissions on Bucket" **
 ⑦ Select ** "Yes" ** in ** "Restrict Viewer Access" **
⑧ Check ** "Self" ** in ** "Trusted Signers" **
⑨ Specify the domain name (FQDN assigned to the CloudFront distribution) in ** "Alternate Domain Names" **
⑦ Select ** "Yes" ** in ** "Restrict Viewer Access" **
⑧ Check ** "Self" ** in ** "Trusted Signers" **
⑨ Specify the domain name (FQDN assigned to the CloudFront distribution) in ** "Alternate Domain Names" **
- After completing the distribution creation, specify the alias of the A record in the relevant record of Route 53.
 ⑩ Set SSL / TLS related items (After selecting ** "Custom SSL Certificate" **, select the certificate to use or request a new SNI SSL certificate)
 ⑪ ** Click "Create Distribution" **
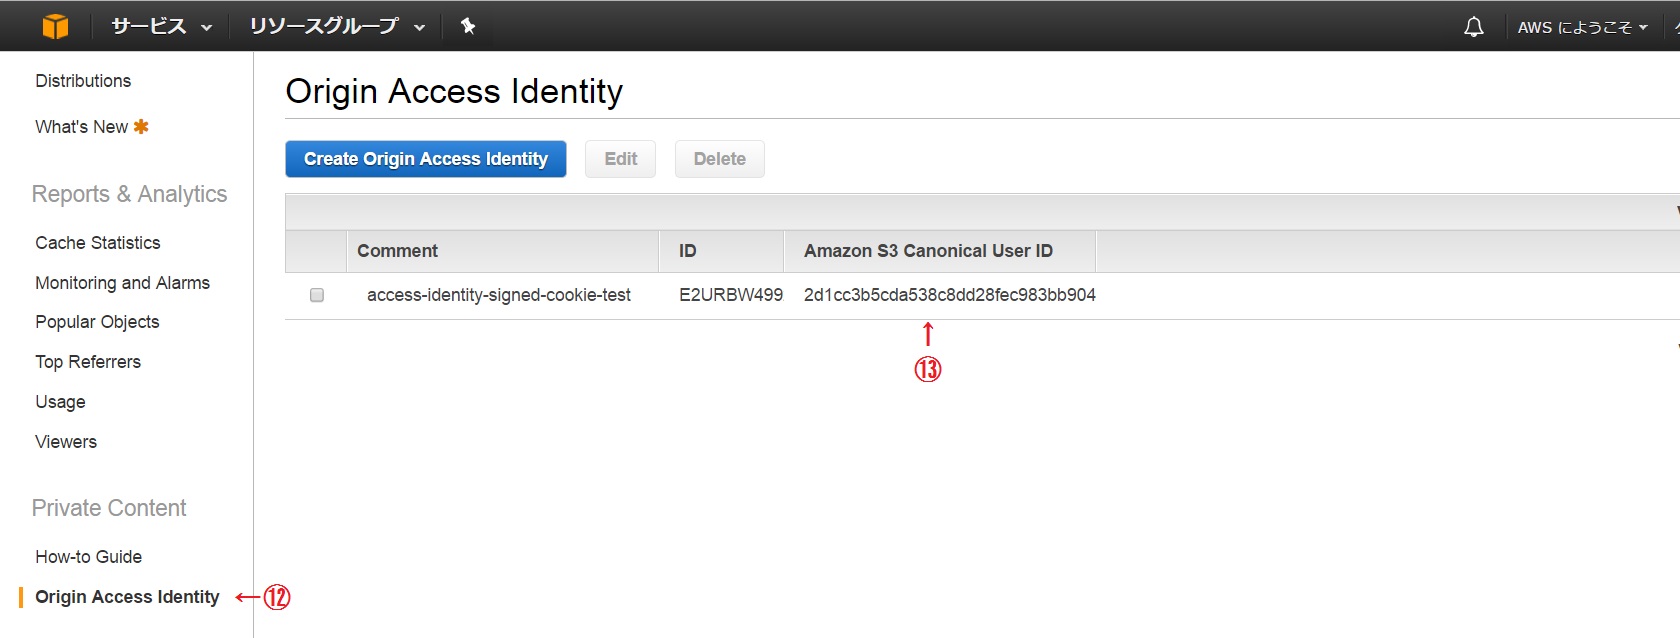 ⑫ Click ** "Origin Access Identity" **
⑬ ** Confirm "Amazon S3 Canonical User ID" **
⑭ Wait for the distribution to be created
⑫ Click ** "Origin Access Identity" **
⑬ ** Confirm "Amazon S3 Canonical User ID" **
⑭ Wait for the distribution to be created
1-3. Set the access authority of S3 bucket
① In S3 of the console, select the S3 bucket to be published → ** "Access authority" tab **
 ② Click ** [Access Control List] **
③ Click ** [Add user] **
④ Enter the character string confirmed in ⑬ of CloudFront settings
⑤ Check ** "Read" ** in ** "Object Access" **
⑥ Click ** [Save] **
② Click ** [Access Control List] **
③ Click ** [Add user] **
④ Enter the character string confirmed in ⑬ of CloudFront settings
⑤ Check ** "Read" ** in ** "Object Access" **
⑥ Click ** [Save] **
 ⑦ Click ** [Bucket Policy] ** and check that the policy is set (as specified when creating the CloudFront distribution).
2. Implement code that sets a signed cookie in your application
This time, I implemented it in Spring Boot environment because it is an experiment in local development environment. Below, only the Controller class ** for ** "/ set-cookie" is described.
Create a ** "files" ** folder under ** "src / main / resources" ** and create a ** "private-" folder in the private key file that has been converted to .der format in advance. Save it as "key.der" **. This time, the file was saved in this location according to the Spring Boot environment, so it is a little troublesome to retrieve the contents of the private key file, but save the file in WEB-INF in the normal Servlet environment. If you keep it, you should be able to take it out more straightforwardly.
In addition, Amazon recommends updating the key pair (private key and public key) every 90 days, and if you update in such a short cycle, the key pair ID and private key file are hard-coded. It's better to keep it in a form that can be updated separately from the application, rather than having it fixedly included in the application package.
SetCookieController.java
package site.hmatsu47.springboot;

import javax.servlet.http.Cookie;
import javax.servlet.http.HttpServletResponse;
import org.springframework.web.bind.annotation.RequestMapping;

import com.amazonaws.services.cloudfront.CloudFrontCookieSigner;
import com.amazonaws.services.cloudfront.CloudFrontCookieSigner.CookiesForCustomPolicy;
import com.amazonaws.util.DateUtils;

import java.io.File;
import java.nio.file.Files;
import java.security.KeyFactory;
import java.security.interfaces.RSAPrivateKey;
import java.security.spec.PKCS8EncodedKeySpec;
import java.util.Date;

import org.springframework.beans.factory.annotation.Autowired;
import org.springframework.core.io.Resource;
import org.springframework.core.io.ResourceLoader;
import org.springframework.stereotype.Controller;

@Controller
public class SetCookieController {

	@Autowired
    ResourceLoader resourceLoader;

	@RequestMapping("/set-cookie")
	public void setCookie(HttpServletResponse res) throws Exception{
		String url = "https://www.hmatsu47.site/";		// URL
		String filepath = "files/private-key.der";		//Private key
		Resource resource = resourceLoader.getResource("classpath:" + filepath);
		File file = resource.getFile();
		byte[] privateKeyByteArray = Files.readAllBytes(file.toPath());
		PKCS8EncodedKeySpec keySpec = new PKCS8EncodedKeySpec(privateKeyByteArray);
		KeyFactory kf = KeyFactory.getInstance("RSA");
		RSAPrivateKey privateKey = (RSAPrivateKey) kf.generatePrivate(keySpec);
		String resourcePath = "*";						//Scope of permission for access
		String keyPairId = "[Key pair ID]";					//Key pair ID
		Date activeFrom = null;							//Validity period: Start (null = immediate)
		Date expiresOn = DateUtils.parseISO8601Date("2020-12-31T23:59:59.999Z"); //Validity period: End (in UTC)
		String ipRange = "0.0.0.0/0";					//IP address range of access source
		//Generating key / value for cookie
		CookiesForCustomPolicy cookies = CloudFrontCookieSigner.getCookiesForCustomPolicy(
				url + resourcePath, privateKey, keyPairId, expiresOn, activeFrom, ipRange);
		//Cookie settings
		Cookie cookiePolicy = new Cookie(
				cookies.getPolicy().getKey(), cookies.getPolicy().getValue());
		cookiePolicy.setDomain("hmatsu47.site");
		cookiePolicy.setHttpOnly(true);
		cookiePolicy.setSecure(true);
		res.addCookie(cookiePolicy);

		Cookie cookieSignature = new Cookie(
				cookies.getSignature().getKey(), cookies.getSignature().getValue());
		cookieSignature.setDomain("hmatsu47.site");
		cookieSignature.setHttpOnly(true);
		cookieSignature.setSecure(true);
		res.addCookie(cookieSignature);

		Cookie cookieKeyPairId = new Cookie(
				cookies.getKeyPairId().getKey(), cookies.getKeyPairId().getValue());
		cookieKeyPairId.setDomain("hmatsu47.site");
		cookieKeyPairId.setHttpOnly(true);
		cookieKeyPairId.setSecure(true);
		res.addCookie(cookieKeyPairId);
		//Transition by redirect
		res.sendRedirect(url + "index.html");
	}
}
3. Execute
In the S3 bucket to be published, save index.html with appropriate contents and images loaded by specifying index.html.
First, start your browser and open ** "https://www.hmatsu47.site/index.html" **. Then, since you do not have access authority, the target page will not open and an error will occur.
Next, open the ** "https://hmatsu47.site/set-cookie" ** implemented in 2. Then, after the signed cookie is set for the domain ** "hmatsu47.site" ** and its subdomain range, it will be redirected and this time the page will open correctly.
When you close the browser, the signed cookie disappears, so when you start the browser again, ** "https://www.hmatsu47.site/index.html" ** will not open and an error will occur.
- This time, I ran the Spring Boot application in the local development environment (Windows 8.1) for quick confirmation (edit the hosts file and point ** "hmatsu47.site" ** locally. Self-authentication key Use Spring Boot to set up SSL / TLS communication (Qiita also has multiple posts in the past about the method). The listening port is 443 instead of 8443 etc.).
hosts file (additional note)
127.0.0.1 hmatsu47.site
This worked fine in the development environment (STS 3.8.4.RELEASE on Windows 8.1) prepared this time, but there is no guarantee that it will work in other environments (local environment), so if it does not work, it is a normal public server environment. It seems better to try it with.
4. Use for video playback
See the article below. ** Play restricted access video (HLS format) under CloudFront with Video.js using signed cookie **
Recommended Posts