[SWIFT] Run a simple model made with Keras on iOS using CoreML
In order to understand CoreML Tools, I thought it would be good if I could use a simple model I made and change the model as I like. I will explain the procedure.
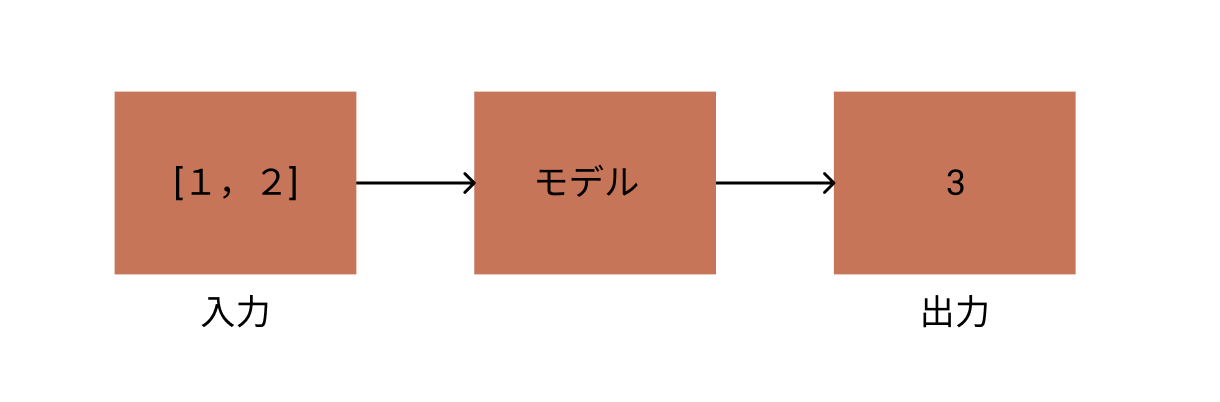
What to make
Given two sets of numbers, create a model that predicts the result of adding them.
<Fig. 1>
procedure
The full version of this code is stored here. https://gist.github.com/TokyoYoshida/bab3d0396c05afce445852d2ae224cf4
** 1. Start Google Colab **
Go to the Google Colaboratory site. Google Colaboratory
** 2. Install & import what you need **
I also installed tensorflow and keras according to the version of coremltools.
notebook
!pip install tensorflow==1.14.0
!pip install -U coremltools
!pip install keras==2.2.4
Then import the required modules.
notebook
from keras.models import Sequential
from keras.layers import Dense, Activation
import numpy as np
import math
from keras.utils import np_utils
import keras
** 3. Get ready for Tensorboard **
Model information may be required when converting with CoreML Tools. To do this, you need to understand the model to some extent, but be prepared to visualize it with Tensorboard because it will help you understand the information of the model. (I'm making a model myself this time, so I don't need model information)
reference: [TF] How to use Tensorboard from Keras
notebook
!mkdir logs
tb_cb = keras.callbacks.TensorBoard(log_dir='./logs', histogram_freq=0, batch_size=32, write_graph=True, write_grads=False, write_images=False, embeddings_freq=0, embeddings_layer_names=None, embeddings_metadata=None)
cbks = [tb_cb]
** 4. Make a model and learn **
Input data to create 10,000 combinations of two integers. Since the teacher data is treated as a classification problem this time, it will be 18 arrays [0,1,2,3,4 ... 17,18]. (Because 9 + 9 = 18 is the maximum value as a combination of answers) In this array, only the answer part contains 1 and the other parts contain 0. This method of expression is called One-hot expression.
<Fig. 2>
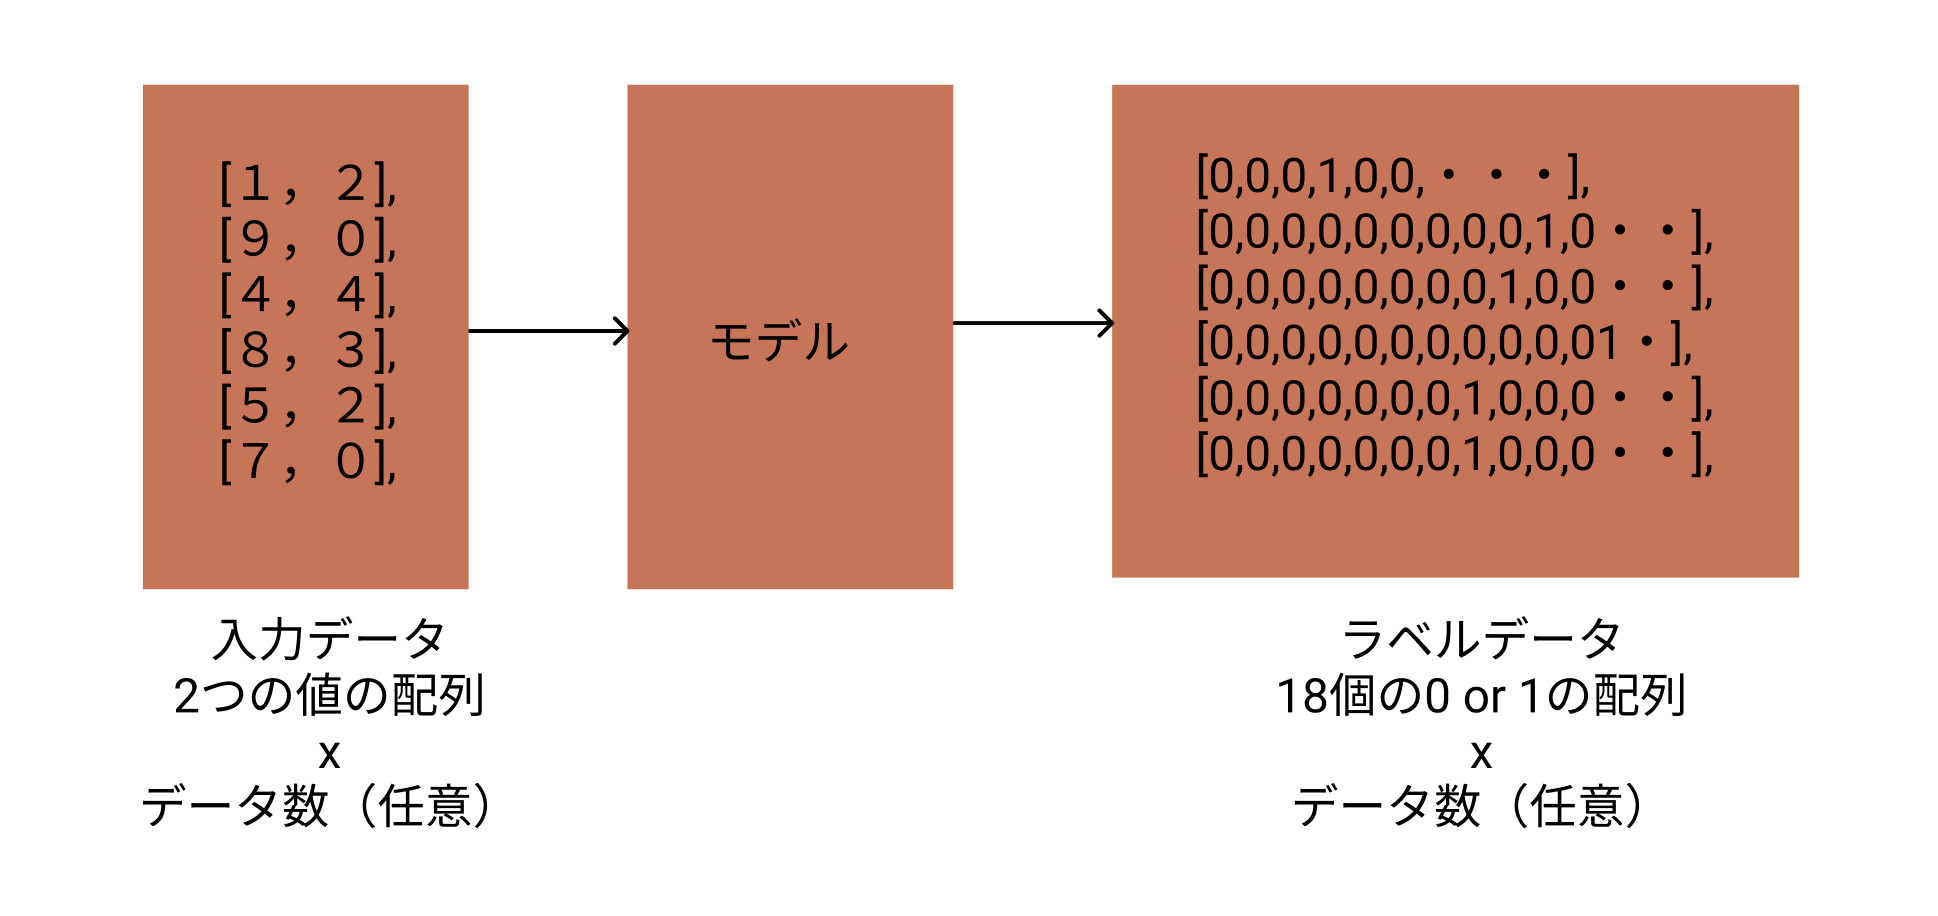
The model uses three simple fully connected layers and the activation function uses softmax.
reference: Addition of 1 digit with Keras
notebook
x = np.random.randint(0, 10, (10000,2))
y = np_utils.to_categorical(np.sum(x, axis=1))

model = Sequential()
model.add(Dense(512, activation='relu', input_dim=2))
model.add(Dense(256, activation='relu'))
model.add(Dense(y.shape[1]))
model.add(Activation("softmax"))
model.compile('rmsprop',
              'categorical_crossentropy',
              metrics=['accuracy'])


train_rate = 0.7
train_len = math.floor(len(x) * train_rate)
trainx = x[0:train_len]
trainy = y[0:train_len]
testx = x[train_len:]
testy = y[train_len:]

history = model.fit(trainx, trainy,
                    batch_size=128,
                    epochs=100,
                    verbose=1,
                    callbacks=cbks,
                    validation_data=(testx, testy))
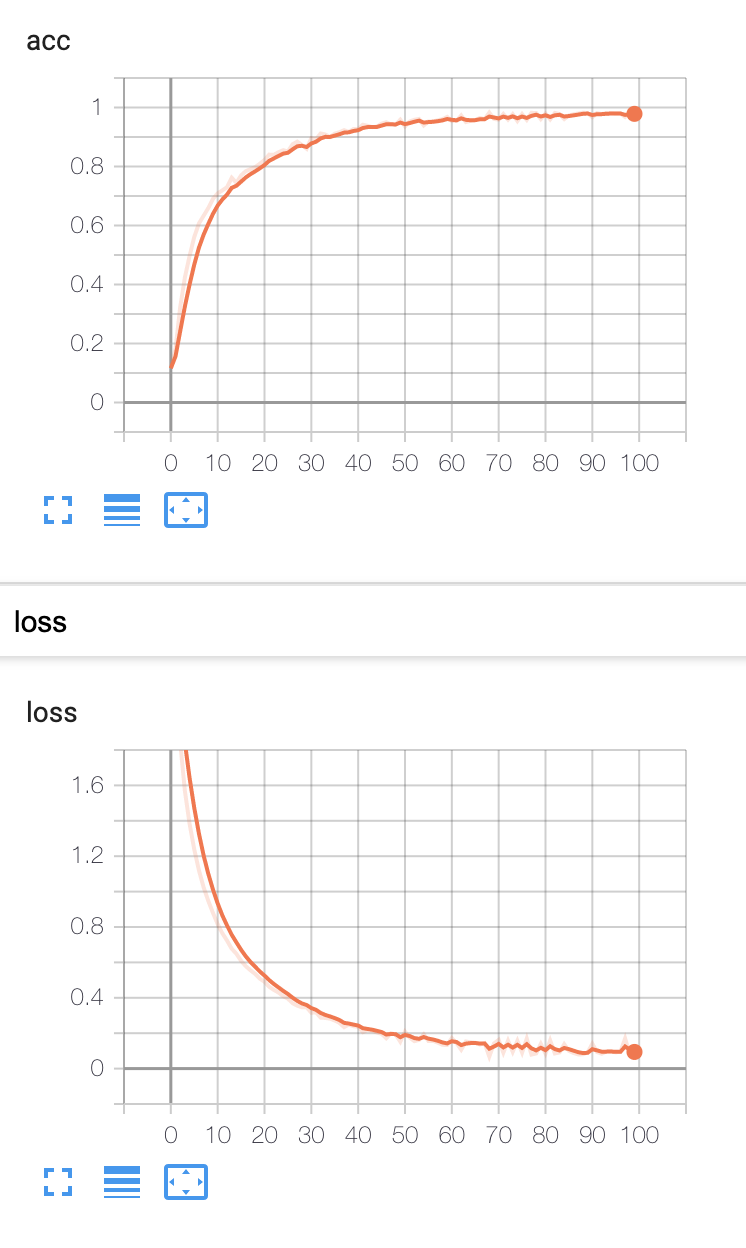
Run the code above to start learning.
notebook
7000/7000 [==============================] - 0s 54us/step - loss: 0.1705 - acc: 0.9677 - val_loss: 0.0172 - val_acc: 1.0000
Epoch 99/100
7000/7000 [==============================] - 0s 53us/step - loss: 0.0804 - acc: 0.9804 - val_loss: 0.0069 - val_acc: 1.0000
Epoch 100/100
7000/7000 [==============================] - 0s 57us/step - loss: 0.0745 - acc: 0.9806 - val_loss: 0.0062 - val_acc: 1.0000
Although the training data and the test data are separated this time, the verification result (val_acc) by the test data is not very reliable because there is actually a fog.
** 5. Visualize with Tensorboard **
Load Tensroboard and run it.
For some reason, if you do not uninstall tensorboard-plugin-wit, an error will occur, so uninstall it.
notebook
%load_ext tensorboard
!pip uninstall tensorboard-plugin-wit
%tensorboard --logdir ./logs
Learning situation
Graph information
Layers are input from bottom (dense_1), output from top (activation_1), and so on.
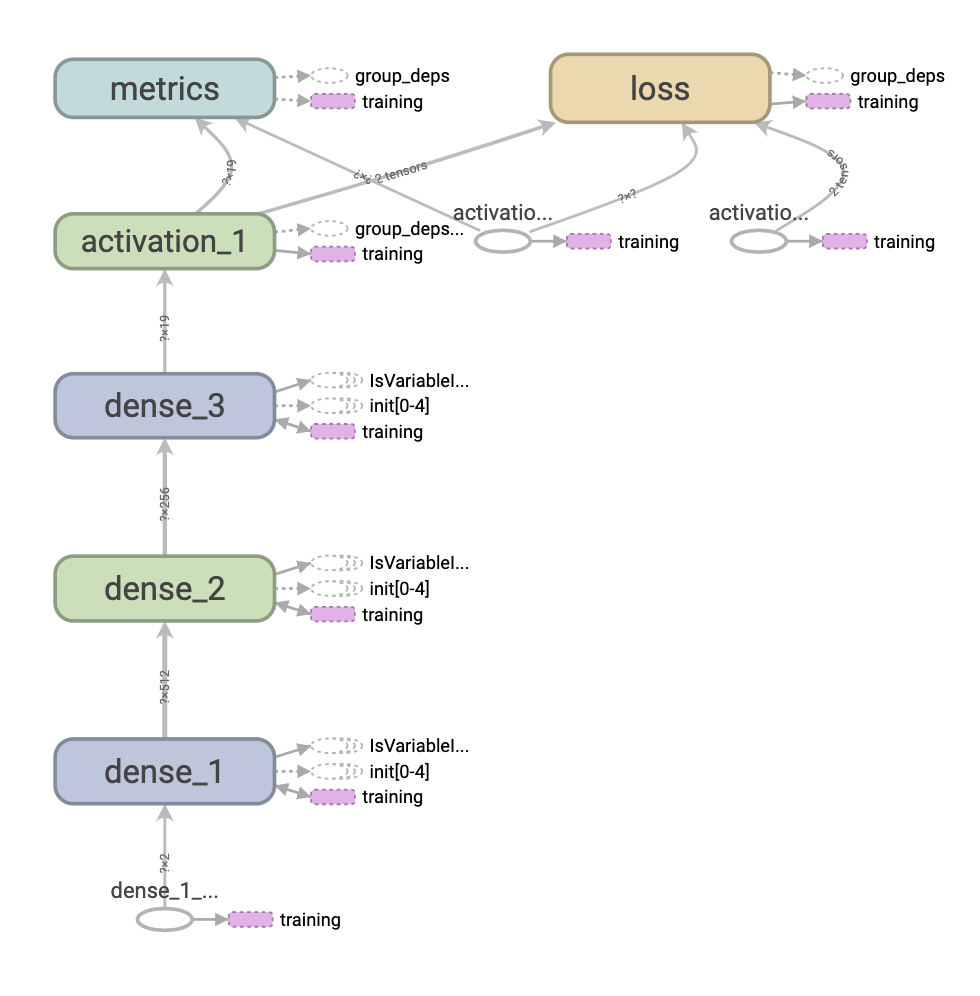
Let's look at the input side (dense_1).
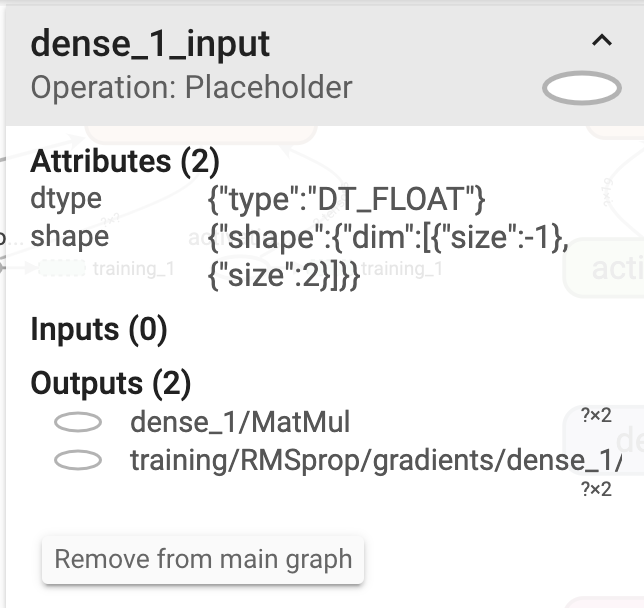
You can see that Operation is a Placeholder and data is entered here. dtype is DT_FLOAT. The data this time is made with integers, but it can handle data with decimal numbers or less. The shape is {"dim": {"size": -1}, "size": 2]}. In other words, it is the shape of (-1,2). -1 means any value. 2 is because you are entering a combination of two letters. In the input data of <Fig.2>, it matches that the combination of two numbers x the number of test data (optional).
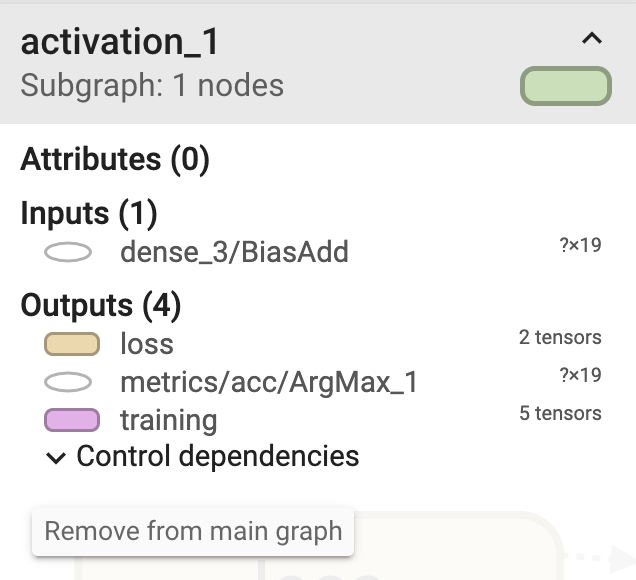
Let's look at the output side (activation_1). Since activation_1 is a softmax function, the calculation result of the softmax function is output for the 19 numbers output by the previous dense_3, and it is output to loss, metrics, and training.
Model information can also be output using the keras summary method. In Tensorboard, the layers were from bottom to top, but this one is from top to bottom.
notebook
model.summary()
_________________________________________________________________
Layer (type)                 Output Shape              Param #
=================================================================
dense_1 (Dense)              (None, 512)               1536
_________________________________________________________________
dense_2 (Dense)              (None, 256)               131328
_________________________________________________________________
dense_3 (Dense)              (None, 19)                4883
_________________________________________________________________
activation_1 (Activation)    (None, 19)                0
=================================================================
Total params: 137,747
Trainable params: 137,747
Non-trainable params: 0
** 6. Try to predict on Notebook **
Before running it on iOS, make sure it works well on your Notebook. If you give a suitable combination of two numbers, you can see that the calculation is correct.
notebook
np.argmax(model.predict(np.array([[7,6]])),axis=1)
// array([13])
np.argmax(model.predict(np.array([[1,3]])),axis=1)
// array([4])
** 7. Convert to Core ML **
Save the model created above. (Even if you don't do this, the model is already obtained, so you can convert it to Core ML as it is.)
notebook
model.save('my_model.h5')
Read and convert.
notebook
from keras.models import load_model
keras_model = load_model('my_model.h5')
from coremltools.converters import keras as converter

#Make a classification label for the numbers of the expected results["0","1","2"..."18"]
class_labels = np.arange(0, 19).astype('unicode').tolist()

#conversion
mlmodel = converter.convert(keras_model, #Model to be converted
  output_names=['digitProbabilities'], #Give the expected output a name. It will be accessible as a variable name from swift
  class_labels=class_labels, #Forecast result classification label
  predicted_feature_name='digit' #Give the classification output a name. It will be accessible as a variable name from swift
)
you save.
notebook
coreml_model_path = 'my_model.mlmodel'
mlmodel.save(coreml_model_path)
The code around here is the same as the one written in this book.
Introduction to Core ML Tools Practice --iOS x DEEP LEARNING

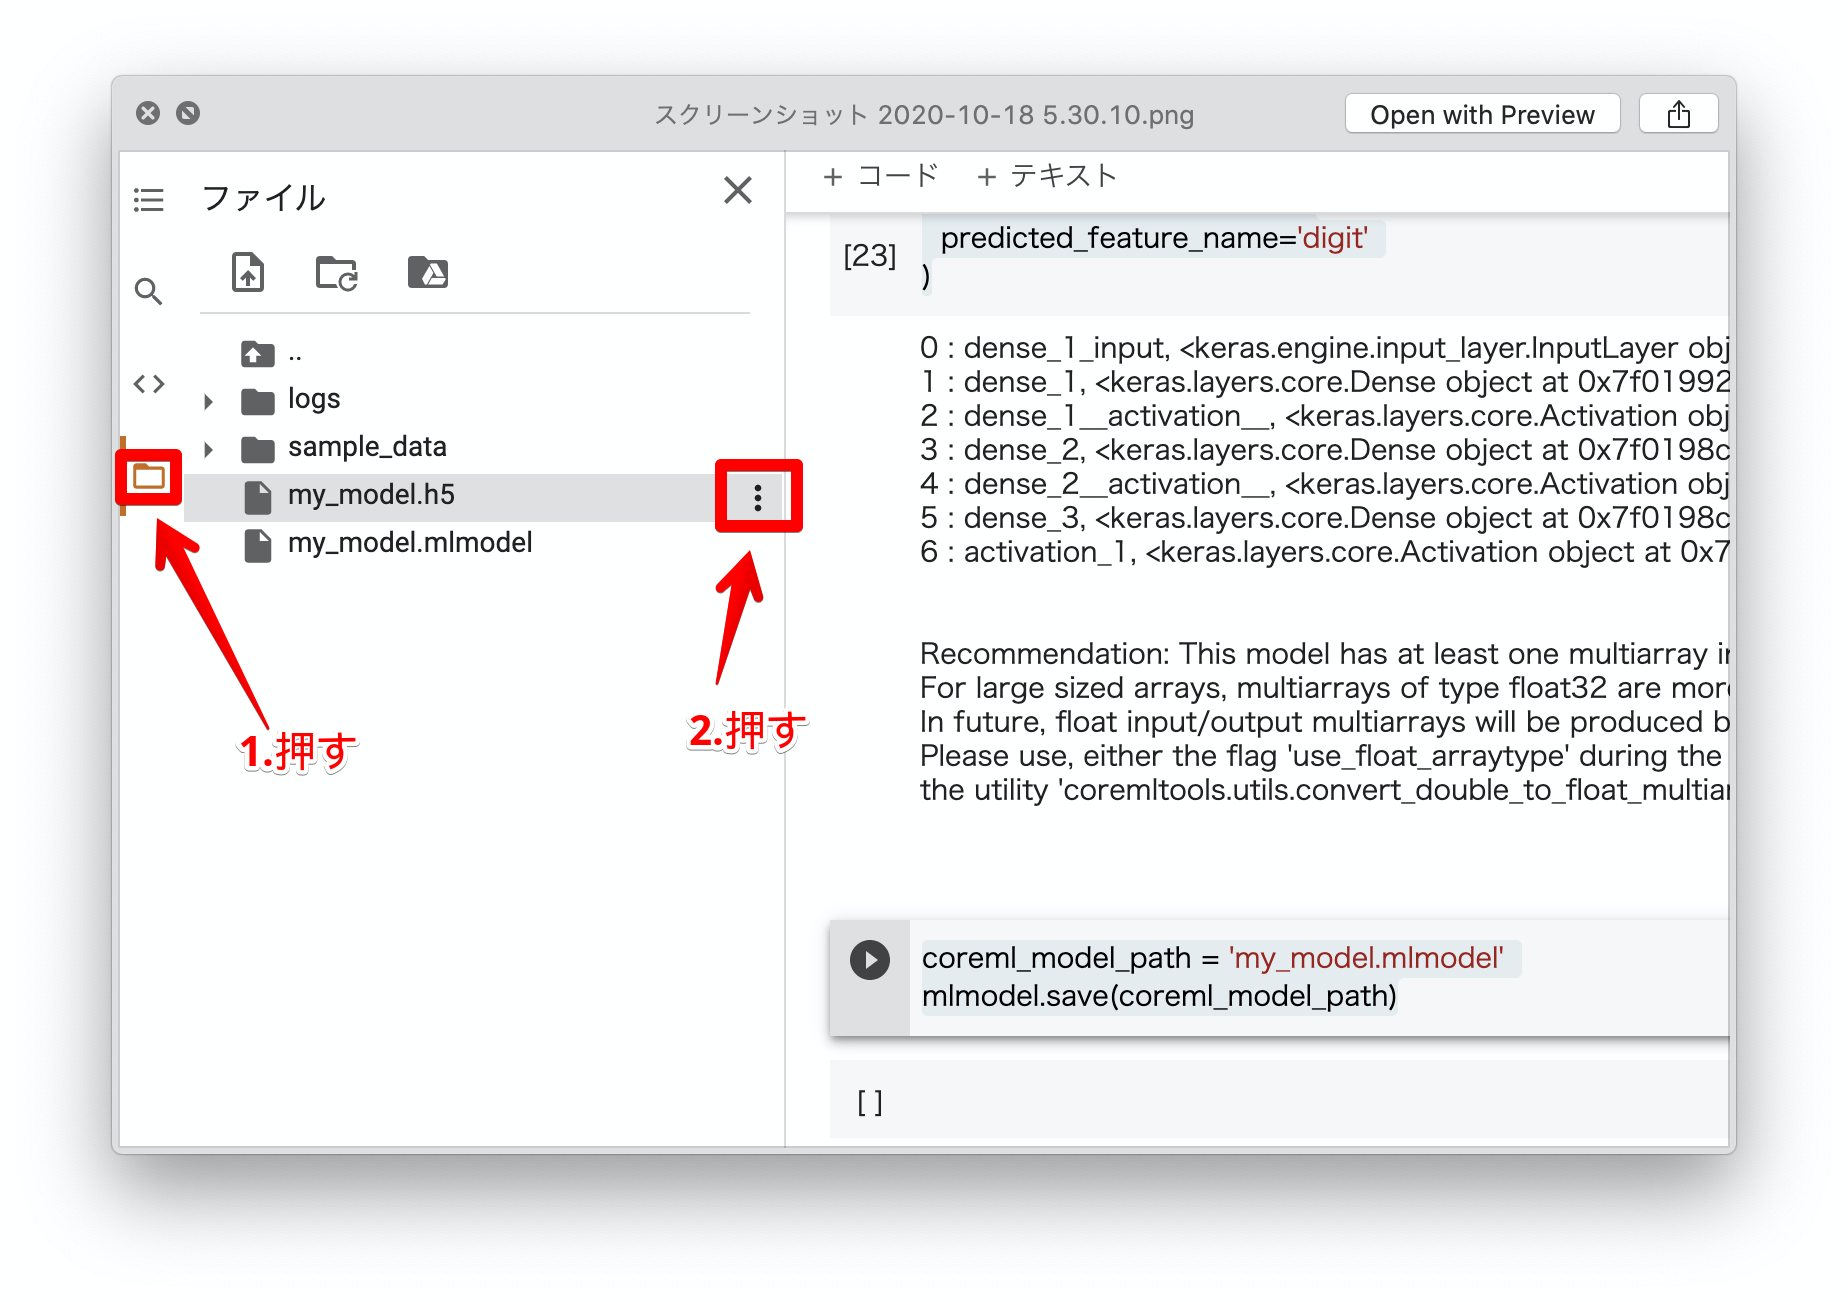
** 8. Download the Core ML model (.mlmodel file) **
Select from Notebook as shown below and select "Download" to download.
** 9. Drag & Drop to Xcode project **
Start Xcode and create a "Single View App" from Create Project.
The project I made this time is on github, so you can use it. TokyoYoshida/CoreMLSimpleTest
Drag and drop the .mlmodel file to any location in your project.
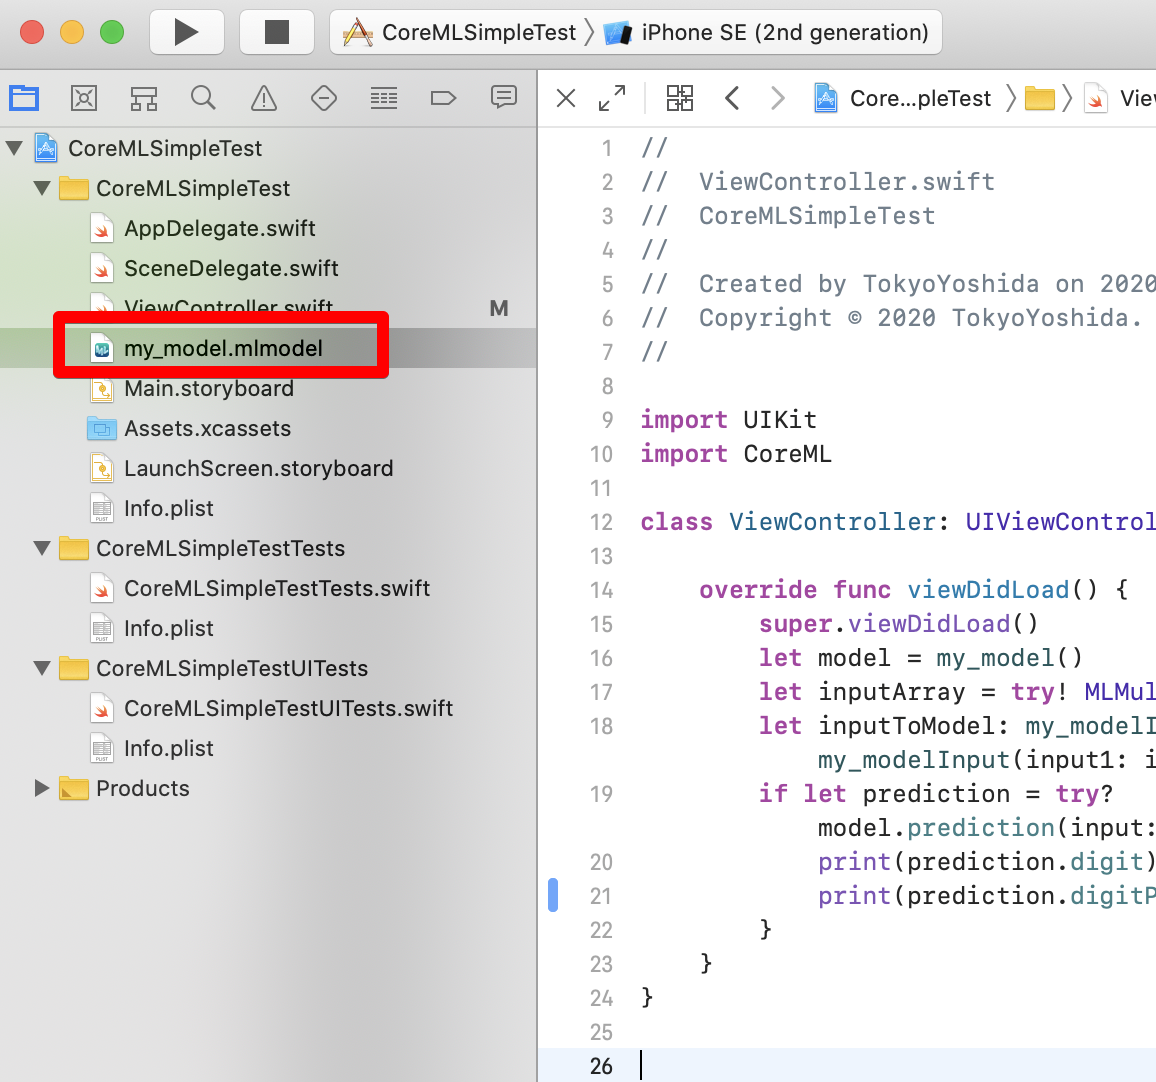
You can see a preview by selecting a model in Xcode.
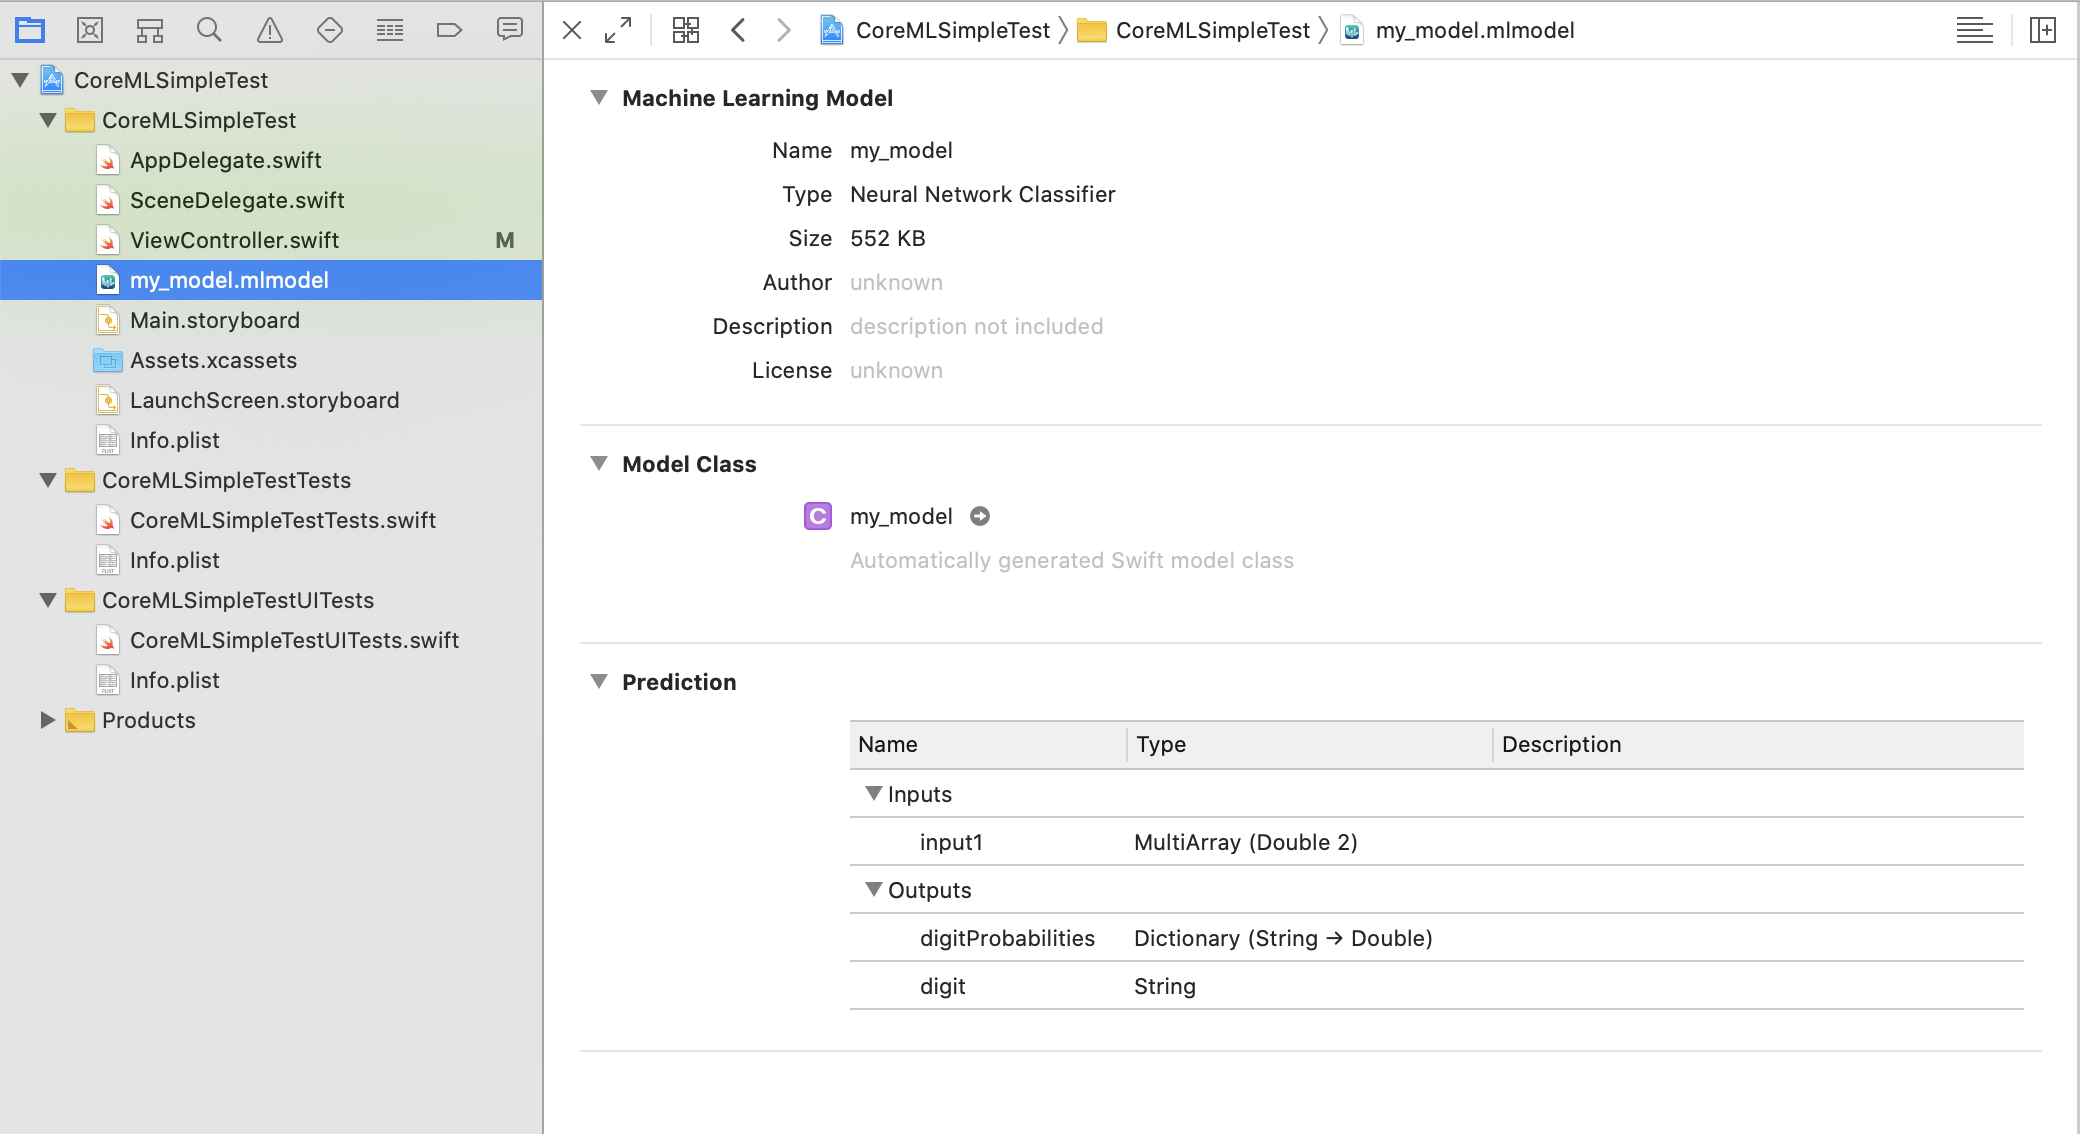
The input is of type MultiArray and takes two Doubes. For example, if you want to expect 2 + 3, give [2,3]. In the output, digitProbabilities is Dictionary, the string is Key, and Double is Value. This item is an expected result, and the probability for each number label is output. digit is the result of applying the expected result to the number label.
The MultiArray type is a multidimensional array used as an input or output of the model defined in Core ML.
** 10. Write inference code using Core ML **
Since this model is not image recognition, we will directly operate Core ML without using Vision Framework. Write the code in viewDidLoad of ViewController.
ViewController.swift
class ViewController: UIViewController {

    override func viewDidLoad() {
        super.viewDidLoad()
        let model = my_model()
        //Make a pair of numbers you want to predict
        let inputArray = try! MLMultiArray([2,3])
        let inputToModel: my_modelInput = my_modelInput(input1: inputArray)
        //Infer
        if let prediction = try? model.prediction(input: inputToModel) {
            //Result output
            print(prediction.digit)
            print(prediction.digitProbabilities)
        }
    }
}
** 11. Do it **
When I run the app, the screen of the app appears uselessly, but I don't care and look at the Output column of Xcode.
Result output
5
["13": 1.401298464324817e-45, "7": 4.403268860642129e-08, "16": 0.0, "12": 1.401298464324817e-45, "10": 1.401298464324817e-45, "4": 2.876720373024e-06, "11": 1.401298464324817e-45, "1": 1.2956196287086532e-23, "6": 6.624156412726734e-06, "8": 6.452452973902557e-18, "15": 1.401298464324817e-45, "2": 7.265933324842114e-14, "0": 1.0373160919090815e-33, "18": 0.0, "9": 1.7125880512063084e-34, "17": 0.0, "3": 1.129986526746086e-15, "14": 1.401298464324817e-45, "5": 0.9999904632568359]
Since we are giving 2 + 3, 5 is inferred. In the output of digitProbabilities, the probability is output using each label as a key. The probability of being 5 is 0.9999904632568359, which is almost 1. The probability of other numbers, for example 13, is 1.401298464324817e-45, which is 1.401298464324817 ✕ 10 to the -45th power, so it is almost zero.
Finally
Note regularly publishes about iOS development, so please follow us. https://note.com/tokyoyoshida
Twitter has simple tips. https://twitter.com/jugemjugemjugem
Recommended Posts