Launch Rails on EC2
Introduction
The procedure for "using the AWS server" is written in 5 parts.
Please check the articles below.
① Initial setting of EC2 ② Create a database in production environment ③ Start Rails on EC2 ← Imakoko ④ Set up the Web server ⑤ Automate deployment
Settings for launching Rails on EC2
Run in terminal (in EC2)
- You may be asked to enter about 3 steps such as "passphrase" on the way. Press Enter to proceed without typing anything.
[ec2-user@ip-***-**-**-*** ~]$ ssh-keygen -t rsa -b 4096
Generating public/private rsa key pair.
Enter file in which to save the key (/home/ec2-user/.ssh/id_rsa):
Enter passphrase (empty for no passphrase):
Enter same passphrase again:
Your identification has been saved in /home/ec2-user/.ssh/id_rsa.
Your public key has been saved in /home/ec2-user/.ssh/id_rsa.pub.
The key fingerprint is:
3a:8c:1d:d1:a9:22:c7:6e:6b:43:22:31:0f:ca:63:fa ec2-user@ip-172-31-23-189
The key's randomart image is:
+--[ RSA 4096]----+
|    +            |
| . . =           |
|  = . o .        |
| * o . o         |
|= *     S        |
|.* +     .       |
|  * +            |
| .E+ .           |
| .o              |
+-----------------+
Next, copy the value of the ssh public key displayed by the "cat command".
By executing the "cat command", you can check the specific contents of the file on the terminal.
[ec2-user@ip-***-**-**-*** ~]$ cat ~/.ssh/id_rsa.pub
ssh-rsa AAAAB3NzaC1yc2E......
Next, register the public key displayed by the cat command in GitHub. Access the following URL
https://github.com/settings/keys
Fill in "Title" Paste the public key into "Key" Press "ADD SSH Key" to save
After registering the key on GitHub, check if you can connect with ssh with the following command
- You may be asked Yes / No if you want to continue as it is, but proceed with "Yes".
[ec2-user@ip-***-**-**-*** ~]$ ssh -T [email protected]
Hi <Github username>! You've successfully authenticated, but GitHub does not provide shell access.
If "Permission denied (public key)." Is displayed, The ssh key setting is incorrect, so check the work again.
Application server settings
"Application server" accepts "requests" from browsers Software that actually runs Rails applications
You also need to run the application server on the EC2 server. The necessary tools for that are ** `ʻUnicorn`` **
"Unicorn" is an application server that is often used on servers that are open to the world. It can be started by "unicorn_rails command" instead of rails s command.
Install Unicorn
Add the following contents to the bottom of the Gemfile and bundle install
- If "group: production do ~ end" already exists, add it to it.
group :production do
  gem 'unicorn', '5.4.1'
end
Create and edit "unicorn.rb"
- The following work is done in the "master branch"
Create "config / unicorn.rb" and edit the contents as follows
config/unicorn.rb
#Put the directory where the application code on the server is installed in a variable
app_path = File.expand_path('../../', __FILE__)

#Determine application server performance
#Worker that accepts requests and generates responses(worker)Determine the number of
worker_processes 1

#Specify the directory where the application is installed
#When Unicorn runs Rails code, it specifies a directory to look for files that it actually references, such as routing.
working_directory app_path

#Specify the location of the files required to start Unicorn
#Unicorn will generate a file with the process id when it starts. Specify the location.
pid "#{app_path}/tmp/pids/unicorn.pid"

#Specify the port number
#Decide which port number you want to accept requests. This time, specify port 3000.
listen 3000

#Specify a file to log errors
stderr_path "#{app_path}/log/unicorn.stderr.log"

#Specify the file to record the normal log
stdout_path "#{app_path}/log/unicorn.stdout.log"

#Set maximum time to wait for Rails application response
timeout 60

#The following is an applied setting, so the explanation is omitted.

preload_app true
GC.respond_to?(:copy_on_write_friendly=) && GC.copy_on_write_friendly = true

check_client_connection false

run_once = true

before_fork do |server, worker|
  defined?(ActiveRecord::Base) &&
    ActiveRecord::Base.connection.disconnect!

  if run_once
    run_once = false # prevent from firing again
  end

  old_pid = "#{server.config[:pid]}.oldbin"
  if File.exist?(old_pid) && server.pid != old_pid
    begin
      sig = (worker.nr + 1) >= server.worker_processes ? :QUIT : :TTOU
      Process.kill(sig, File.read(old_pid).to_i)
    rescue Errno::ENOENT, Errno::ESRCH => e
      logger.error e
    end
  end
end

after_fork do |_server, _worker|
  defined?(ActiveRecord::Base) && ActiveRecord::Base.establish_connection
end
Reflect your edits in the remote repository
"Commit → push" to the remote repository If it can be reflected in the remote repository of GitHub, reflect all the local contents so far in EC2.
- If you have a separate branch, merge it into the master branch and then execute the following command.
#Create a new directory with the mkdir command
[ec2-user@ip-***-**-**-*** ~]$ sudo mkdir /var/www/

#Ec2 permissions on the created www directory-Change to user
[ec2-user@ip-***-**-**-*** ~]$ sudo chown ec2-user /var/www/
Next, get the "repository URL" from GitHub and clone it.
You can copy the URL by pressing the green "Code".

Once you have copied the URL, clone the code
[ec2-user@ip-***-**-**-*** ~]$ cd /var/www/
[ec2-user@ip-***-**-**-*** www]$git clone paste the copied URL
Success if there is no error in the above input.
Production settings
The EC2 instance that is currently running does not have enough computer power, An error may occur when installing Gem. Specifically, there is not enough memory related to the processing power of the computer. This is the limit of instances that can be run for free, so it can't be helped ...
Therefore, before making future settings, a process called "Swap file" is performed to increase the memory.
A "Swap file" is a file prepared to temporarily increase the amount of memory. EC2 does not prepare a Swap file by default, so preparing it will prevent memory shortage processing errors.
Increase the area of Swap files
Make an ssh connection to EC2 and move to your home directory Run in terminal (in EC2)
[ec2-user@ip-***-**-**-*** ~]$ cd
Execute the following commands in order
[ec2-user@ip-***-**-**-*** ~]$ sudo dd if=/dev/zero of=/swapfile1 bs=1M count=512

#Wait for a while and succeed if the following is displayed
512+0 record input
512+0 record output
536870912 bytes(537 MB)Copied, 7.35077 seconds, 73.0 MB/Seconds
[ec2-user@ip-***-**-**-*** ~]$ sudo chmod 600 /swapfile1
[ec2-user@ip-***-**-**-*** ~]$ sudo mkswap /swapfile1

#Success if the following is displayed
Set swap space version 1, size= 524284 KiB
No label, UUID=74a961ba-7a33-4c18-b1cd-9779bcda8ab1
[ec2-user@ip-***-**-**-*** ~]$ sudo swapon /swapfile1
[ec2-user@ip-***-**-**-*** ~]$ sudo sh -c 'echo "/swapfile1 none swap sw 0 0" >> /etc/fstab'
This completes allocating the Swap file area.
Install gem in EC2
Install the gem required to launch the application cloned on EC2 with the following command
Run in terminal (in EC2)
#Move to the cloned directory
[ec2-user@ip-***-**-**-*** www]$ cd  /var/www/Application under development

#Check the version of ruby
[ec2-user@ip-***-**-**-*** <Repository name>]$ ruby -v
ruby 2.6.5p114 (2019-10-01 revision 67812) [x86_64-linux]
- If it is "ruby 2.6.5 ...", it is successful. If not, Since the originally prepared Ruby is used, check if the Ruby installation is successful.
Next, install bundler to manage gems in production environment. First, check which version of bundler was used in the locally developed application.
Run in terminal (local)
#Run in the directory of the application under development

% bundler -v
Bundler version 2.1.4 ← Example
Introduced the same version of bundler as local on the EC2 side. In the above case, install the version of "bundler 2.1.4" and execute bundle install.
Run in terminal (in EC2)
# 「2.1.In the part of "4", the version of bundler confirmed locally is introduced.
[ec2-user@ip-***-**-**-*** <Repository name>]$ gem install bundler -v 2.1.4

#The following commands may take several minutes or more to process
[ec2-user@ip-***-**-**-*** <Repository name>]$ bundle install
Set environment variables
The value of the environment variable can be used from Rails by writing "ENV ['
"Secret_key_base" is a character string used to encrypt cookies. You need to prepare it when you run a Rails application. Also, since it is a value that should not be leaked to the outside, this is also referred to from the environment variable.
First, create secret_key_base with the following command
Run in terminal (in EC2)
# 「2.1.In the part of "4", the version of bundler confirmed locally is introduced.
[ec2-user@ip-***-**-**-*** <Repository name>]$ rake secret
69619d9a75b78f2e1c87ec5e07541b42f23efeb6a54e97da3723de06fe74af29d5718adff77d2b04b2805d3a1e143fa61baacfbf4ca2c6fcc608cff8d5a28e8d
- Make a note of all the displayed alphanumeric characters in a memo app, etc.
Next, set environment variables in EC2. Environment variables are saved in a file called "/ etc / environment". Use the vim command to write environment variables. At that time, use the option "sudo".
"Sudo" is an option with the role of "execute a command with all privileges". Since "files under / etc" cannot be written or saved without strong authority, add "sudo" to the beginning of the command.
Run in terminal (in EC2)
# 「2.1.In the part of "4", the version of bundler confirmed locally is introduced.
[ec2-user@ip-***-**-**-*** ~]$ sudo vim /etc/environment
Type "i" to enter input mode. After that, it is described as follows.
#Enter the password for the database root user (see the article from the link below)

DATABASE_PASSWORD='Database root user password'
SECRET_KEY_BASE='The secret created earlier_key_base'
- Root user settings Read Creating an AWS Account.
After completing the input, execute in the order of "esc key" → ": wq" and save. Log out of the production environment once to reflect the set environment variables.
Run in terminal (in EC2)
# 「2.1.In the part of "4", the version of bundler confirmed locally is introduced.
[ec2-user@ip-***-**-**-*** ~]$ exit
logout
Connection to 52.xx.xx.xx closed.
Next, check if the environment variables you have just set are reflected properly. Connect to EC2 again with the following command.
Terminal (local)
$ ssh -i [The name of the downloaded key].pem ec2-user@[Elastic IP associated with the created EC2 instance]
After reconnecting, combine the "env command" and "grep command" to Make sure that the environment variables you set earlier are applied.
env command: Command to display the set environment variables grep command: Command used to search environment variables, etc. The usage is "grep (search target)".
Run in terminal (in EC2)
# 「2.1.In the part of "4", the version of bundler confirmed locally is introduced.
[ec2-user@ip-***-**-**-*** ~]$ env | grep SECRET_KEY_BASE
SECRET_KEY_BASE='secret_key_base'

[ec2-user@ip-***-**-**-*** ~]$ env | grep DATABASE_PASSWORD
DATABASE_PASSWORD='Database root user password'
Release port
The EC2 instance you just launched can be accessed with ssh, It is not connected at all by other communication methods such as HTTP. Therefore, the EC2 instance used as a server needs to open the "port" so that HTTP can be connected in advance. Earlier, I wrote "listen 3000" in config / unicorn.rb, This means "start the Rails server on port 3000".
In order to set the port, it is necessary to change the setting called "security group" of EC2.
Set security group port
Select the target instance from the EC2 instance list screen and select it.
Click the "Security Group" link ("launch-wizard-2" in the figure) at the bottom right of the figure
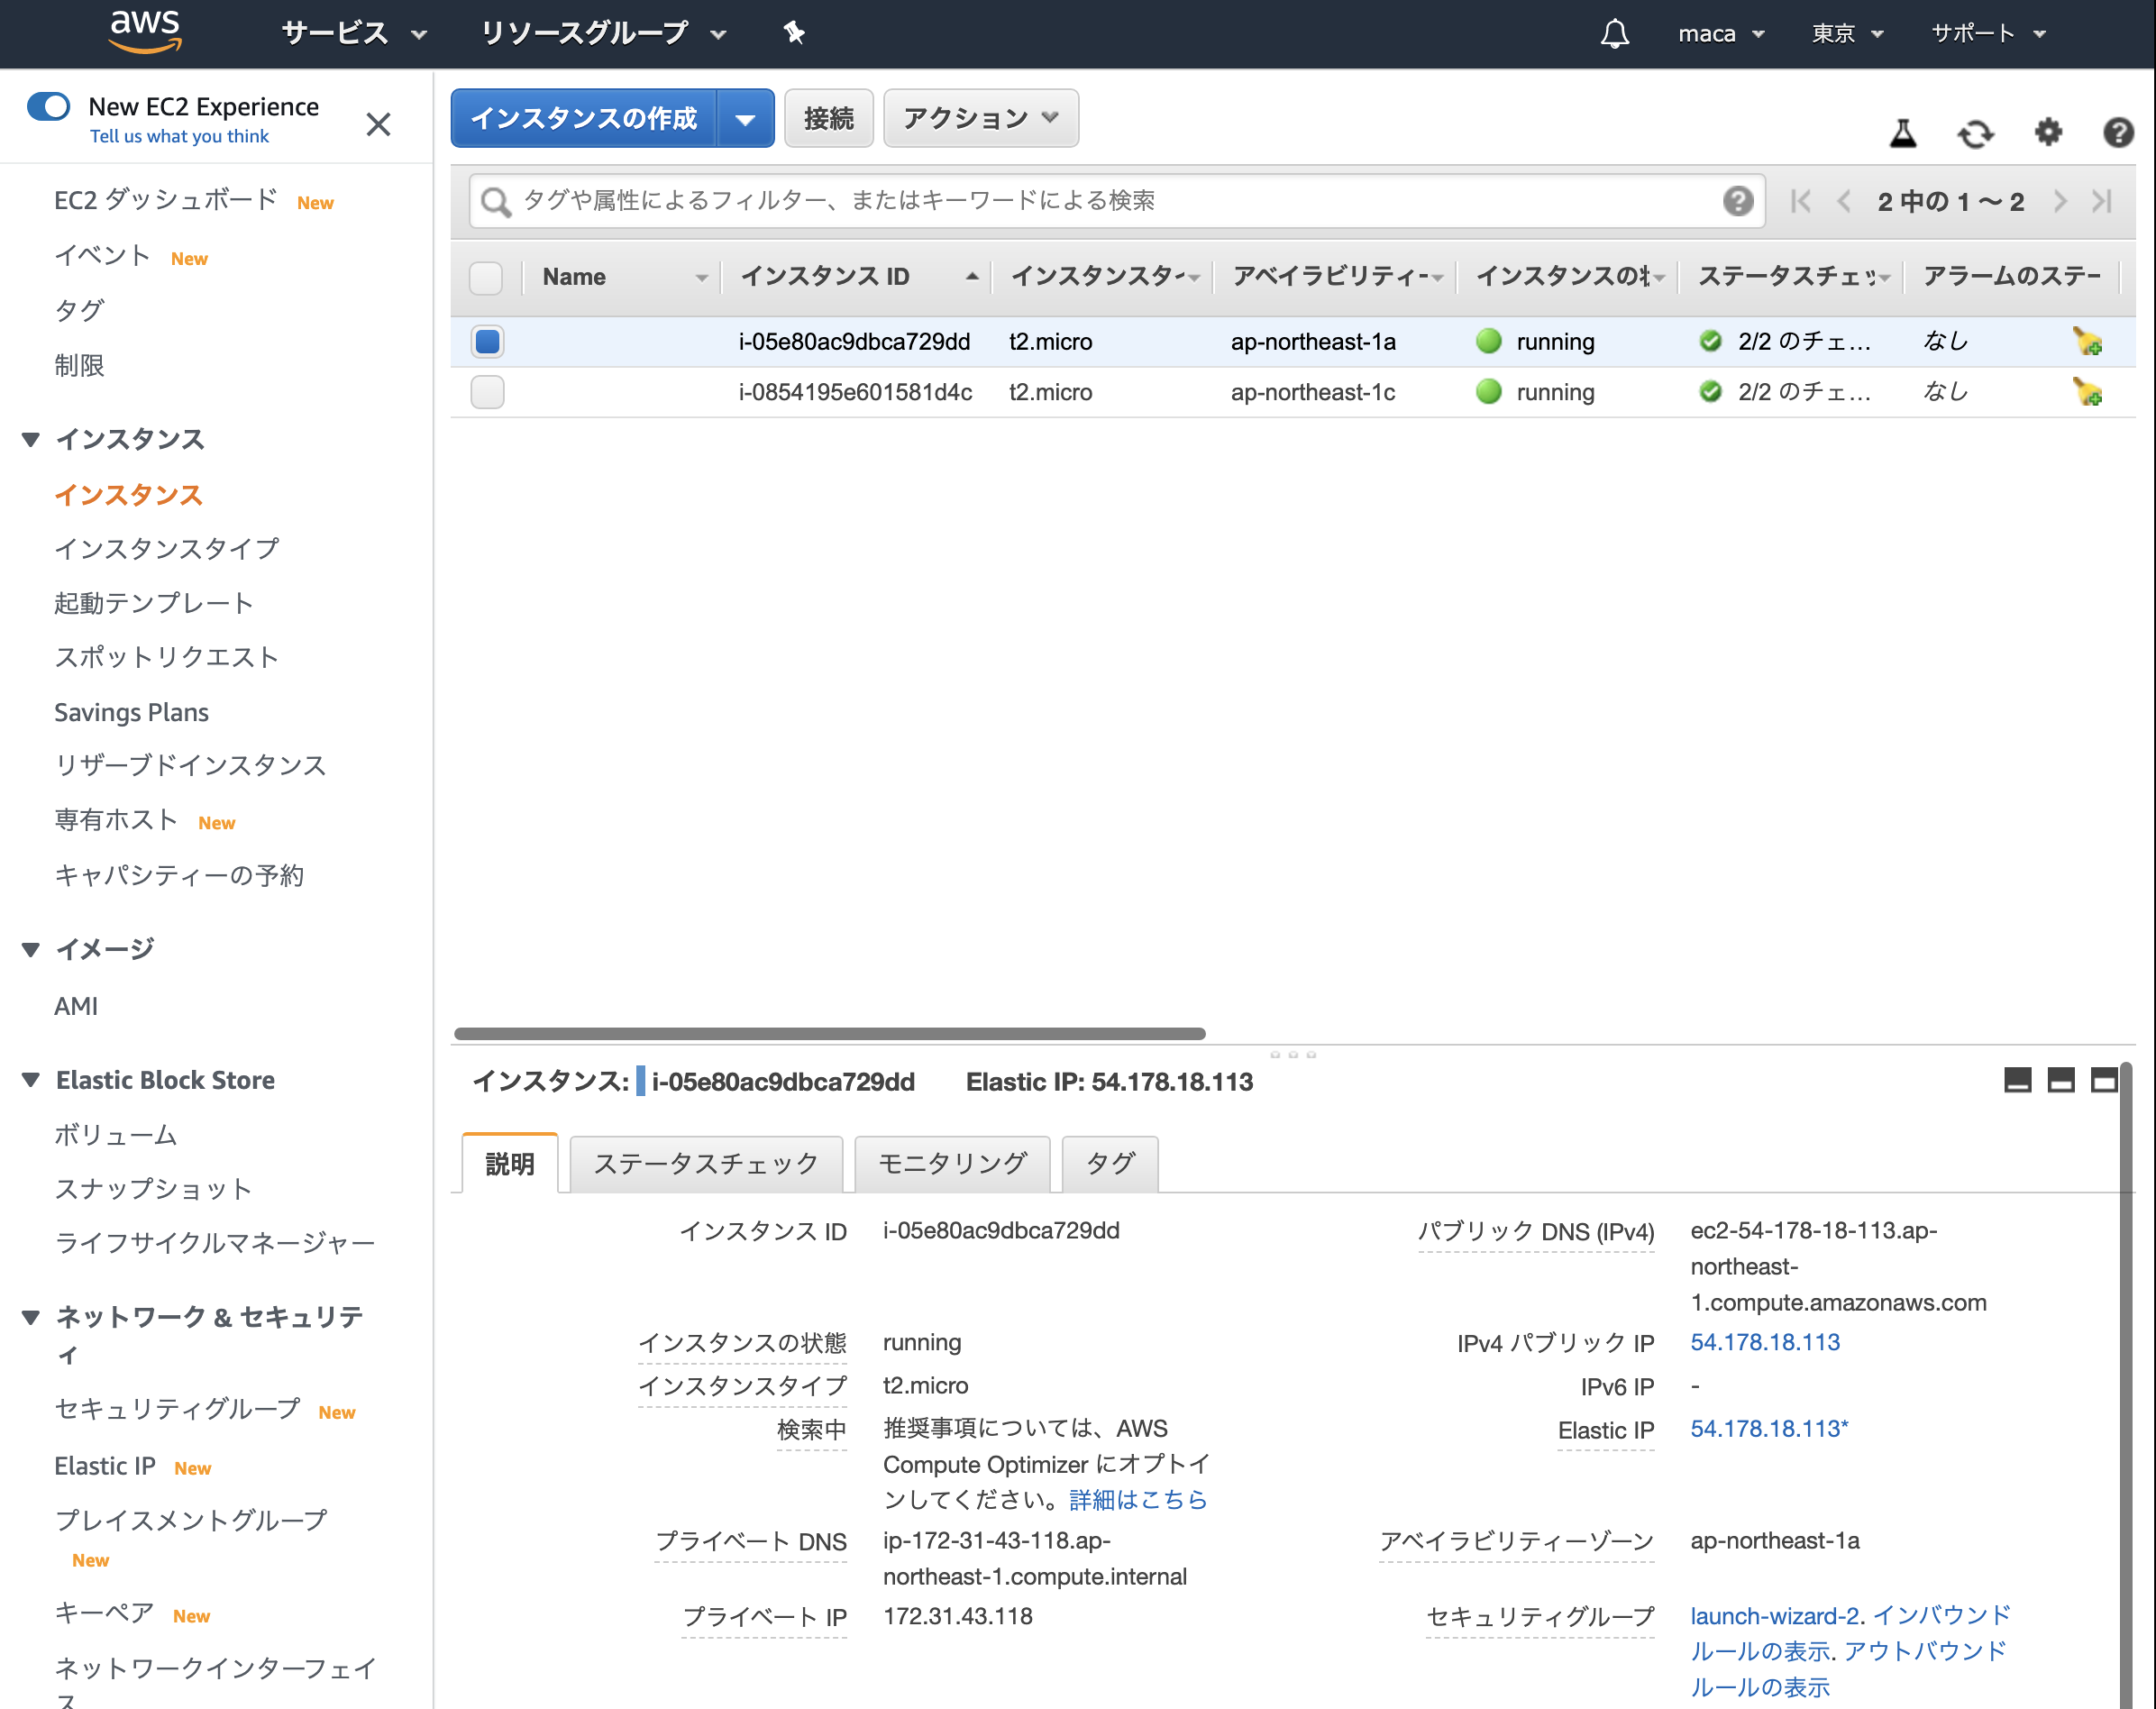 ](https://gyazo.com/cef10db71b1cb250b5fcc8851bc46d1b)
Then click "Edit Inbound Rule" in the "Inbound" tab
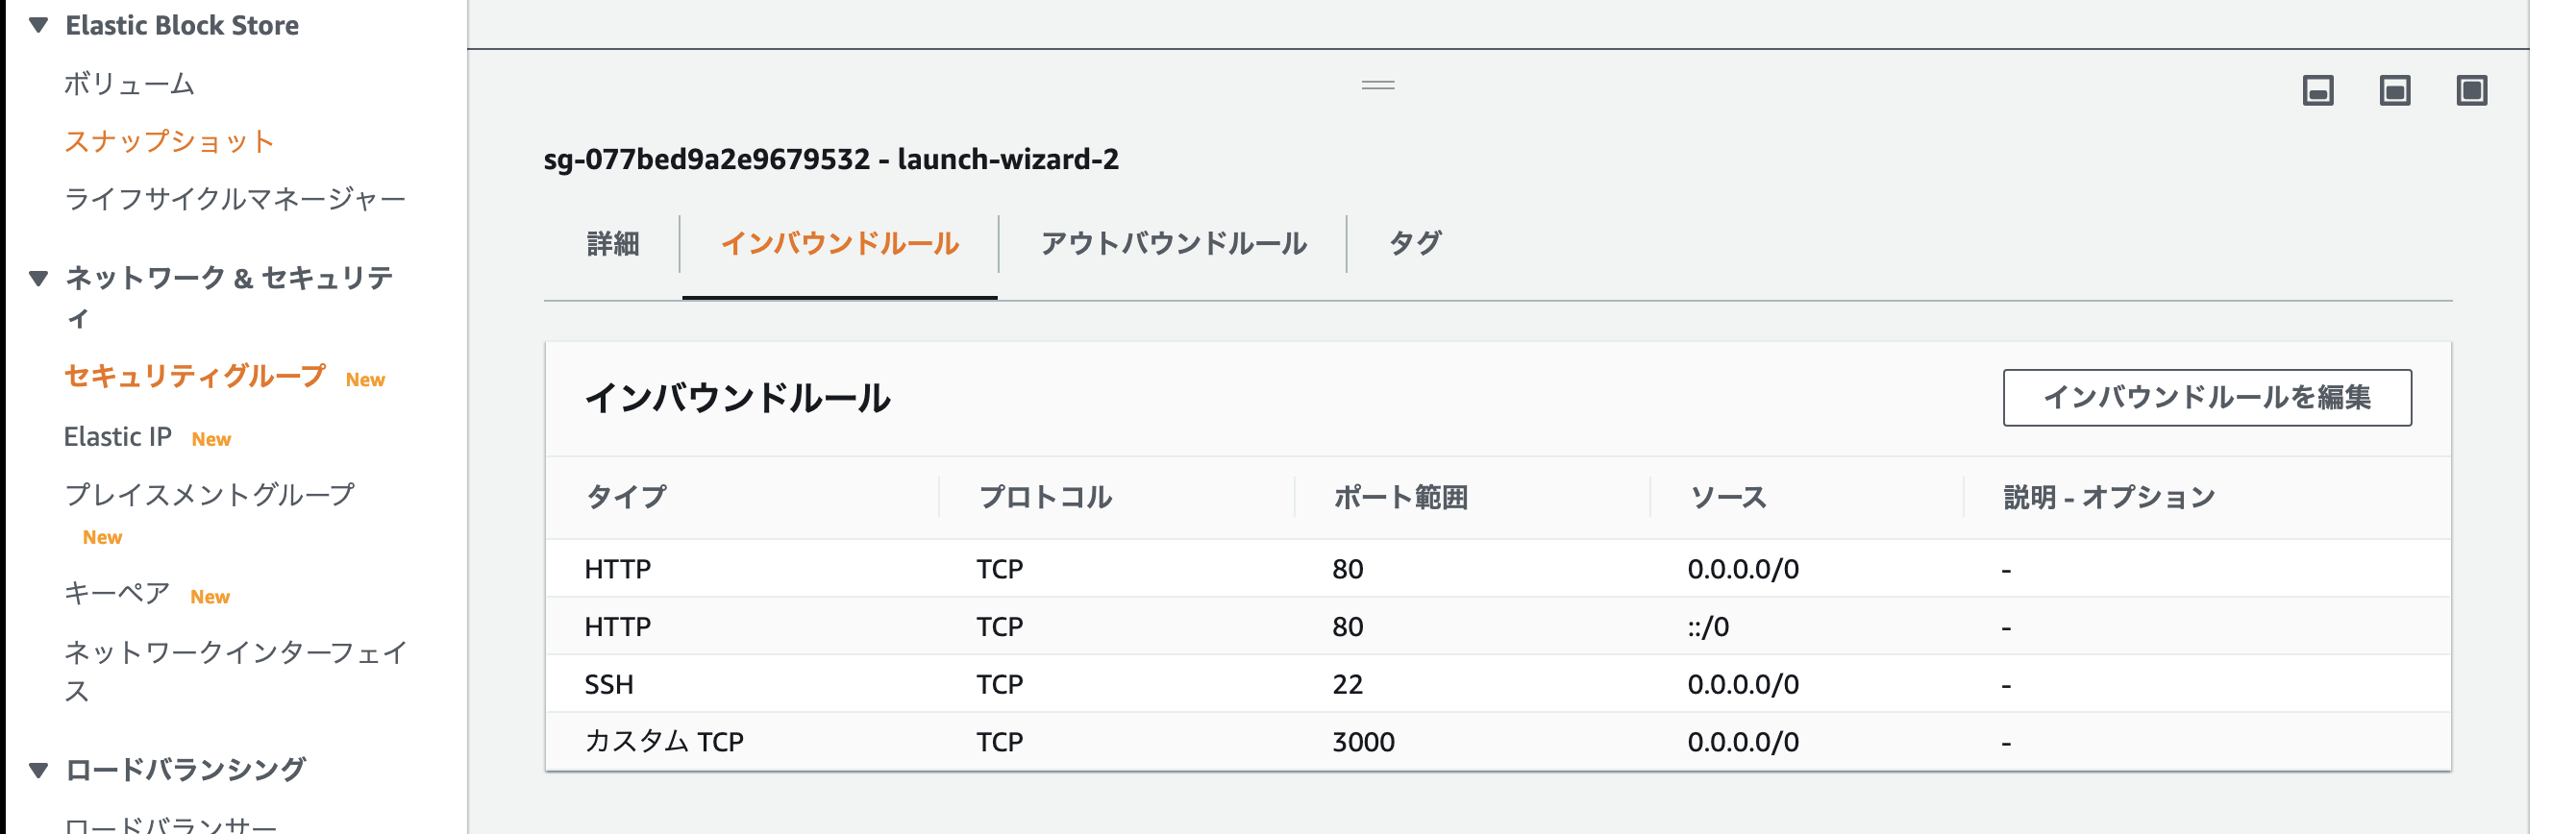
After the screen transition, click "Add rule" and edit as follows
Type: Custom TCP
Protocol: TCP
Port range: 3000
Source: Custom /0.0.0.0/0
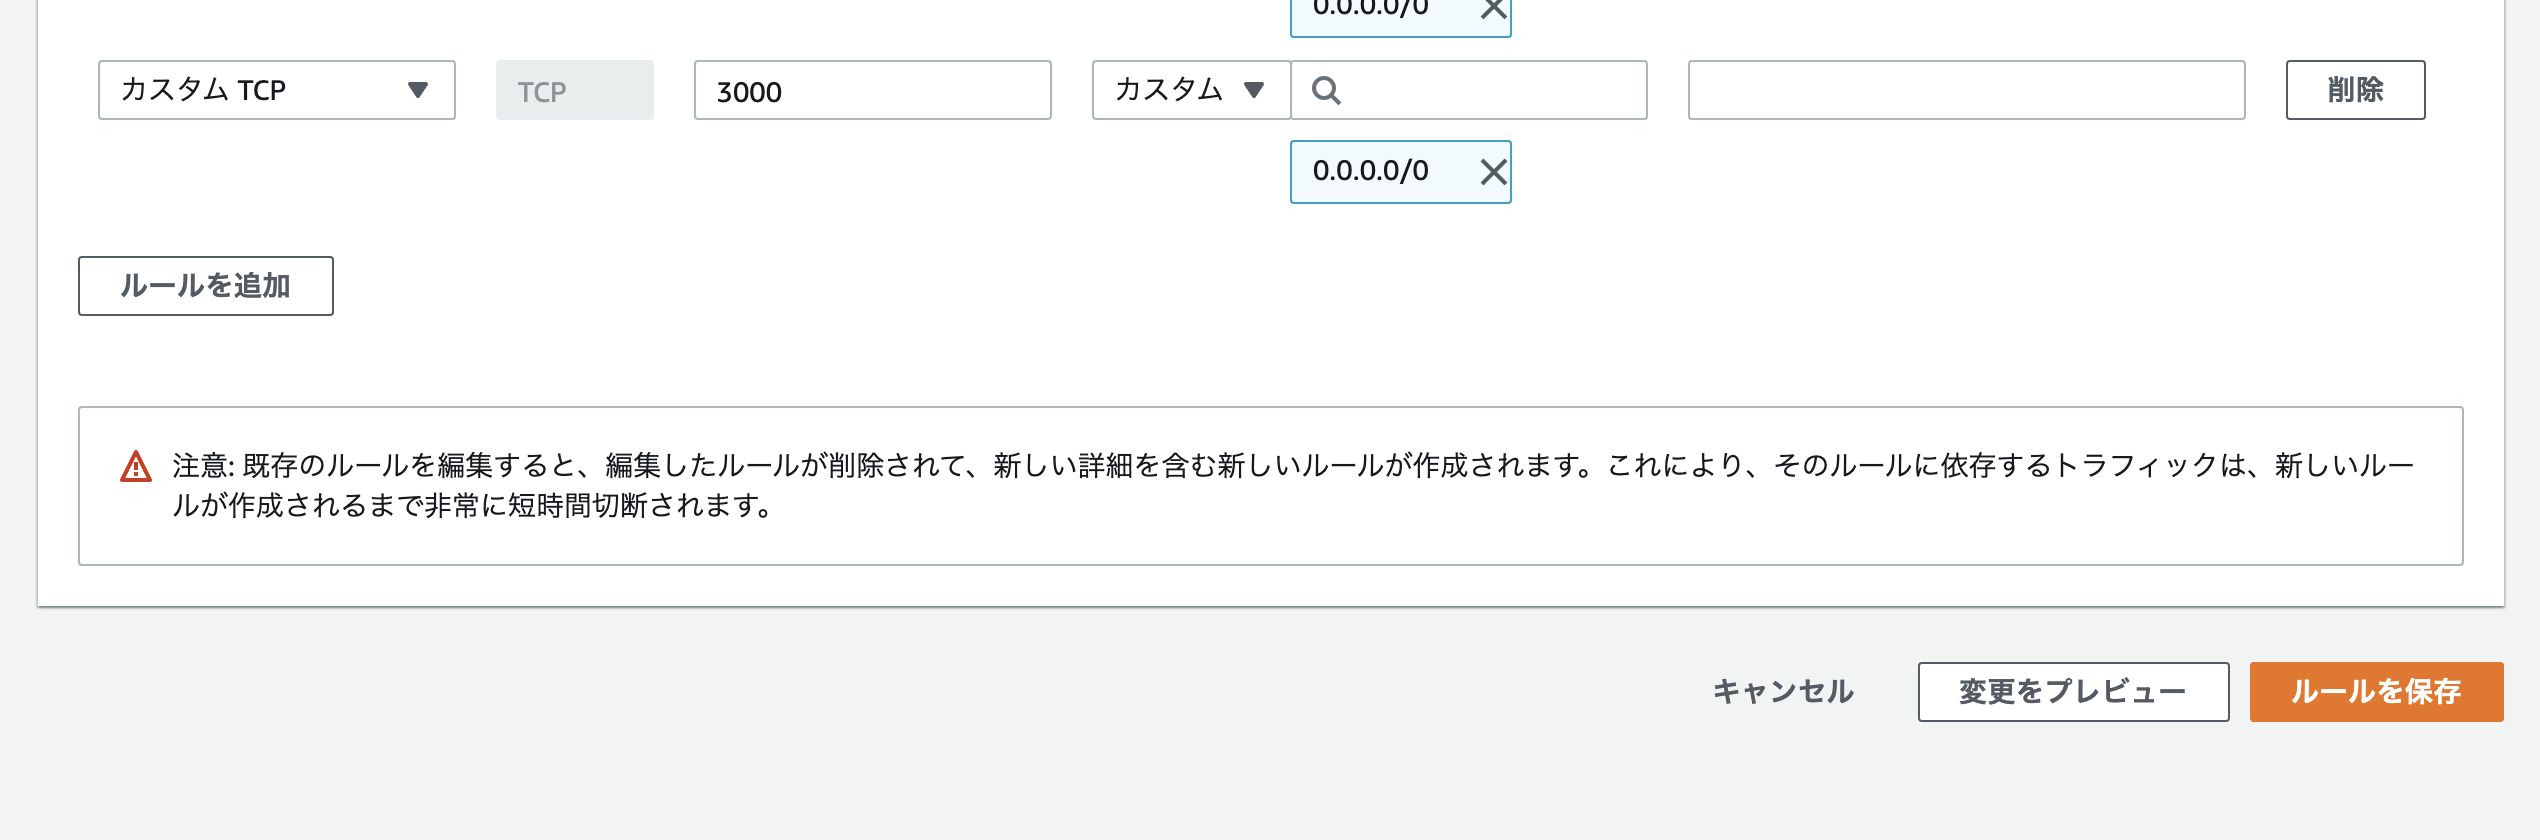
After setting, click "Save Rule". That's all for opening the port.
Launch Rails in production
Use the "unicorn_rails command" to start Rails in a production environment.
First, edit the production environment settings of "database.yml" with VS Code. Edit the local database.yml as follows to match the mysql settings in the production environment.
config/database.yml (local)
production:
  <<: *default
  database:(* Do not edit here)
  username: root
  password: <%= ENV['DATABASE_PASSWORD'] %>
  socket: /var/lib/mysql/mysql.sock
Next, edit "commit → push"
Next, reflect the contents of GitHub on EC2 Execute the following command in the terminal (in EC2)
- If you have a separate branch, merge it into the master branch and then execute the following command.
[ec2-user@ip-***-**-**-*** <Repository name>]$ git pull origin master
Next, create a database in EC2. There is an option "RAILS_ENV = production". RAILS_ENV = production: Options that are attached when executing commands in the production environment.
Run in terminal (in EC2)
[ec2-user@ip-***-**-**-*** <Repository name>]$ rails db:create RAILS_ENV=production
Created database '<Database name>'
[ec2-user@ip-***-**-**-*** <Repository name>]$ rails db:migrate RAILS_ENV=production
- If the error "Mysql2 :: Error: Can't connect to local MySQL server through socket'/var/lib/mysql/mysql.sock'" occurs here, the database may not be started. .. Try starting mysql by typing the command "sudo systemctl start mariadb" from the terminal.
Once you've done that, start Rails.
Run in terminal (in EC2)
[ec2-user@ip-***-**-**-*** <Repository name>]$ cd /var/www/[Repository]
[ec2-user@ip-***-**-**-*** <Repository name>]$ bundle exec unicorn_rails -c config/unicorn.rb -E production -D
Go to http: //
- When connecting, <> of
does not need to be entered.
When I check it with a browser, the view remains broken. An error message (We're sorry, but something went wrong.) May be displayed.
This is not good, so organize the "asset files".
Asset file: A file that manages images, CSS, JavaScript, etc. The process of compressing this asset file and transferring the data is called "compilation". If you do not do this, the CSS will not be reflected in the production environment and the view will collapse, Problems such as the browser not being displayed due to an error occur.
Compile asset files
Run in terminal (in EC2)
[ec2-user@ip-***-**-**-*** <Repository name>]$ rails assets:precompile RAILS_ENV=production
When I'm done so far, I started Rails again, but since the server is already up, I need to restart Rails.
Follow the steps below to restart Rails in production
First, check "Unicorn process". Use the "ps command" to check the process from the terminal. Then kill the process with the "kill command".
ps command: A command to check the currently running process. kill command: A command to stop the currently running process.
Run in terminal (in EC2)
[ec2-user@ip-***-**-**-*** <Repository name>]$ ps aux | grep unicorn
...

Then you should see the process as below.


#### **`Terminal`**
```bash

ec2-user 17877  0.4 18.1 588472 182840 ?       Sl   01:55   0:02 unicorn_rails master -c config/unicorn.rb -E production -D
ec2-user 17881  0.0 17.3 589088 175164 ?       Sl   01:55   0:00 unicorn_rails worker[0] -c config/unicorn.rb -E production -D
ec2-user 17911  0.0  0.2 110532  2180 pts/0    S+   02:05   0:00 grep --color=auto unicorn
Above "ec2-The number to the right of "user" is the process id (PID) 「unicorn_The process labeled "rails master" is the Unicorn process body The process id at this time is "17877"
Terminal (in EC2))Run on
[ec2-user @ ip-***-**-**-*** <repository name>] $ kill <confirmed unicorn rails master process id> ← This time 17878
View the executed process again and confirm that it has been terminated.
 [ec2-user @ ip-***-**-**-*** <repository name>] $ ps aux | grep unicorn
...
ec2-user 17911  0.0  0.2 110532  2180 pts/0    S+   02:05   0:00 grep --color=auto unicorn
If the execution result is as above, the stop of Unicorn is completed.
- Only one process remains, "ps aux"|grep unicorn "command process "I used to search the unicorn process" ps aux|"grep unicorn" is also counted. "
###Finally, run the command to restart Rails 「RAILS_SERVE_STATIC_FILES="1" has the role of specifying Rails to find the compiled asset.
Terminal (in EC2))Run on
[ec2-user @ ip-***-**-**-*** <repository name>] $ RAILS_SERVE_STATIC_FILES = 1 unicorn_rails -c config / unicorn.rb -E production -D
Http in browser://<Elastic IP>:3000/Go to and check if the site is displayed.
- When connecting, <> of
does not need to be entered.
##When Rails doesn't start well unicorn_When running rails 「master failed to start, check stderr log for details」 If you get, you need to check the error log of unicorn.
Use something called "less command" when viewing log files
less command: A command that allows you to check the contents of a file. The "cat command" has a similar role.
Terminal (in EC2))Run on
 [ec2-user@ip-***-**-**-*** <repository name>] $ less log / unicorn.stderr.log
I, [2016-12-21T04:01:19.135154 #18813]  INFO -- : Refreshing Gem list
I, [2016-12-21T04:01:20.732521 #18813]  INFO -- : listening on addr=0.0.0.0:3000 fd=10
E, [2016-12-21T04:01:20.734067 #18813] Mysql2::Error::ConnectionError: Can't connect to local MySQL server through socket '/var/lib/mysql/mysql.sock' (2)
/var/www/furima/shared/bundle/ruby/2.6.0/gems/mysql2-0.5.3/lib/mysql2/client.rb:90:in `connect'
/var/www/furima/shared/bundle/ruby/2.6.0/gems/mysql2-0.5.3/lib/mysql2/client.rb:90:in `initialize'
/var/www/furima/shared/bundle/ruby/2.6.0/gems/activerecord-6.0.2.1/lib/active_record/connection_adapters/mysql2_adapter.rb:24:in `new'
/var/www/furima/shared/bundle/ruby/2.6.0/gems/activerecord-6.0.2.1/lib/active_record/connection_adapters/mysql2_adapter.rb:24:in `mysql2_connection'
/var/www/furima/shared/bundle/ruby/2.6.0/gems/activerecord-6.0.2.1/lib/active_record/connection_adapters/abstract/connection_pool.rb:889:in `new_connection'
- "Latest log from the bottom" is displayed for the log file. If you execute "" shift key "+" G "", you can move to the bottom in an instant. Search for the error statement from this.
##「We’re sorry,but ~ "is displayed First of all, "production.Check "log".
production.log: A place to record server logs, "a place to record events in EC2"
Terminal (in EC2))Run on
 [ec2-user@ip-***-**-**-*** <repository name>] $ less log / production.log

 (Display production.log)
- "Latest log from the bottom" is displayed for the log file. If you execute "" shift key "+" G "", you can move to the bottom in an instant. Search for the error statement from this.
####tail -use the f command tail -f command: A command that displays the latest log for only 10 lines. It is a tool that allows you to check the log easily, so use it as much as possible.
that's all. Thank you for your hard work.
Continue →Here
Recommended Posts