[Windows] [IntelliJ] [Java] [Tomcat] Create a Tomcat9 environment with IntelliJ
Java and Tomcat Elementary Notes
official
Verification environment
| Type | version |
|---|---|
| OS | Windows 10 64bit |
| JDK | jdk1.8.0_121 |
| IDE | IntelliJ IDEA 2017.1.3 |
| Tomcat | 9.0.0.M21 |
Install tomcat
This time, I verified it with the latest Tomcat 9. Apache Tomcat® - Apache Tomcat 9 Software Downloads
Install the 32-bit / 64-bit Windows Service Installer on the download page.
During the installation, add an admin account and this time use it for authentication.
Add deployment destination server settings
Add the server settings that Maven goes to browse.
Add the following to C: \ Users \ user \ .m2 \ settings.xml.
ʻId is optional. ʻUsername / password is added once with the admin account.
Add tomcat account
    <servers>
        <server>
            <id>localhost</id>
            <username>user</username>
            <password>pass</password>
        </server>
    </servers>
Create a new project in IntelliJ
Select maven-achetype-webapp in new Maven project

Modify pom.xml
After creating the project, add the following to pom.xml.
pom.xml
  <build>
    <finalName>test3</finalName>
    <!--Add the following-->
    <plugins>
      <plugin>
        <groupId>org.apache.maven.plugins</groupId>
        <artifactId>maven-compiler-plugin</artifactId>
        <version>3.6.1</version>
        <configuration>
          <source>1.8</source>
          <target>1.8</target>
          <encoding>UTF-8</encoding>
        </configuration>
      </plugin>
      <plugin>
        <groupId>org.apache.tomcat.maven</groupId>
        <artifactId>tomcat7-maven-plugin</artifactId>
        <version>2.2</version>
        <configuration>
          <server>localhost</server>
          <url>http://localhost:8080/manager</url>
          <path>/${project.build.finalName}</path>
        </configuration>
      </plugin>
    </plugins>
  </build>
maven-compiler-plugin => Explicitly specify version (1.8 this time) tomcat7-maven-plugin => Specify the server to deploy to
After adding the plugin settings, run Maven Reimport

Added deployment settings when building IntelliJ
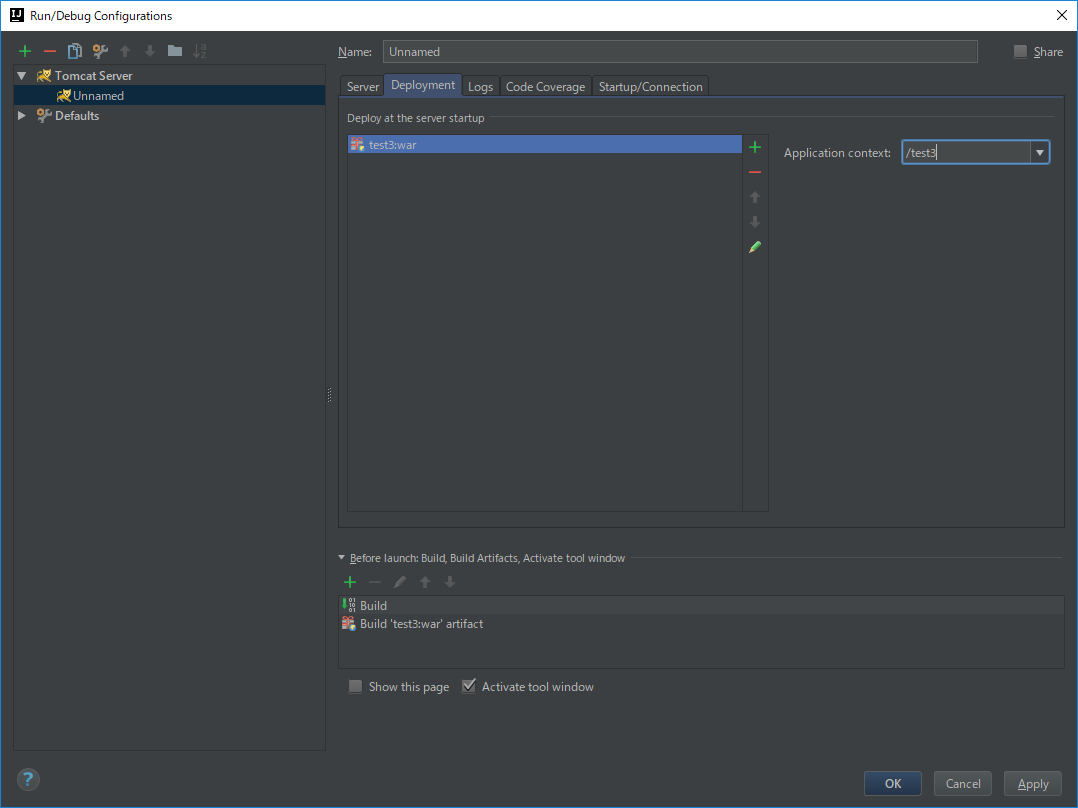
Add settings from ʻEdit Configurations`

Select Tomcat Server from Add +

ʻSpecify the Tomcat 9 installed on Application Server`.

In the Deployment tab in the same settings, specify the artifact (* .war) generated by the project.

ʻSpecify the application name in Apptication Context. (TODO: If you leave /`, the initial screen of Tomcat will be displayed)

Execute
If you execute the build with the settings completed, it will be executed with the war file deployed on Tomcat.

Modify ʻindex.jsp` as follows.
index.jsp
<html>
<body>
<h2>Hello World!!!</h2>
<%= new java.util.Date() %>
</body>
</html>
I was able to confirm that it was reflected.

Summary
I think it's rough because it's my first year, but for the time being I was able to build a minimum environment.
reference
Servlet / Introduction to JSP: Java server-side application I tried deploying a web application to Tomcat using IntelliJ IDEA-Qiita 5. Real application development with Maven | TECHSCORE
Recommended Posts