[Python] Using OpenCV with Python (Edge Detection)
laplacian cv2.Laplacian(src, ddepth[, dst[, ksize[, scale[, delta[, borderType]]]]])
img = cv2.imread('./data/SIDBA/Lenna.bmp')
imgRGB = cv2.cvtColor(img, cv2.COLOR_BGR2RGB)
imgYUV = cv2.cvtColor(img, cv2.COLOR_BGR2YUV)
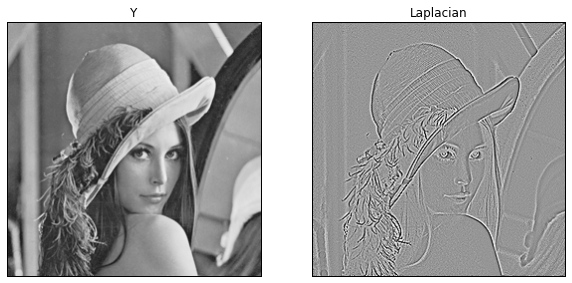
imgY = imgYUV[:,:,0]
result = cv2.Laplacian(imgY, cv2.CV_64F)
fig, axes = plt.subplots(ncols=2, figsize=(10,5))
axes[0].imshow(imgY, cmap=cm.Greys_r, vmin=0, vmax=255)
axes[0].set_title('Y')
axes[0].get_xaxis().set_visible(False)
axes[0].get_yaxis().set_visible(False)
axes[1].imshow(result, cmap=cm.Greys_r, vmin=-128, vmax=128)
axes[1].set_title('Laplacian')
axes[1].get_xaxis().set_visible(False)
axes[1].get_yaxis().set_visible(False)
Sobel cv2.Sobel(src, ddepth, dx, dy[, dst[, ksize[, scale[, delta[, borderType]]]]])
dx = cv2.Sobel(imgY, cv2.CV_64F, 1, 0, ksize=3)
dy = cv2.Sobel(imgY, cv2.CV_64F, 0, 1, ksize=3)
grad = np.sqrt(dx ** 2 + dy ** 2)

fig, axes = plt.subplots(ncols=4, figsize=(20,5))
axes[0].imshow(imgY, cmap=cm.Greys_r, vmin=0, vmax=255)
axes[0].set_title('Y')
axes[0].get_xaxis().set_visible(False)
axes[0].get_yaxis().set_visible(False)
axes[1].imshow(dx, cmap=cm.Greys_r, vmin=-128, vmax=128)
axes[1].set_title('dx')
axes[1].get_xaxis().set_visible(False)
axes[1].get_yaxis().set_visible(False)
axes[2].imshow(dy, cmap=cm.Greys_r, vmin=-128, vmax=128)
axes[2].set_title('dy')
axes[2].get_xaxis().set_visible(False)
axes[2].get_yaxis().set_visible(False)
axes[3].imshow(grad, cmap=cm.Greys_r, vmin=0, vmax=255)
axes[3].set_title('gradient')
axes[3].get_xaxis().set_visible(False)
axes[3].get_yaxis().set_visible(False)
Canny cv2.Canny(image, threshold1, threshold2[, edges[, apertureSize[, L2gradient]]])
Canny features ** Non-maximum Suppression ** and ** Hysteresis Thresholding **. ** Non-maximum Suppression **, leaving only the maximum value in the gradient direction and erasing the rest, which makes the line thinner. As for the processing, if you look at 3 pixels in the gradient direction and the center is the maximum value, it will be left.
** Hysteresis Thresholding ** uses ** High Threshold ** and ** Low Threshold **. High Threshold and above should be Edge without complaint. Set to non-Edge below Low Threshold. It is an image between High Threshold and Low Threshold, but if it is connected to the image judged as Edge pixel, it will be set to Edge. Lines that wander between High Threshold and Low Threshold and are interrupted do not become Edge, but lines that are connected from Edge pixels above High Threshold and wander between High Threshold and Low Threshold become Edge. I will.
http://opencv-python-tutroals.readthedocs.org/en/latest/py_tutorials/py_imgproc/py_canny/py_canny.html
result = cv2.Canny(imgY, 100, 200)

fig, axes = plt.subplots(ncols=2, figsize=(10,5))
axes[0].imshow(imgY, cmap=cm.Greys_r, vmin=0, vmax=255)
axes[0].set_title('Y')
axes[0].get_xaxis().set_visible(False)
axes[0].get_yaxis().set_visible(False)
axes[1].imshow(result, cmap=cm.Greys_r, vmin=0, vmax=255)
axes[1].set_title('Canny')
axes[1].get_xaxis().set_visible(False)
axes[1].get_yaxis().set_visible(False)
Hysteresis Thresholding I make a straight line image of 1 horizontal line, change the threshold and see the result. Here, we use a 100x100 image with a straight line with a value of 30 drawn in the center.
** First from left: ** Original image ** Second from left: ** Low / High Threshold set to 119 ** Third from the left: ** Low Threshold set to 119 and High Threshold set to 120 ** 4th from the left: ** The image in the middle is set to 31 and the Low Threshold is set to 119 and the High Threshold is set to 120. ** Fifth from the left: ** Pixels per 1/4 from the left are set to 29, Low Threshold is set to 119, and High Threshold is set to 120.
The second image from the left is all detected because Edge has exceeded the High Threshold value. The third image from the left is no longer detected because the High Threshold has been raised. The fourth image from the left is now detected as an Edge because the value in the middle is slightly increased so that it exceeds the High Threshold. In the 5th image from the left, the pixels per 1/4 from the left are set to 29 so that it is below the Low Threshold, so the first 1/4 is no longer detected as Edge.
From this experiment, you should be able to understand what the Hysteresis Thresholding process is doing.

L = np.tile(30, 100)
P = np.zeros((100,100), dtype=np.uint8)
P[50,:] = L

result_L119_H119 = cv2.Canny(P,119,119)
result_L119_H120 = cv2.Canny(P,119,120)
P[50, 50] = 31
result_L119_H120_new = cv2.Canny(P,119,120)
P[50, 25] = 29
result_L119_H120_new2 = cv2.Canny(P,119,120)

fig, axes = plt.subplots(ncols=5, figsize=(20,5))
axes[0].imshow(P, cmap=cm.Greys_r, vmin=0, vmax=32)
axes[0].set_title('Y')
axes[0].get_xaxis().set_visible(False)
axes[0].get_yaxis().set_visible(False)
axes[1].imshow(result_H119_L119, cmap=cm.Greys_r, vmin=0, vmax=255)
axes[1].set_title('Canny L119,H119')
axes[1].get_xaxis().set_visible(False)
axes[1].get_yaxis().set_visible(False)
axes[2].imshow(result_H120_L120, cmap=cm.Greys_r, vmin=0, vmax=255)
axes[2].set_title('Canny L119, H120')
axes[2].get_xaxis().set_visible(False)
axes[2].get_yaxis().set_visible(False)
axes[3].imshow(result_H120_L120_new, cmap=cm.Greys_r, vmin=0, vmax=255)
axes[3].set_title('Canny L119, H120 new1')
axes[3].get_xaxis().set_visible(False)
axes[3].get_yaxis().set_visible(False)
axes[4].imshow(result_H120_L120_new2, cmap=cm.Greys_r, vmin=0, vmax=255)
axes[4].set_title('Canny L119 H120 new2')
axes[4].get_xaxis().set_visible(False)
axes[4].get_yaxis().set_visible(False)
Pyramid
cv2.pyrUp(src[, dst[, dstsize[, borderType]]] cv2.pyrDown(src[, dst[, dstsize[, borderType]]]
Use pyramid and pyramid to create a pyramid image. pyrUp is expansion and pyrDown is reduction. The sizes are $ \ times 2 and \ times \ frac {1} {2} $, respectively. With pyrUp and pyrDown, the filter is convolutioned when the image is scaled up or down. The filter is a $ 5 \ times 5 $ Gaussian filter. The value of filter is as follows.
\begin{equation}
\frac{1}{256}
\begin{bmatrix}
1 & 4 & 6 & 4 & 1 \\
4 & 16 & 24 & 16 & 4 \\
6 & 24 & 36 & 24 & 6 \\
4 & 16 & 24 & 16 & 4 \\
1 & 4 & 6 & 4 & 1 \\
\end{bmatrix}
\end{equation}
L = 3
tmp = imgY.copy()
pyImg = [tmp]
pyEdge = [cv2.Canny(tmp.astype(np.uint8),100,200 )]
for idx in xrange(L-1):
    tmp = cv2.pyrDown(tmp)
    pyImg.append(tmp)
    pyEdge.append(cv2.Canny(tmp.astype(np.uint8),100,200 ))

height = np.sum([img.shape[0] for img in pyImg])
width  = np.max([img.shape[1] for img in pyImg])
con_img = np.zeros((height, width), dtype=pyImg[0].dtype)
y = 0
for Y in pyImg:
    con_img[y:y+Y.shape[0],0:Y.shape[1]] = Y
    y += Y.shape[0]

fig,axes = plt.subplots(nrows=1, figsize=(8,8))
axes.imshow(con_img, cmap=cm.Greys_r, vmin=0, vmax=255)
axes.get_xaxis().set_visible(False)
axes.get_yaxis().set_visible(False)

python
fig, axes = plt.subplots(ncols = 3,nrows=2, figsize=(10,8))
for idx, (Y, E) in enumerate(zip(pyImg, pyEdge)):
    axes[0,idx].imshow(Y, cmap=cm.Greys_r, vmin=0, vmax=255)
    axes[0,idx].set_title('Level %d Image' % idx)
    axes[0,idx].get_xaxis().set_visible(False)
    axes[0,idx].get_yaxis().set_visible(False)
    axes[1,idx].imshow(E, cmap=cm.Greys_r)
    axes[1,idx].set_title('Level %d Edge' % idx)
    axes[1,idx].get_xaxis().set_visible(False)
    axes[1,idx].get_yaxis().set_visible(False)
Recommended Posts