A story about how Windows 10 users created an environment to use OpenCV3 with Python 3.5
(2016.4.6 postscript) Since there was an easier way, I will put a link. http://qiita.com/sugurunatsuno/items/ce3c0d486bdc93688192
I was able to install OpenCV in the same way as Ubuntu in the Windows 10 environment.
Note that there was no article summarizing how to install OpenCV3 on Windows + Python3 (I'm just not good at finding it?).
things to do
Build OpenCV3 in Windows10 environment so that it can be used from Python3.5 (Miniconda).
What I was able to do
I loaded OpenCV3 from Python3.5 as follows.
$ python
Python 3.5.0 |Continuum Analytics, Inc.| (default, Nov  7 2015, 13:15:24) [MSC v.1900 64 bit (AMD64)] on win32
Type "help", "copyright", "credits" or "license" for more information.
>>> import cv2
>>> cv2.__version__
'3.0.0-dev'
>>>
Referenced articles
- OpenCV environment construction (OpenCV 2.4.9) --Build Insider
- http://www.buildinsider.net/small/opencv/02
- OpenCV3 installation battle --Qiita
- http://qiita.com/emakryo/items/5e2c79c2a18e60dd212f
procedure
1. Clone the OpenCV source from Github
$ git clone https://github.com/Itseez/opencv.git
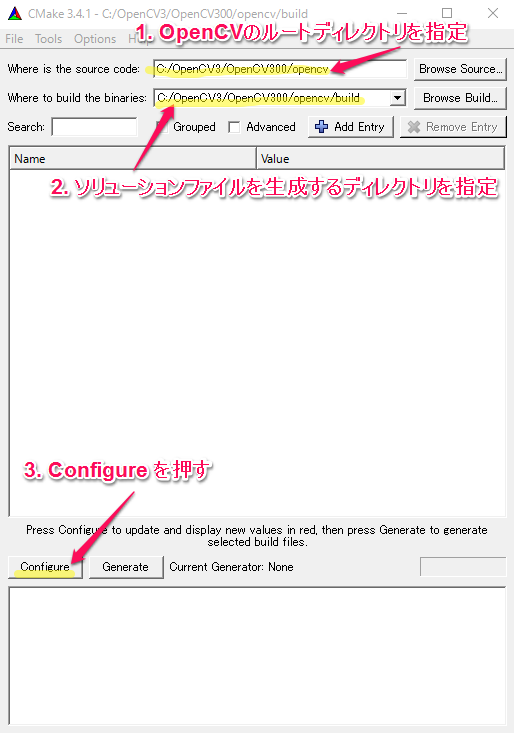
2. Start CMake and specify the location of the OpenCV source you downloaded earlier and the location to generate the solution file to build the source as shown in the figure.

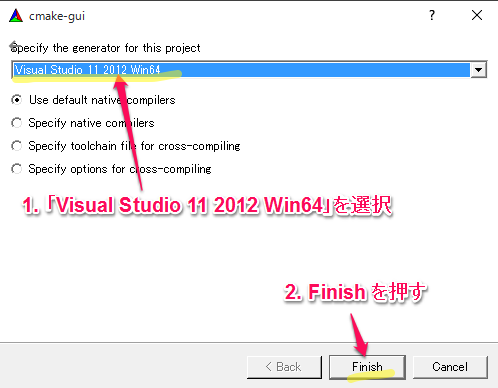
3. Select "Visual Studio 11 2012 Win64" as the compiler (vs2013 or something is fine)

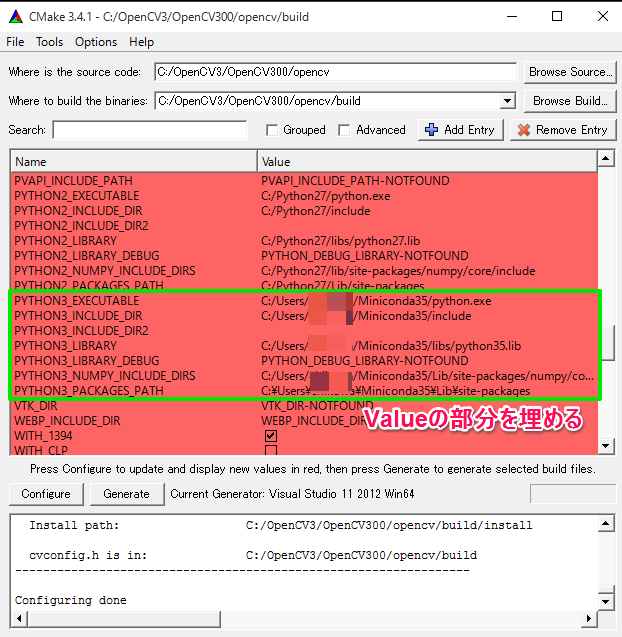
4. Many variables displayed in red will appear, so set the values for the variables related to Python3. Press Configure when the settings are complete
- When Python is installed, the values related to that version of Python seem to be set automatically.
- Wasn't it set automatically because I'm using Miniconda as the Python 3 environment?

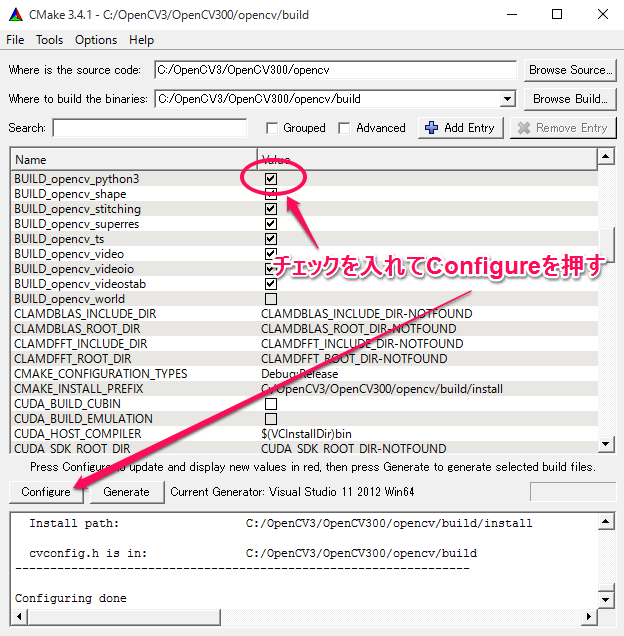
5. Only BUILD_opencv_python3 is displayed in red, so check it and configure again.
- Screenshots are after reconfiguring.

6. Press Generate to generate the solution file in build
7. Open the solution in Visual Studio 2012 and build with Debug and Release respectively (it takes time)
- As a result of the build, directories called bin and lib are created in the build.
8. Copy the contents of bin / Release and lib / Release to build / x64 / vc11 / bin and build / x64 / vc11 / lib, respectively.
- In the reference, it seemed to be automatically placed when building, but in my case it was generated in a strange position, so I manually created a directory and moved it.
9. Add the path of build / x64 / bin to the environment variable
10. Confirm that the file cv2.cp35-win_amd64.pyd exists in the path set in PYTHON3_PACKAGES_PATH in step 4.
11. Start Python, import OpenCV and complete when the version can be displayed
$ python
Python 3.5.0 |Continuum Analytics, Inc.| (default, Nov  7 2015, 13:15:24) [MSC v.1900 64 bit (AMD64)] on win32
Type "help", "copyright", "credits" or "license" for more information.
>>> import cv2
>>> cv2.__version__
'3.0.0-dev'
>>>
Recommended Posts