[RUBY] Rails Tutorial 6th Edition Learning Summary Chapter 2
Overview
This article deepens my understanding by writing a Rails tutorial commentary article to further solidify my knowledge It is part of my study. In rare cases, ridiculous content or incorrect content may be written. Please note. I would appreciate it if you could tell me implicitly ...
Source Rails Tutorial 6th Edition
What to do in this chapter
Learn the powerful features of scaffold through the creation of toy_app Get a rough idea of what a REST architecture is.
Generate Toy_app
(1) Generate by specifying the Rails version in the same way as hello_app
$ cd ~/environment
$ rails _6.0.3_ new toy_app
$ cd toy_app/
(2) The Gemfile is also new, so rewrite it for the Toy app.
Gemfile
source 'https://rubygems.org'
git_source(:github) { |repo| "https://github.com/#{repo}.git" }

gem 'rails',      '6.0.3'
gem 'puma',       '4.3.4'
gem 'sass-rails', '5.1.0'
gem 'webpacker',  '4.0.7'
gem 'turbolinks', '5.2.0'
gem 'jbuilder',   '2.9.1'
gem 'bootsnap',   '1.4.5', require: false

group :development, :test do
  gem 'sqlite3', '1.4.1'
  gem 'byebug',  '11.0.1', platforms: [:mri, :mingw, :x64_mingw]
end

group :development do
  gem 'web-console',           '4.0.1'
  gem 'listen',                '3.1.5'
  gem 'spring',                '2.1.0'
  gem 'spring-watcher-listen', '2.0.1'
end

group :test do
  gem 'capybara',           '3.28.0'
  gem 'selenium-webdriver', '3.142.4'
  gem 'webdrivers',         '4.1.2'
end

group :production do
  gem 'pg', '1.1.4'
end

#On Windows tzinfo for timezone information-Must include data gem
gem 'tzinfo-data', platforms: [:mingw, :mswin, :x64_mingw, :jruby]
③ And as before
bundle installRun,
You have requested:
  listen = 3.1.5

The bundle currently has listen locked at 3.2.1.
Try running `bundle update listen`

If you are updating multiple gems in your Gemfile at once,
try passing them all to `bundle update`
If you get an error like this, it's stuck in Gemfile.lock, so delete Gemfile.lock once.
bundle updateAfter running
bundle installTo do.
④ Finally, put it under Git version control like hello_app.
$ git init
$ git add -A
$ git commit -m "Initialize repository"
Now that you have a local repository, create a new remote repository for your mobile app. To push. (Create a remote repository on the Github site in the same way as in Chapter 1) The repository is still private.
$ git remote add origin https://github.com/<Your GitHub account name>/toy_app.git
$ git push -u origin master
⑤ Try deploying for the time being. In the current state, there is no content, so for the time being, just like hello_app Add to output hello, world
application_controller.rb
class ApplicationController < ActionController::Base

  def hello
    render html: "hello, world!"
  end
end
routes.rb
Rails.application.routes.draw do
  root 'application#hello'
end
Then commit this change & push it to Github / Heroku
$ git commit -am "Add hello"
$ heroku create
$ git push && git push heroku master
Create a User model
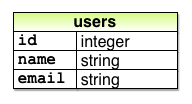
User model design
 From Rails Tutorial 6th Edition
https://railstutorial.jp/chapters/toy_app?version=6.0#sec-modeling_demo_users
From Rails Tutorial 6th Edition
https://railstutorial.jp/chapters/toy_app?version=6.0#sec-modeling_demo_users
The id, name, and email attributes correspond to the table columns.
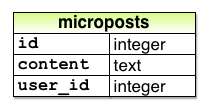
Micropost model design
Microposts are premised on short posts of about 140 characters, similar to Twitter tweets. If you add the id of the post, the content of the text type that stores the text content of the post, and the user_id to record who posted it
 From Rails Tutorial 6th Edition
https://railstutorial.jp/chapters/toy_app?version=6.0#sec-modeling_demo_microposts
From Rails Tutorial 6th Edition
https://railstutorial.jp/chapters/toy_app?version=6.0#sec-modeling_demo_microposts
It becomes such a data model.
Users resource
Immediately generate Rails from the Users resource with the scaffold generator.
$ rails generate scaffold User name:string email:string
It is written as rails generate scaffold resource name column name: data type ~. There is no need to write the id attribute because it is always added as one primary key to one model.
I created a User model with scaffold, but I can't use it as it is. The database created by the generator needs to be migrated.
Migrate the database ↓
$ rails db:migrate
Now that you can run your local web server, if you're using Cloud9 As in Chapter 1, edit development.rb to allow connection to Cloud9.
development.rb
Rails.application.configure do
  .
  .
  .
  config.hosts.clear
end
After that, start the terminal in another tab and execute `` `rails server```. This will launch the local server and display hello, world !.
Explore user pages
By creating the Users resource with scaffold in the above series of steps, many pages for user management are automatically added. The URL and contents of the page are as follows.
| URL | action | Use |
|---|---|---|
| /users | index | Page listing all users |
| /users/1 | show | id=Page to display 1 user |
| /users/new | new | Page to create a new user |
| /users/1/edit | edit | id=Page to edit 1 user |
From Rails Tutorial 6th Edition https://railstutorial.jp/chapters/toy_app?version=6.0#sec-a_user_tour
See the Rails tutorial for exploring the user page.
Exercise
- When you start the developer tool of the browser with the F12 key etc. and check the corresponding part, the contents are deleted at the time of reloading.
- I can register even if I register without entering email. This is bad, so the app created from Chapter 3 will also deal with such problems.
- I can register even if I enter the wrong email address. It is the same as 2 and this will also be a countermeasure.
- A warning message "Are you sure?" Is displayed. We will also implement functions devised to make it easier for these users to use.
MVC behavior
When you open the index page of / users, what kind of processing is done internally is illustrated in MVC like this.
 From Rails Tutorial 6th Edition
https://railstutorial.jp/chapters/toy_app?version=6.0#sec-mvc_in_action
From Rails Tutorial 6th Edition
https://railstutorial.jp/chapters/toy_app?version=6.0#sec-mvc_in_action
Request from the browser → Router assigns to the corresponding action → Queries the required data to the User model → Model retrieves data from database → Model passes data to controller → Assign the received data to the instance variable and pass it to the view → The view generates HTML and passes it to the controller → Returns the HTML received by the controller to the browser The flow.
Now that the Toy app has been created for the time being, try changing the root URL to the Toy app index page.
routes.rb
Rails.application.routes.draw do
  resources :users
  # For details on the DSL available within this file, see https://guides.rubyonrails.org/routing.html
  root "users#index"
end
The writing method is the same this time as well, and it is described by "controller name # action name"
Let's take a look at the users_controller generated by scaffold.
users_controller.rb
class UsersController < ApplicationController
  before_action :set_user, only: [:show, :edit, :update, :destroy]

  # GET /users
  # GET /users.json
  def index
    @users = User.all
  end

  # GET /users/1
  # GET /users/1.json
  def show
  end

  # GET /users/new
  def new
    @user = User.new
  end

  # GET /users/1/edit
  def edit
  end
Such a description is made. The description of UsersController <ApplicationController on the first line It means inheritance in Ruby grammar. here It means the UserController class that inherits ApplicationController.
The table below lists the actions that support REST. Some URLs are duplicated, but these are counted as different routes because the HTTP request type is different.
| HTTP request | URL | action | Use |
|---|---|---|---|
| GET | /users | index | Page listing all users |
| GET | /users/1 | show | id=Page to display 1 user |
| GET | /users/new | new | Page to create a new user |
| POST | /users | create | Action to create a user |
| GET | /users/1/edit | edit | id=Page to edit 1 user |
| PATCH | /users/1 | update | id=Action to update 1 user |
| DELETE | /users/1 | destroy | id=Action to delete 1 user |
From Rails Tutorial 6th Edition https://railstutorial.jp/chapters/toy_app?version=6.0#table-demo_RESTful_users
Looking at the index action of users_controller
  def index
    @users = User.all
  end
It is written like this. This is processing to retrieve and assign all the data in the User database to the @users variable.
The User model itself is very simple with no description Because the "ActiveRecord class" inherited by the User class has so many functions related to DB operations. In this case, User.all was able to retrieve User's data from the database.
This @users variable is used in the index view that corresponds to the index action. Let's look at the relevant place.
erb:index.html.erb
<% @users.each do |user| %>
      <tr>
        <td><%= user.name %></td>
        <td><%= user.email %></td>
        <td><%= link_to 'Show', user %></td>
        <td><%= link_to 'Edit', edit_user_path(user) %></td>
        <td><%= link_to 'Destroy', user, method: :delete, data: { confirm: 'Are you sure?' } %></td>
      </tr>
<% end %>
Of this description<% @users.each do |user| %>But the part
To briefly explain at this stage, pull out the data (records) contained in the @users variable one by one.
The process of assigning to user and repeating the part surrounded by end for the number of records.
If there are 3 users (A, B, C)
Put the data of A in user and generate html
Put the data of B in user and generate html
Put C data in user and generate html
Iterative processing is performed.
You don't have to understand at this point
Exercise
① The request is sent from the browser to the router (2) The router assigns it to the edit action of the controller corresponding to the request. ③ Request the data required by the edit action from the model. ④ The model reads the requested data from the database and returns it to the controller. ⑤ Call the view edit.html.erb corresponding to the edit action (at this time, pass the read data to the view) ⑥ The view generates HTML and returns it to the controller. ⑦ The controller returns the HTML passed to the browser.
It is described in the private method of users_controller.
users_controller.rb
class UsersController < ApplicationController
  before_action :set_user, only: [:show, :edit, :update, :destroy]


  private
    # Use callbacks to share common setup or constraints between actions.
    def set_user
      @user = User.find(params[:id])
    end

    # Never trust parameters from the scary internet, only allow the white list through.
    def user_params
      params.require(:user).permit(:name, :email)
    end
end
The description before_action specifies that the set_user method should be executed before executing the edit action. In the ser_user action, the @user variable contains a statement to read the table of requested IDs in the User database.
3.edit.html.erb
About the drawbacks of the Users resource
As I mentioned in the previous exercise, I can register even if my user name and email address are messed up.
Also, since there is no login mechanism, anyone can delete or edit the user. There is no authority or shit.
And there are almost no tests to confirm the operation of the app. Is the above content correct? Whether the function of the application works properly, etc. Not tested at all. → I can't find it even if there is something wrong
The UI is ugly and the layout is messed up No one uses a web app with such a layout (affirmation)
Difficult to understand. Exhausted to this It's hard to fully understand the code, even for myself, who read through the Rails tutorial for a week. The code is basically concise and easy to understand.
Create a micro post
Let's generate Microposts with scaffold as well as Users.
$ rails g scaffold Micropost content:text user_id:integer
Running via Spring preloader in process 3794
      invoke  active_record
      create    db/migrate/20200601141608_create_microposts.rb
      create    app/models/micropost.rb
      invoke    test_unit
      create      test/models/micropost_test.rb
      create      test/fixtures/microposts.yml
      invoke  resource_route
       route    resources :microposts
      invoke  scaffold_controller
      create    app/controllers/microposts_controller.rb
      invoke    erb
      create      app/views/microposts
      create      app/views/microposts/index.html.erb
      create      app/views/microposts/edit.html.erb
      create      app/views/microposts/show.html.erb
      create      app/views/microposts/new.html.erb
      create      app/views/microposts/_form.html.erb
      invoke    test_unit
      create      test/controllers/microposts_controller_test.rb
      create      test/system/microposts_test.rb
      invoke    helper
      create      app/helpers/microposts_helper.rb
      invoke      test_unit
      invoke    jbuilder
      create      app/views/microposts/index.json.jbuilder
      create      app/views/microposts/show.json.jbuilder
      create      app/views/microposts/_micropost.json.jbuilder
      invoke  assets
      invoke    scss
      create      app/assets/stylesheets/microposts.scss
      invoke  scss
   identical    app/assets/stylesheets/scaffolds.scss
First, migrate the database so that it can be used, just like when creating Users.
$ rails db:migrate
== 20200601141608 CreateMicroposts: migrating =================================
-- create_table(:microposts)
   -> 0.0041s
== 20200601141608 CreateMicroposts: migrated (0.0048s) ========================
Microposts is the same as in Users, the router has been updated, and resources now supports REST architecture. Each routing is assigned.
| HTTP request | URL | action | Use |
|---|---|---|---|
| GET | /microposts | index | Page showing all microposts |
| GET | /microposts/1 | show | id=Page displaying 1 micropost |
| GET | /microposts/new | new | Page to create a new micro post |
| POST | /microposts | create | Action to create a new micropost |
| GET | /microposts/1/edit | edit | id=Page to edit 1 micropost |
| PATCH | /microposts/1 | update | id=Action to update 1 micropost |
| DELETE | /microposts/1 | destroy | Delete the id1 micropost |
From Rails Tutorial 6th Edition https://railstutorial.jp/chapters/toy_app?version=6.0#code-demo_microposts_resource
The code generated by scaffold does not change except that the class name replaces the name you gave it. That is, it has the same structure.
Like Users, Microposts can access the index page with / microposts and post with New micropost.
Exercise
- As with Users, the contents disappear.
- This is also the same as for Users, and since no countermeasures are currently taken, empty users can post empty posts.
- I can post because the code that limits the number of characters has not been generated. (This is also one of the drawbacks)
- You can delete it by following the destroy link from the index page. This is also deleted after the confirmation message is displayed.
Micropost to micropost
Since there is no character limit in the third item of the previous exercise, even long sentences could be posted, and a non-micro problem was discovered. We will fix this problem.
Fix this problem by adding restrictions (validation) to the contents of the database. The specific code is below
micropost.rb
class Micropost < ApplicationRecord
  validates :content, length:{maximum: 140}

end
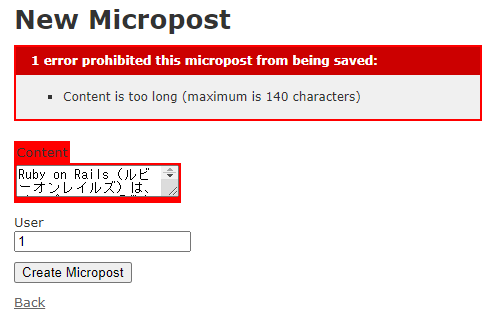
Limit content to 140 characters by writing validation in the model that handles the database. This code is Very simple code that limits the maximum length of content to 140. The maximum number of characters in a post can be rephrased as 140 characters.
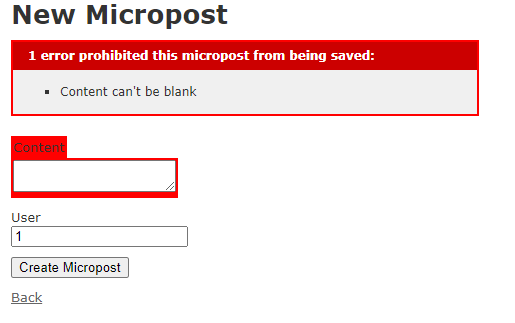
Rails now throws an error with the addition of validation.
Here is the screen where I actually posted Micropost with 140 characters or more.

Super excellent.
Exercise
- I get an error like the screen above and no posts are added when I return to the index page. (Not registered in the database)
- The error content is stored in the ul list in the error_explanation class. If the number of errors increases, the content of the li tag will be added as an error.
Associating users with microposts
Like on Twitter and Qiita "One user has multiple posts" In other words There can be multiple posts with user ID 1. Rails makes it super easy to implement these one-to-many data relationships. Here is the code
user.rb
class User < ApplicationRecord
  has_many :microposts
end
micropost.rb
class Micropost < ApplicationRecord
  belongs_to :user
  validates :content, length:{maximum: 140}
end
User has multiple microposts. microposts belong to one user. This relationship is implemented in this code.
By writing this code, you can display the user from the value of the user_id column of Microposts. Let's actually try it.
First, start the console `` `rails console``` that can use Rails functions. It's very convenient because you can freely try database data and code in rails console. First, create a user in the rails console, and also create a Micropost with that user's ID.
user1 = User.first
   (0.4ms)  SELECT sqlite_version(*)
  User Load (0.1ms)  SELECT "users".* FROM "users" ORDER BY "users"."id" ASC LIMIT ?  [["LIMIT", 1]]
 => #<User id: 1, name: "takemo", email: "[email protected]", created_at: "2020-05-31 14:00:23", updated_at: "2020-05-31 14:00:23">
2.6.3 :002 > user1.microposts
Substitute the first registered data in the User database for user1 Since I created a user on a local server as a trial before, that data is assigned.
Here is a scene where the previous association is useful
> user1.microposts
  Micropost Load (0.1ms)  SELECT "microposts".* FROM "microposts" WHERE "microposts"."user_id" = ? LIMIT ?  [["user_id", 1], ["LIMIT", 11]]
 => #<ActiveRecord::Associations::CollectionProxy [#<Micropost id: 1, content: "taskemodsjfa jl", user_id: 1, created_at: "2020-06-01 14:24:23", updated_at: "2020-06-01 14:24:23">, #<Micropost id: 3, content: "Ruby is Yukihiro Matsumoto (commonly known as):Object-oriented script developed by Matz)...", user_id: 1, created_at: "2020-06-01 14:27:03", updated_at: "2020-06-01 14:27:03">, #<Micropost id: 5, content: "Associating different data models with each other is a powerful feature of Rails. Here, multiple for one user...", user_id: 1, created_at: "2020-06-01 14:41:51", updated_at: "2020-06-01 14:41:51">]>
2.6.3 :003 >
Since multiple Microposts are linked to User by the association, if you use user1.microposts You can retrieve all Microposts associated with user1. (You can find out what the user posted.)
Try using it in the opposite direction (find out who surrendered from the post)
> micropost = user1.microposts.first
  Micropost Load (0.1ms)  SELECT "microposts".* FROM "microposts" WHERE "microposts"."user_id" = ? ORDER BY "microposts"."id" ASC LIMIT ?  [["user_id", 1], ["LIMIT", 1]]
 => #<Micropost id: 1, content: "taskemodsjfa jl", user_id: 1, created_at: "2020-06-01 14:24:23", updated_at: "2020-06-01 14:24:23">
The first micropost of user1 (user_id = 1) was assigned to the micropost variable. In other words, it is only necessary to extract the user with user_id 1 from micropost.
> micropost.user
 => #<User id: 1, name: "takemo", email: "[email protected]", created_at: "2020-05-31 14:00:23", updated_at: "2020-05-31 14:00:23">
2.6.3 :004 >
micropost.I was able to retrieve the user to which micropost belongs just by setting it as user.
 You can use it conveniently just by implementing a one-to-many relationship using has_many and belongs_to.

### Exercise
 1. You can display the content of the first micropost in @user's microposts, so if you copy and paste from another line as it is, it will be like this.


#### **`erb:show.html.erb`**
<%= notice %>
Name: <%= @user.name %>
Email: <%= @user.email %>
Micropost_first <%= @user.microposts.first.content %>
<%= link_to 'Edit', edit_user_path(@user) %> | <%= link_to 'Back', users_path %>
↓ Result

2. After adding the code, when I actually post it blank
I got caught in validation and threw an error.
3. For FILL_IN, specify the column to which validation is applied. (name and email)
#### **`user.rb`**
```ruby
class User < ApplicationRecord
has_many :microposts
validates :name, presence: true
validates :email, presence: true
end
Since I added validation, I started to throw an error when I registered empty.

About Rails inheritance
Even if you understand something here, it's OK for the time being
The Rails model is inherited by the Ruby-specific grammar User <ApplicationRecord.
The structure of model inheritance is as shown in the figure.

From Rails Tutorial 6th Edition https://railstutorial.jp/chapters/toy_app?version=6.0#fig-demo_model_inheritance
All Rails models such as User and Micropost inherit from the ApplicationRecord class. And ApplicationRecord inherits a base class called ActiveRecord :: Base. This ActiveRecord provides the ability to handle databases. The first method of User.first can also be used by inheriting this ActiveRecord.
The controller has a similar structure.
 From Rails Tutorial 6th Edition
https://railstutorial.jp/chapters/toy_app?version=6.0#fig-demo_controller_inheritance
From Rails Tutorial 6th Edition
https://railstutorial.jp/chapters/toy_app?version=6.0#fig-demo_controller_inheritance
Each controller inherits ApplicationController and ApplicationController By inheriting the base class ActionController :: Base You can use the basic functions of the controller equally with various controllers. Also, since it inherits ApplicationController, the rules defined in ApplicationController are It is applied in each inherited controller, and defined methods can be used in the same way.
Exercise
Line 1.1
application_controller.rb
class ApplicationController < ActionController::Base
  def hello
    render html:"hello,world!"
  end
end
- The first line of application_record.rb in the models folder where the models are stored
application_record.rb
class ApplicationRecord < ActiveRecord::Base
  self.abstract_class = true
end
Finally
Deploy the Toy app created in this chapter to Heroku
$ git add -A
$ git commit -m "Finish toy app"
$ git push
$ git push heroku
If this is left as it is, an error will occur on Heroku and the site will not be displayed in the production environment. Follow the error logs on Heroku with heroku logs. Then there is a line like this.
2020-06-01T15:52:35.330114+00:00 app[web.1]: [3a72d85c-e21f-41d2-92ce-40c241660d8f]
 ActionView::Template::Error (PG::UndefinedTable: ERROR:  relation "users" does not exist
PG stands for PostgreSQL. The meaning is PG and it is angry that the users table does not exist. Because the database in the production environment and the database in the development environment are different The migration must also be done in the production environment. In other words, I am angry because I have not migrated.
Migrate the production database with migrate.
This should work fine.
### Exercise
1. If you are doing the previous exercise [2.3.3.1](https://railstutorial.jp/chapters/toy_app?version=6.0#sec-exercises_demo_user_has_many_microposts), no microposts will be registered in the production database. Not done
Since it will throw an error, delete the code part added in the exercise, commit it, and push it again.
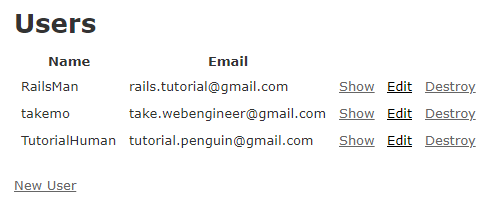
Hopefully you can create a user like this.
<br>
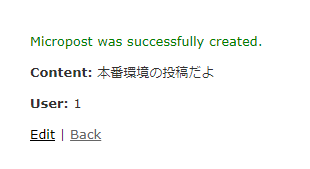
2. It was confirmed that the micro post can be created in the production environment as well.
3. Of course it works
[← To the previous chapter](https://qiita.com/take_webengineer/items/35ff3342ce2471e34a43)
[To the next chapter →](https://qiita.com/take_webengineer/items/ccebe817b40b1152feba)
Recommended Posts