Real-time web with Django Channels
Introduction
This article is the 17th day of Django Advent Calendar 2016.
What is Django Channels?
Django Channels — Channels 0.17.2 documentation
Channels is a project to make Django able to handle more than just plain HTTP requests, including WebSockets and HTTP2, as well as the ability to run code after a response has been sent for things like thumbnailing or background calculation.
Channels is a project that allows Django to execute code after a response is sent, such as thumbnails and background calculations, as well as simple HTTP requests such as WebSockets and HTTP2.
The core of the system is, unsurprisingly, a datastructure called a channel. What is a channel? It is an ordered, first-in first-out queue with message expiry and at-most-once delivery to only one listener at a time.
- The core of the system is a data structure called a channel
- Channels are ordered first-in first-out queues
- Has an expiration date
- Send at-most-once to only one listener at a time (maximum once & not guaranteed to arrive)
If you’ve used channels in Go: Go channels are reasonably similar to Django ones. The key difference is that Django channels are network-transparent; the implementations of channels we provide are all accessible across a network to consumers and producers running in different processes or on different machines.
- Logically similar to Go channels
- The main difference is that Django channels are network transparent
- Access to consumers and producers running on different processes and machines
- It is different from django-channels, which is a library that can send notifications to Slack and Twitter.
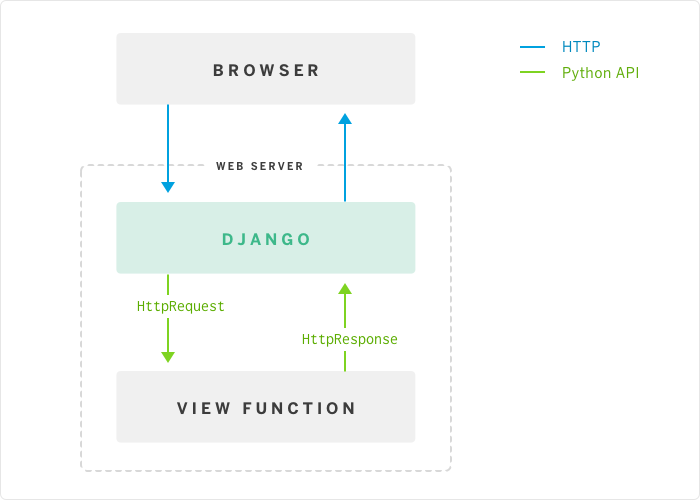
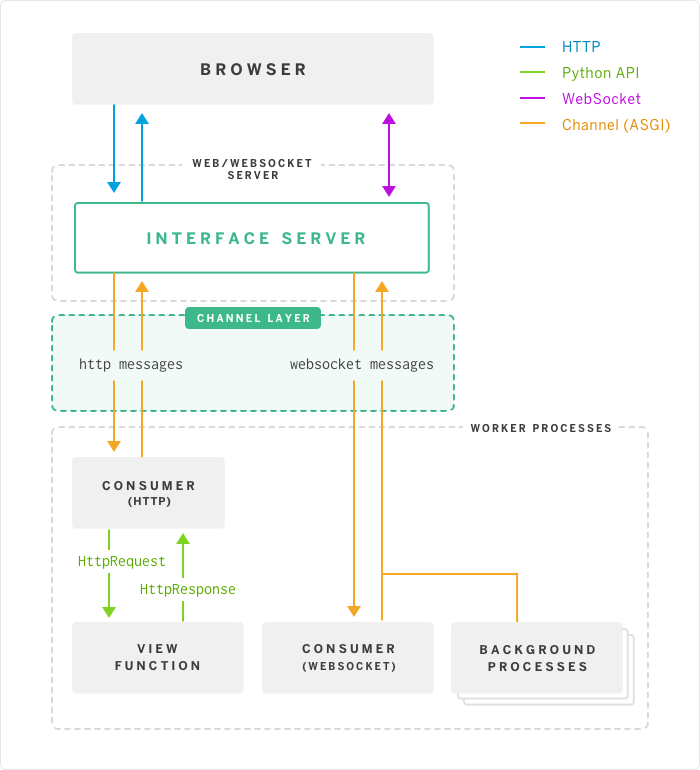
model figure
Traditional request / response model

Worker model by Channels

What is ASGI
ASGI (Asynchronous Server Gateway Interface) Draft Spec — Channels 0.17.2 documentation
This document proposes a standard interface between network protocol servers (particularly webservers) and Python applications, intended to allow handling of multiple common protocol styles (including HTTP, HTTP2, and WebSocket).
A standard interface between a network protocol server (especially a web server) and a Python application to allow handling of multiple common protocol styles (including HTTP, HTTP2, and WebSockets).
- It is a WSGI extension to the last (supplement and expand on WSGI)
Installation
Just install it with pip and add it to ʻINSTALLED_APPS`.
$ pip install -U channels
INSTALLED_APPS = (
    'django.contrib.auth',
    'django.contrib.contenttypes',
    'django.contrib.sessions',
    'django.contrib.sites',
    ...
    'channels',
)
Try for the first time
For now, let's take a look at the Getting Started with Channels in the documentation.
$ pip install django channels
$ django-admin startproject myapp
$ tree
.
├── db.sqlite3
├── manage.py
└── myapp
    ├── __init__.py
    ├── settings.py
    ├── urls.py
    └── wsgi.py
First Consumers
First, let's override the built-in request handling.
consumers.py
from django.http import HttpResponse
from channels.handler import AsgiHandler


def http_consumer(message):
    # Make standard HTTP response - access ASGI path attribute directly
    response = HttpResponse("Hello world! You asked for %s" % message.content['path'])
    # Encode that response into message format (ASGI)
    for chunk in AsgiHandler.encode_response(response):
        message.reply_channel.send(chunk)
settings.py
INSTALLED_APPS = [
    'django.contrib.admin',
    'django.contrib.auth',
    'django.contrib.contenttypes',
    'django.contrib.sessions',
    'django.contrib.messages',
    'django.contrib.staticfiles',
    'myapp',
    'channels',
]
...
CHANNEL_LAYERS = {
    "default": {
        "BACKEND": "asgiref.inmemory.ChannelLayer",
        "ROUTING": "myproject.routing.channel_routing",
    },
}
routing.py
from channels.routing import route

channel_routing = [
    route("http.request", "myapp.consumers.http_consumer"),
]
The setting is now complete.
$ tree
.
├── db.sqlite3
├── manage.py
└── myapp
    ├── __init__.py
    ├── consumers.py
    ├── routing.py
    ├── settings.py
    ├── urls.py
    └── wsgi.py
$ python manage.py runserver
Check http://127.0.0.1:8000/ and if the text "Hello world! You asked for /" is displayed, it's OK. However, this is boring, so let's create a basic chat server using WebSockets.
It's not practical at all, but first, let's create a server that sends the message back to the client that sent the message.
consumers.py
def ws_message(message):
    # ASGI WebSocket packet-received and send-packet message types
    # both have a "text" key for their textual data.
    message.reply_channel.send({
        "text": message.content['text'],
    })
routing.py
from channels.routing import route
from myapp.consumers import ws_message

channel_routing = [
    route("websocket.receive", ws_message),
]
$ python manage.py runserver
Go to http://127.0.0.1:8000/ and type in the js console as follows:
// Note that the path doesn't matter for routing; any WebSocket
// connection gets bumped over to WebSocket consumers
socket = new WebSocket("ws://" + window.location.host + "/chat/");
socket.onmessage = function(e) {
    alert(e.data);
}
socket.onopen = function() {
    socket.send("hello world");
}
// Call onopen directly if socket is already open
if (socket.readyState == WebSocket.OPEN) socket.onopen();
It's OK if the alert "hello world" is displayed.
Groups
Then use Groups to implement a real chat where you can talk to each other.
cousumers.py
from channels import Group


# Connected to websocket.connect
def ws_add(message):
    message.reply_channel.send({"accept": True})
    Group("chat").add(message.reply_channel)


# Connected to websocket.receive
def ws_message(message):
    Group("chat").send({
        "text": "[user] %s" % message.content['text'],
    })


# Connected to websocket.disconnect
def ws_disconnect(message):
    Group("chat").discard(message.reply_channel)
routing.py
from channels.routing import route
from myapp.consumers import ws_add, ws_message, ws_disconnect

channel_routing = [
    route("websocket.connect", ws_add),
    route("websocket.receive", ws_message),
    route("websocket.disconnect", ws_disconnect),
]
$ python manage.py runserver
Open http://127.0.0.1:8000/ in multiple tabs and type the same js code into the console as before. It is OK if the alert of "[user] hello world" is displayed on each tab.
Running with Channels
Next, let's switch the Channel layer.
I used to use ʻasgiref.inmemory.ChannelLayer, but this only works within the same process. In a production environment, use a backend like ʻasgi_redis.
$ pip install asgi_redis
setting.py
CHANNEL_LAYERS = {
    "default": {
        "BACKEND": "asgi_redis.RedisChannelLayer",
        "CONFIG": {
            "hosts": [("localhost", 6379)],
        },
        "ROUTING": "myapp.routing.channel_routing",
    },
}
$ python manage.py runserver --noworker
$ python manage.py runworker
You can now execute the runworker command.
Persisting Data
The replay_channel attribute we've seen so far is a unique point for connected WebSockets. Now you can trace who the message came from.
In a production environment, use channel_session to make the session persistent like a cookie in HTTP communication.
consumers.py
from channels import Group
from channels.sessions import channel_session


# Connected to websocket.connect
@channel_session
def ws_connect(message):
    # Accept connection
    message.reply_channel.send({"accept": True})
    # Work out room name from path (ignore slashes)
    room = message.content['path'].strip("/")
    # Save room in session and add us to the group
    message.channel_session['room'] = room
    Group("chat-%s" % room).add(message.reply_channel)


# Connected to websocket.receive
@channel_session
def ws_message(message):
    Group("chat-%s" % message.channel_session['room']).send({
        "text": message['text'],
    })


# Connected to websocket.disconnect
@channel_session
def ws_disconnect(message):
    Group("chat-%s" % message.channel_session['room']).discard(message.reply_channel)
routing.py
from channels.routing import route
from myapp.consumers import ws_connect, ws_message, ws_disconnect

channel_routing = [
    route("websocket.connect", ws_connect),
    route("websocket.receive", ws_message),
    route("websocket.disconnect", ws_disconnect),
]
Authentication
Channels can get the Django session required for user authentication in two ways:
- cookie
- Get parameter
session_key
Authentication using a Django session is done by specifying a decorator.
consumers.py
from channels import Channel, Group
from channels.sessions import channel_session
from channels.auth import http_session_user, channel_session_user, channel_session_user_from_http


# Connected to websocket.connect
@channel_session_user_from_http
def ws_add(message):
    # Accept connection
    message.reply_channel.send({"accept": True})
    # Add them to the right group
    Group("chat-%s" % message.user.username[0]).add(message.reply_channel)


# Connected to websocket.receive
@channel_session_user
def ws_message(message):
    Group("chat-%s" % message.user.username[0]).send({
        "text": message['text'],
    })


# Connected to websocket.disconnect
@channel_session_user
def ws_disconnect(message):
    Group("chat-%s" % message.user.username[0]).discard(message.reply_channel)
Routing
You can flexibly set routing.py using regular expressions, like Django's ʻurls.py`.
routing.py
http_routing = [
    route("http.request", poll_consumer, path=r"^/poll/$", method=r"^POST$"),
]

chat_routing = [
    route("websocket.connect", chat_connect, path=r"^/(?P<room>[a-zA-Z0-9_]+)/$"),
    route("websocket.disconnect", chat_disconnect),
]

routing = [
    # You can use a string import path as the first argument as well.
    include(chat_routing, path=r"^/chat"),
    include(http_routing),
]
Models
Django's ORM makes it easy to incorporate message persistence.
consumers.py
from channels import Channel
from channels.sessions import channel_session
from .models import ChatMessage


# Connected to chat-messages
def msg_consumer(message):
    # Save to model
    room = message.content['room']
    ChatMessage.objects.create(
        room=room,
        message=message.content['message'],
    )
    # Broadcast to listening sockets
    Group("chat-%s" % room).send({
        "text": message.content['message'],
    })


# Connected to websocket.connect
@channel_session
def ws_connect(message):
    # Work out room name from path (ignore slashes)
    room = message.content['path'].strip("/")
    # Save room in session and add us to the group
    message.channel_session['room'] = room
    Group("chat-%s" % room).add(message.reply_channel)


# Connected to websocket.receive
@channel_session
def ws_message(message):
    # Stick the message onto the processing queue
    Channel("chat-messages").send({
        "room": message.channel_session['room'],
        "message": message['text'],
    })


# Connected to websocket.disconnect
@channel_session
def ws_disconnect(message):
    Group("chat-%s" % message.channel_session['room']).discard(message.reply_channel)
Enforcing Ordering
By giving a @enforce_ordering (slight = True) decorator, you can change the order in which the websocket.connect was made first, rather than the order in which they were queued.
consumers.py
from channels import Channel, Group
from channels.sessions import channel_session, enforce_ordering
from channels.auth import http_session_user, channel_session_user, channel_session_user_from_http


# Connected to websocket.connect
@enforce_ordering(slight=True)
@channel_session_user_from_http
def ws_add(message):
    # Add them to the right group
    Group("chat-%s" % message.user.username[0]).add(message.reply_channel)


# Connected to websocket.receive
@enforce_ordering(slight=True)
@channel_session_user
def ws_message(message):
    Group("chat-%s" % message.user.username[0]).send({
        "text": message['text'],
    })


# Connected to websocket.disconnect
@enforce_ordering(slight=True)
@channel_session_user
def ws_disconnect(message):
    Group("chat-%s" % message.user.username[0]).discard(message.reply_channel
tutorial
A chat app tutorial like the one we've seen here is available on Heroku. Finally, Real-Time Django Is Here: Get Started with Django Channels
If you try until you actually deploy it on Heroku, you will get a better sense.
Reference
- Server Push with WebSocket in Django
- Finally, Real-Time Django Is Here: Get Started with Django Channels
in conclusion
As voluntas wrote in "Server Push with WebSockets in Django", if you want performance, you should do it in another language.
You don't need to launch SwampDragon or Tornado separately, and you can easily use it for Django applications. The biggest attraction is that it can be incorporated.
The Channels are also being considered for inclusion in Django 2.0, due out next December. Let's use it and liven up Channels!
Recommended Posts