Finally ... Make a radio control using python on Raspberry Pi 3! (The motor moves while the button is pressed)
Introduction
My name is Ryosuke Kamei and I am an IT consultant based on the idea of "gentle IT"! Currently, in my work, I am doing upstream processes focusing on requirements analysis and requirements definition, but I also write programs! As part of our friendly IT activities, we will introduce "Raspberry Pi 3" (commonly known as Raspberry Pi), which has the philosophy of "providing inexpensive PCs that can be programmed for education"!
Until now, I've been touching Raspberry Pi because I was wondering if my daughter (11 and 8) would work on a radio-controlled model during the summer vacation! (I'm a daughter, but a radio-controlled model? How to raise it ... Fufufu) As a result, I don't know if they will choose a radio-controlled model (laughs), but I will try to make a prototype.
This time I will write up to the point where the motor moves while pressing the button!
There is also an article using a magnet switch (reed switch)! The motor moves while the magnet is brought closer The motor moves when the magnet is brought closer and stops automatically
[Razpai Magazine-June 2016 Special Feature 1 Akiba's Popular Parts Wiring Diagram Best 17](https://www.amazon.co.jp/ Razpai Magazine-June 2016 Issue-Nikkei BP PC Best Mook- Nikkei Linux-ebook / dp / B01EH2RX42 / ref = as_li_ss_tl? ie = UTF8 & dpID = 61P3o6Agz + L & dpSrc = sims & preST = OU09__BG0,0,0,0_FMpng_AC_UL160_SR120,160 & psc = 1 & refRID = 31SKG5E0DGKBSF9BWNGV & linkCode = ll1 & tag = sr2smail-22 & linkId = 18fd04738627edef8d6fffd6c9b8f9c2) [Razpai Magazine-August 2016 Special Feature 1 Basic Patterns for Electronic Work 12](https://www.amazon.co.jp/%E3%83%A9%E3%82%BA%E3%83%91 % E3% 82% A4% E3% 83% 9E% E3% 82% AC% E3% 82% B8% E3% 83% B3-2016% E5% B9% B48% E6% 9C% 88% E5% 8F% B7 -% E6% 97% A5% E7% B5% 8CBP% E3% 83% 91% E3% 82% BD% E3% 82% B3% E3% 83% B3% E3% 83% 99% E3% 82% B9% E3% 83% 88% E3% 83% A0% E3% 83% 83% E3% 82% AF-% E6% 97% A5% E7% B5% 8CLinux / dp / 4822237710 / ref = as_li_ss_tl? Ie = UTF8 & qid = 1471057119 & sr = 8-4 & keywords =% E3% 83% A9% E3% 82% BA% E3% 83% 91% E3% 82% A4 & linkCode = ll1 & tag = sr2smail-22 & linkId = c42c3f78bd8af3af1414020a400090fe) While watching, I am studying and applying. It was very helpful!
procedure
- Wiring
- Program Raspycon_ver1.py
- Run the program
1. Wiring
If you get an image like this, referring to the picture of the circuit

I also made a video
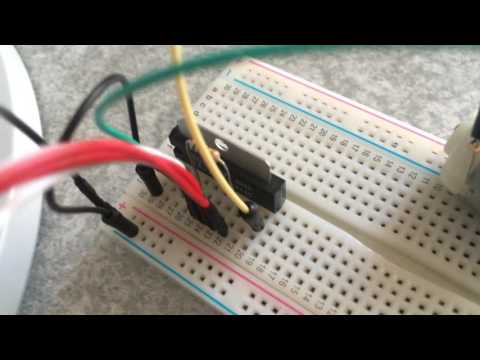
I tried to wake it up in the text. Wiring seen from Raspberry Pi
--Raspberry Pi 1st terminal (3.3V) --Motor driver 8th pin (Vs) --Raspberry Pi 2nd terminal (5V) --Motor driver 7th pin (Vcc) --Raspberry Pi 16th terminal (GPIO23) --Motor driver 5th pin (IN1) --Raspberry Pi 18th terminal (GPIO24) --Motor driver 6th pin (IN2) --Raspberry Pi 6th terminal (GND) --Motor driver pin 1 (GND) --Battery minus side --Raspberry Pi 11th terminal (GPIO17) --Button switch left side --Button switch right side --Resistance (1kΩ) --Raspberry Pi 9th terminal (GND)
Wiring seen from the motor driver
--Motor driver No. 4 (Vref) --Resistance 5.1kΩ --Motor driver No. 8 (Vs) --Motor driver No. 2 (OUT1) --DC motor --Motor driver No. 10 (OUT2) --DC motor
Others (not included in images and videos)
--Condenser --DC motor
2. Program Raspycon_ver1.py
The source is uploaded to GitHub, so please use it as you like.
Clone with git
$ git clone https://github.com/RyosukeKamei/raspberrypi3.git
Raspycon_ver1.py
#Library to control GPIO
import wiringpi
#Timer library
import time

#GPIO terminal number to which the button switch is connected
button_pin = 17 #Terminal 11
#GPIO terminal settings
motor1_pin = 23 #Terminal 16
motor2_pin = 24 #Terminal 18

#GPIO initialization
wiringpi.wiringPiSetupGpio()

#Set the button switch to input mode (0)
wiringpi.pinMode( button_pin  , 0 )

#Motor driver set to output mode (1)
wiringpi.pinMode( motor1_pin, 1 )
wiringpi.pinMode( motor2_pin, 1 )


#Set the state when nothing is connected to the terminal
# 3."2" (pull-up) for 3V
#(Set to "1" for 0V (pull-down))
wiringpi.pullUpDnControl( button_pin  , 2 )

#While processing becomes the range of the loop when indented
while True:
    #Read the state of GPIO terminal
    #Press the button and go straight
    #GPIO status is 0V(0)Compare
    if( wiringpi.digitalRead(button_pin) == 1 ):
        #When the button is released, "3".3V(1)」
        #(It is difficult to understand that it is stopped when it is 1)
        print ("Stop")
        #Stop the motor
        wiringpi.digitalWrite( motor1_pin, 1 )
        wiringpi.digitalWrite( motor2_pin, 0 )
    else:
        #When the button is pressed, "0V"(0)」
        print ("Go straight")
        #Rotate the motor
        wiringpi.digitalWrite( motor1_pin, 1 )
        wiringpi.digitalWrite( motor2_pin, 1 )
    time.sleep(0.5)
3. Run the program
I recorded the video of how it is moving.
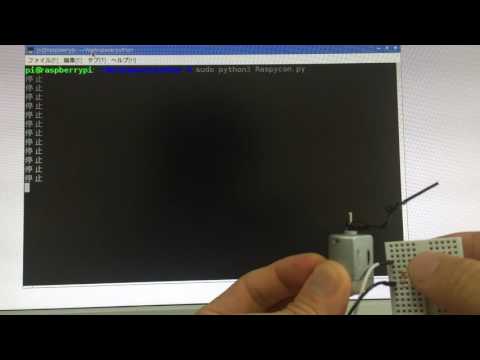
The motor runs while the button is pressed
$ sudo python3 Raspycon_ver1.py
It seems interesting to use a magnet switch (reed switch), so please refer to the following article as well ~ The motor moves while the magnet is brought closer The motor moves when the magnet is brought closer and stops automatically
site map
Let's play with Raspberry Pi 3 and python
Install Raspberry Pi 3 → Wireless LAN → Japanese input / output → Operate from Mac Programming with Node-RED programming with Raspberry Pi 3 and programming normally Light the LED with python on Raspberry Pi 3 (Hello World) Detect switch status on Raspberry Pi 3 Run a servo motor using python on Raspberry Pi 3 Control the motor with a motor driver using python on Raspberry Pi 3! Detect slide switch using python on Raspberry Pi 3! Detect magnet switch using python on Raspberry Pi 3! Detect temperature using python on Raspberry Pi 3! Sound the buzzer using python on Raspberry Pi 3! Detect analog signals with A / D converter using python on Raspberry Pi 3! Detect "brightness" using python on Raspberry Pi 3! Detect "temperature (using A / D converter)" using python on Raspberry Pi 3! Output to "7-segment LED" using python on Raspberry Pi 3! Use python on Raspberry Pi 3 to light the LED with switch control! Use python on Raspberry Pi 3 and turn on the LED when it gets dark! Finally ... Make a radio control using python on Raspberry Pi 3! (The motor moves while the button is pressed)
Rules focused on test-driven development
Coding rules "Let's write gentle code" (FuelPHP) Naming convention "Friendly to yourself, team-friendly, and unseen members after 3 months"
Web application development with Docker + Python
Easy to develop environment construction (Docker + PHP)
PHP environment + Eclipse is linked to Apache using Docker Building FuelPHP development environment using Docker Create CRUD skeleton using initial settings of FuelPHP development environment using Docker and scaffold FuelPHP database migration