Edit videos in Python using MoviePy
Preface
This article is a quick summary of the MoviePy Official Documentation. For those who want to use MoviePy in earnest, we recommend that you read the entire official document carefully while picking it up with a snack **. Although it is in English, it should be okay if you read the esoteric parts while using DeepL while using Google Translate. You may also want to read Github. This article is for those who just want to understand the whole thing and want to use it right away. Please do not hesitate to let us know if there are any mistakes or information updates.
What is MoviePy?
A library that allows you to edit videos in Python. There are other ways to edit videos in Python. The method using the image editing library openCV, the method of operating ffmpeg from the command line, etc. In some cases it is also an ant to consider these. There is a Sample what you can do concretely with MoviePy on YouTube.
Installation
I think that people with windwos will stumble in various ways, so I recommend using WSL. (WSL best)
pip install moviepy
If you cannot use WSL, you may need the procedure described in the reference below. Reference
Basic
Before enumerating specific editing examples, I will summarize it because it will be less confusing if you keep the basics.
clip
MoviePy edits with the concept of clips. Clips include video clips, audio clips, image clips, text clips, and more. You can edit them by editing them or stitching them together.
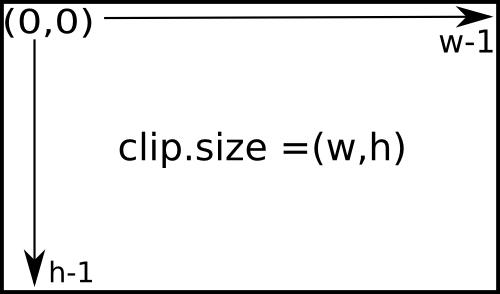
Coordinate
The coordinates are 0 on the upper left, X on the right, and Y on the bottom.
 Quote: https://zulko.github.io/moviepy/getting_started/compositing.html
Time designation
The basic unit for specifying time is seconds, and there are various ways to specify it.
t=15              #15 seconds
t=15.12           #Decimal point is also available
t=(3, 15.12)      #In this case 3 minutes 15.12 seconds
t=(1, 3, 15.12)   #In this case 1 hour 3 minutes 15.12 seconds
t=('1:03:15.12')  #You can also specify like this
What you can do
Sample material
I downloaded Cat Video from NHK Creative Library as a sample material. Any video material of several tens of seconds will do. However, I think it is better to use a material that has not been cut so that the effect of editing can be easily understood. Save this as cat.mp4.
Execution environment
Ubuntu20.24 (WSL) Python 3.8.5
Connect multiple videos
Connect 0 ~ 2 seconds, 4 seconds ~ 5 seconds, 10 seconds ~ 11 seconds of cat.mp4 to make one file.
from moviepy.editor import *
clip1 = VideoFileClip("cat.mp4").subclip(0, 2)              #Cut out the video
clip2 = VideoFileClip("cat.mp4").subclip(4, 5)
clip3 = VideoFileClip("cat.mp4").subclip(10, 11)
final_clip = concatenate_videoclips([clip1, clip2, clip3])  #Combine videos
final_clip.write_videofile("final_cat.mp4")                 #Export video
Add effects to videos
Video reversal
You can add effects to clips with <clip> .fx (<effect>).
In this case, you can create a video that is flipped horizontally and vertically.
clip4 = VideoFileClip("cat.mp4")
clip5 = clip4.fx(vfx.mirror_x)  #Invert video on x-axis
clip6 = clip4.fx(vfx.mirror_y)  #Invert video on y-axis
Video glue size
You can give options to clip effects with <clip> .fx (<effect>, option).
In this case, the aspect ratio remains the same, and a video with a width of 200px is exported.
clip7 = VideoFileClip("cat.mp4")
clip8 = clip7.fx(vfx.resize, width=200)
Cut video
These effects can be written together. In this case, the width is 500px and the range of 200px * 200px is cut out from the upper left.
clip9 = VideoFileClip("cat.mp4")
clip10 = (clip9.fx(vfx.resize, width=500)
               .fx(vfx.crop, x1=0, y1=0, x2=200, y2=200))
There are so many other things you can do. See the official documentation (https://zulko.github.io/moviepy/ref/videofx.html?highlight=vfx#) for more information.
Made by making MoviePy
Here has an example of a work made using MoviePy.
We plan to add more content in the future ...
Recommended Posts