[JAVA] Show a simple Hello World with SpringBoot + IntelliJ
Overview
SpringBoot makes it relatively easy to create web apps that use Java.
This time, I would like to create a program that displays a simple Hello World using Spring Boot and IntelliJ.
In addition, the contents created this time are posted in the following repository.
https://github.com/kymx1983/first_springboot
1. Environment to use
The environment used this time is as follows.
1.1 Java
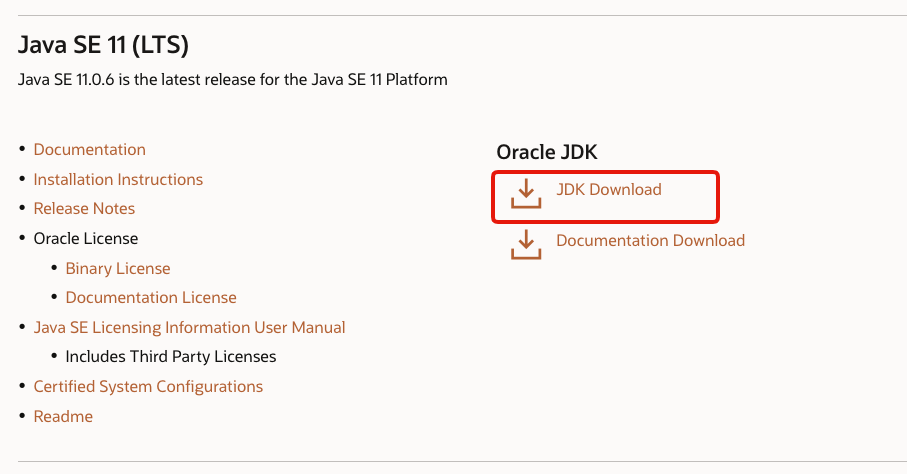
The Java version is not specified. Java 11 is used in the sample example.
Java can be downloaded from:
https://www.oracle.com/java/technologies/javase-downloads.html
First, click the version of JDK Download that you want to install.
After that, download the download file that matches your OS from Download at the bottom.
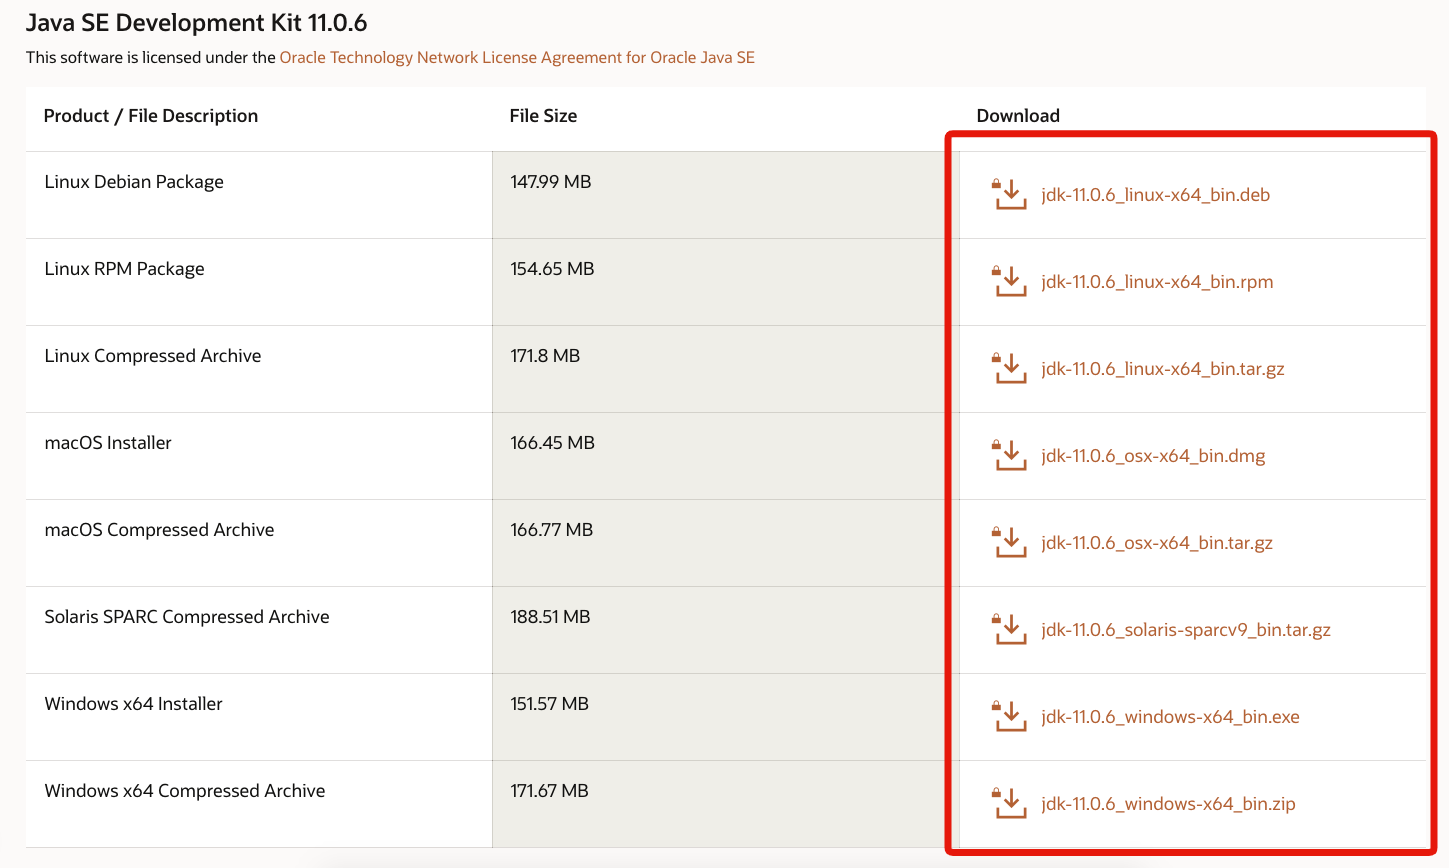
After the download is complete, run the file to install it. (I will omit the installation procedure, but I hope you will install it according to the navigation)
1.2 Installing IntelliJ
There are various ways to download IntelliJ, but I think it is better to download it from the following Samrisem site.
https://samuraism.com/jetbrains
IntelliJ is a paid tool. There is also a free Community Edition, but the paid version has more features for Spring Boot, so we recommend that you use the paid version.
Even if you download the paid version, there is a free period of 30 days, so you can try it first.
I will omit the installation method for IntelliJ, but I hope you can install it according to the navigation.
2 Creating a project
Follow the steps below to create a new project. Correctly, the Spring Initializer mentioned in this procedure can only be used with the paid version. There is a major replacement procedure, which will be posted at a later date.
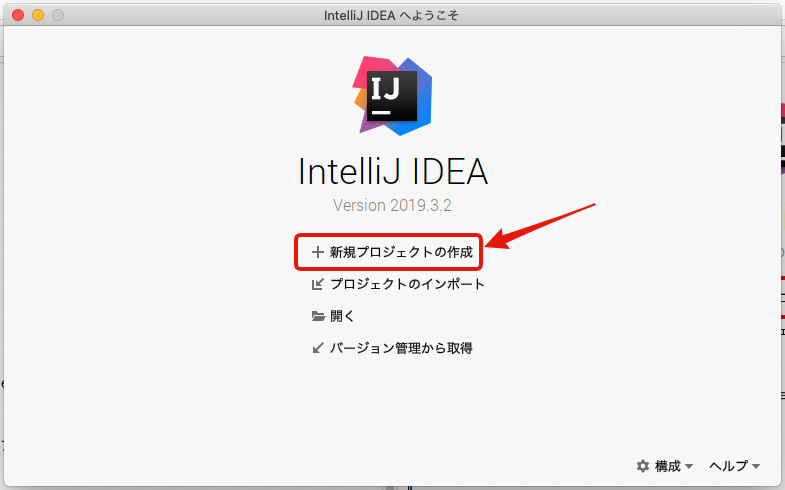
First, when you start IntelliJ, the following "Welcome to IntelliJ IDEA" screen will be displayed. Click Create new project there.
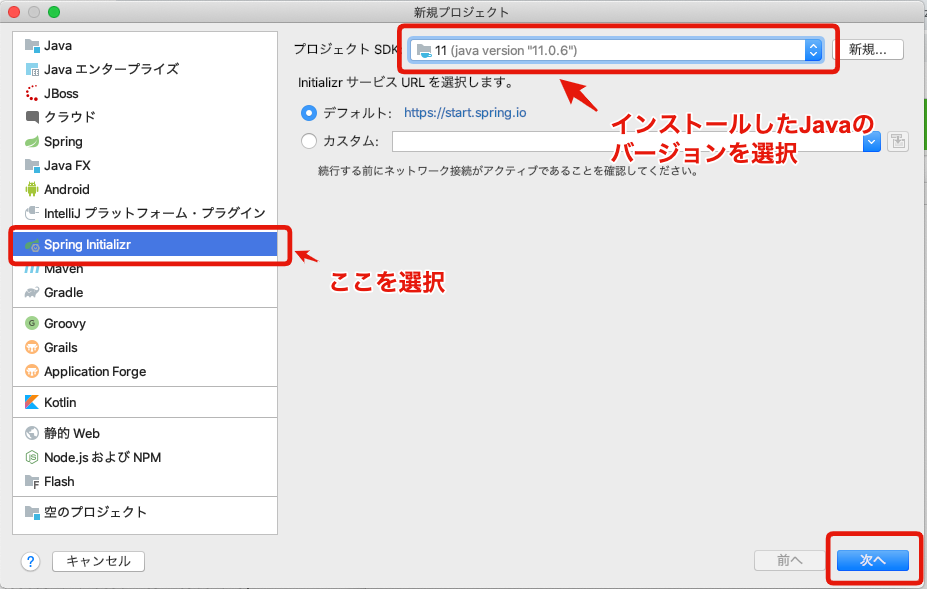
Select Spring Initializr from the menu on the left.
(For the free version, Spring Initializr is not displayed)
Choose the project SDK to match the version of Java you have installed.
Then click Next.
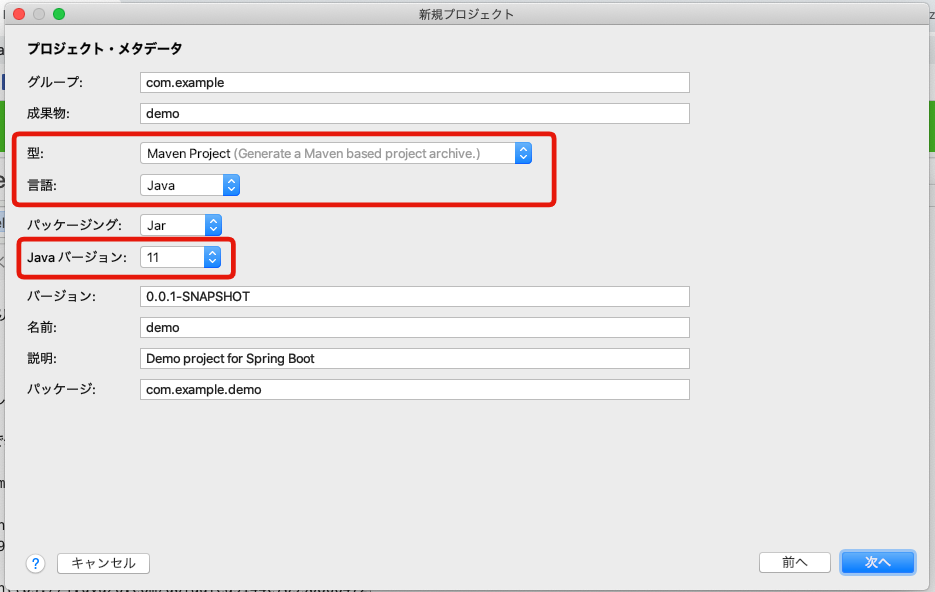
The following screen is basically fine by default, but the important part is supplemented.
| item | Description |
|---|---|
| Mold | There are two types of Java build tools, Maven and Gradle. This time, we will use Maven, so select Maven Project. |
| language | Spring Boot can be created not only in Java but also in Kotlin and Groovy. This time I want to create it in Java, so select Java. |
| Java version | Choose a Java version lower than the JDK you are using. |
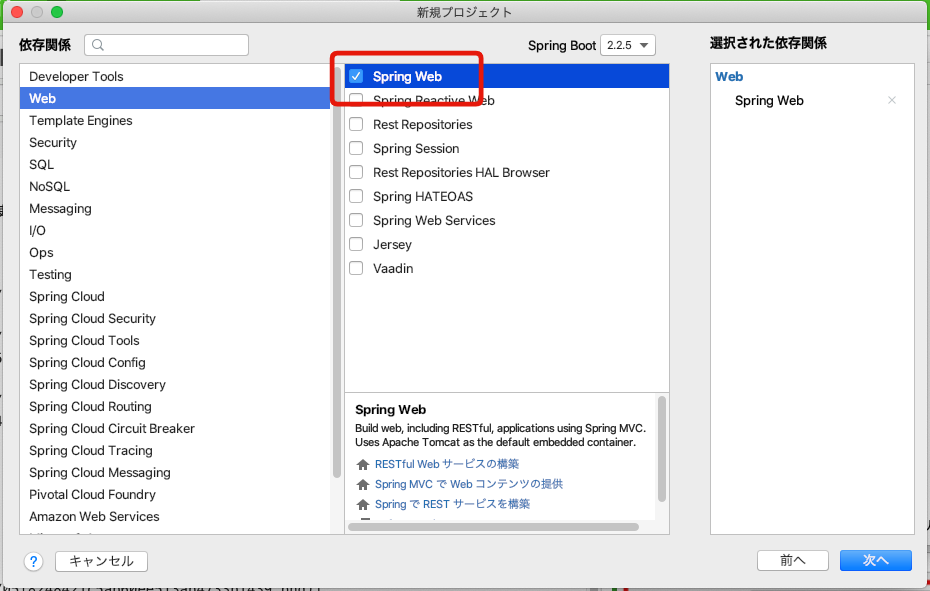
We'll talk about dependencies later. This time, select Spring → Spring Web.
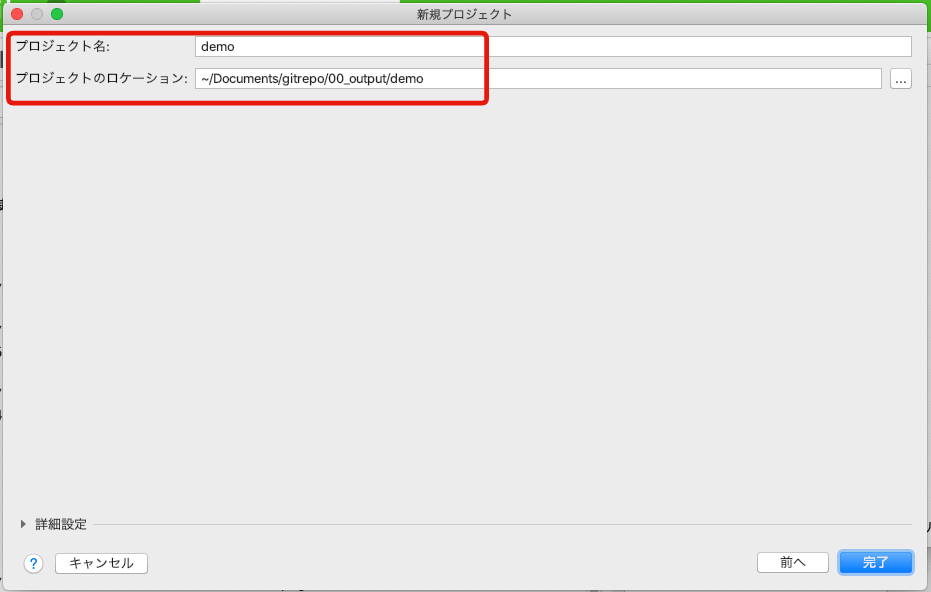
Specify the project name and location (save destination) arbitrarily.
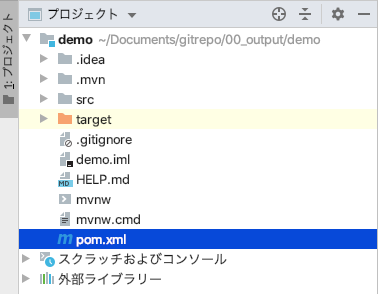
When completed, the initial screen as shown below will be displayed.
3. Create HTML for screen display
When creating a web application in Java, I think that there are many types that imagine JSP as a screen display, but JSP is not used in Spring Boot. (It can be used in the settings.)
Instead, you can use a template engine called thymeleaf to display the screen based on the contents described in the html file.
Therefore, you need to add thymeleaf to the maven dependency. I will explain the dependencies in another article at a later date, but at this point, I think it's okay to recognize that it is something that sets the external API used in Spring.
Specifically, add to the range enclosed by the
The contents to be added are as follows.
        <dependency>
            <groupId>org.springframework.boot</groupId>
            <artifactId>spring-boot-starter-thymeleaf</artifactId>
        </dependency>
The total amount of pom.xml when actually described is as follows. (It depends on the environment, so it is not always necessary to make an exact match.)
<?xml version="1.0" encoding="UTF-8"?>
<project xmlns="http://maven.apache.org/POM/4.0.0" xmlns:xsi="http://www.w3.org/2001/XMLSchema-instance"
	xsi:schemaLocation="http://maven.apache.org/POM/4.0.0 https://maven.apache.org/xsd/maven-4.0.0.xsd">
	<modelVersion>4.0.0</modelVersion>
	<parent>
		<groupId>org.springframework.boot</groupId>
		<artifactId>spring-boot-starter-parent</artifactId>
		<version>2.2.5.RELEASE</version>
		<relativePath/> <!-- lookup parent from repository -->
	</parent>
	<groupId>com.example</groupId>
	<artifactId>demo</artifactId>
	<version>0.0.1-SNAPSHOT</version>
	<name>demo</name>
	<description>Demo project for Spring Boot</description>

	<properties>
		<java.version>11</java.version>
	</properties>

	<dependencies>
		<dependency>
			<groupId>org.springframework.boot</groupId>
			<artifactId>spring-boot-starter-web</artifactId>
		</dependency>

		<dependency>
			<groupId>org.springframework.boot</groupId>
			<artifactId>spring-boot-starter-test</artifactId>
			<scope>test</scope>
			<exclusions>
				<exclusion>
					<groupId>org.junit.vintage</groupId>
					<artifactId>junit-vintage-engine</artifactId>
				</exclusion>
			</exclusions>
		</dependency>

		<dependency>
			<groupId>org.springframework.boot</groupId>
			<artifactId>spring-boot-starter-thymeleaf</artifactId>
		</dependency>

	</dependencies>

	<build>
		<plugins>
			<plugin>
				<groupId>org.springframework.boot</groupId>
				<artifactId>spring-boot-maven-plugin</artifactId>
			</plugin>
		</plugins>
	</build>

</project>
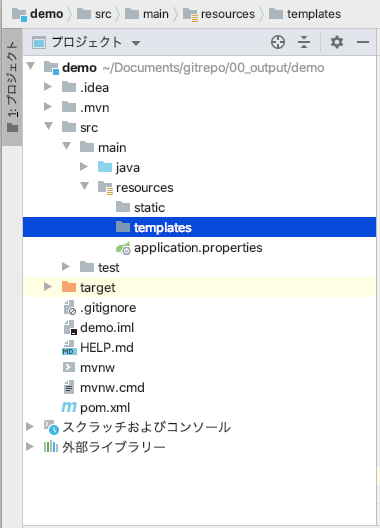
Next, create a file such as index.html in the src / main / resources / templates folder. (Select the templates folder and right-click → New, or Command + N (Mac), Ctrl + N (Windows) to create a new one.
After describing index.html, please describe the contents as follows.
<!DOCTYPE html>
<html lang="en">
<head>
    <meta charset="UTF-8">
    <title>first Spring-boot</title>
</head>
<body>
    <h1>Hello World</h1>
    <p>OK if this is displayed</p>
</body>
</html>
At this point, the creation of index.html for display is complete.
4. Call the template from Java
Finally, from Java, call index.html created earlier and display it.
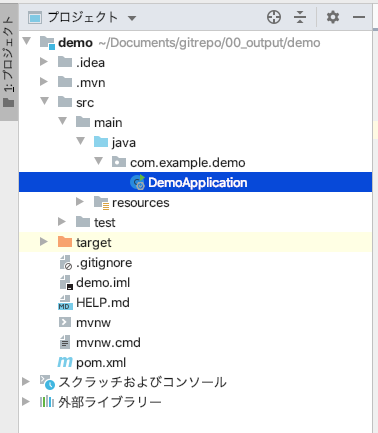
First, create a new Java file in src / main / java / com.example.demo.
The file name is arbitrary, but here it is HelloController.
package com.example.demo;

import org.springframework.stereotype.Controller;
import org.springframework.web.bind.annotation.RequestMapping;
import org.springframework.web.servlet.ModelAndView;

@Controller
public class HelloController {

  @RequestMapping("/")
  public ModelAndView index() {

    ModelAndView model = new ModelAndView();
    model.setViewName("index");
    return model;

  }
}
I will briefly explain the important points.
@Controller
public class HelloController {
By giving @Controller, you can indicate that the specified class is the Controller in the MVC model.
 @RequestMapping("/")
  public ModelAndView index() {
When you hit the URL specified in RequestMapping, the contents of the specified method will be called.
Since it is set to / this time, it is the case when nothing is specified, that is, the top screen.
ModelAndView model = new ModelAndView();
model.setViewName("index");
ModelndView defines the data and settings used in the template (that is, the html file). This time, since "index" is specified as setViewName, it is specified to simply display index.html.
- Extension (.html) can be omitted
Find the html file with the corresponding file name in the templates folder and execute it.
5. Try to run
Now that you've created it, let's run your web application.
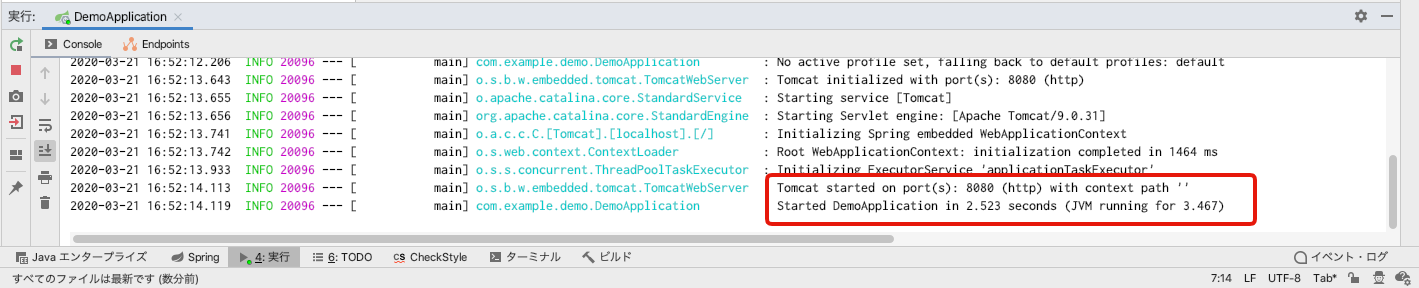
To execute it, right-click the DemoApplication already created in src / main / java / com.example.demo → execute it to create a jar file to be used in Spring Boot, and then start it.
By the way, the jar file used by Springboot contains a web server (tomcat etc.) by default, so There is no need to start a separate web server.
If the last two lines are output as follows, the startup is successful.
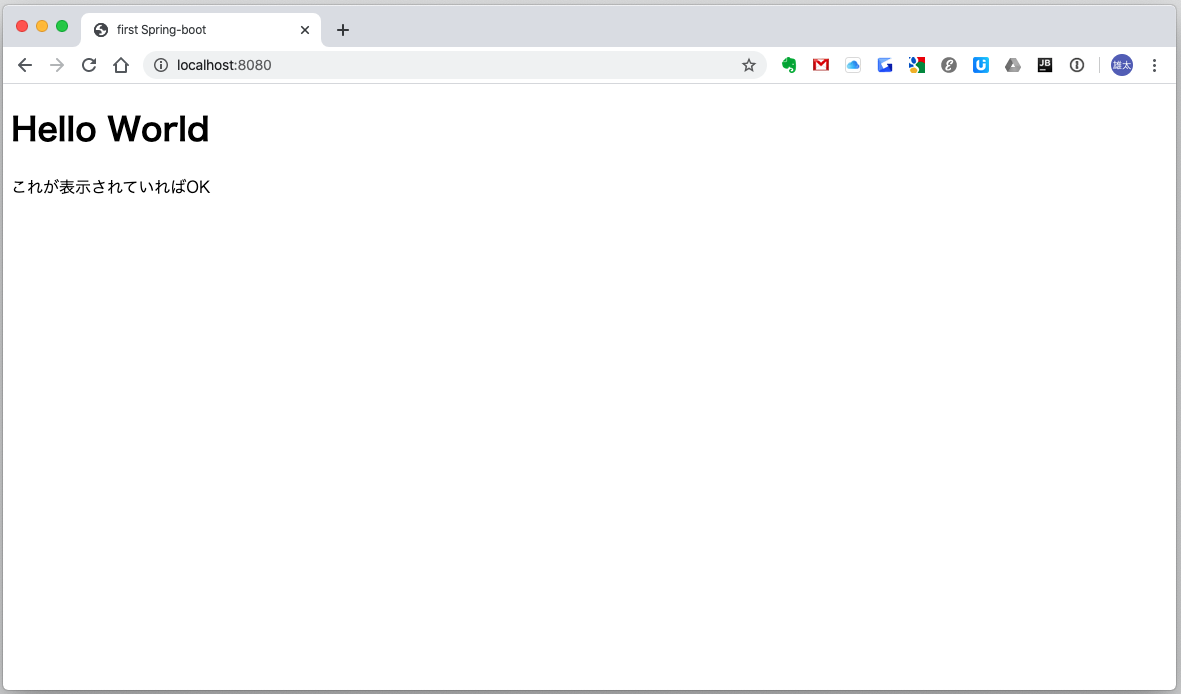
Start your browser and execute the URL http: // localhost: 8080, and Hello World and the character string below it will be displayed in the browser as shown below.
Summary
With the operation so far, the following is done.
- Create a Spring Boot project
- Displaying HTML using Thymeleaf as a template engine
- From the Java side, call the specified template file (index.html) and display it in the cell
Recommended Posts